
Creating, Editing, and Viewing RPL Sets
This section describes the editor dialogs used to build RPL Rules, Functions, Goals, and other expressions. There are two ways to view the RPL editor dialogs, either in the RPL Viewer or in the single RPL Editor.
RPL Viewer and RPL Editor
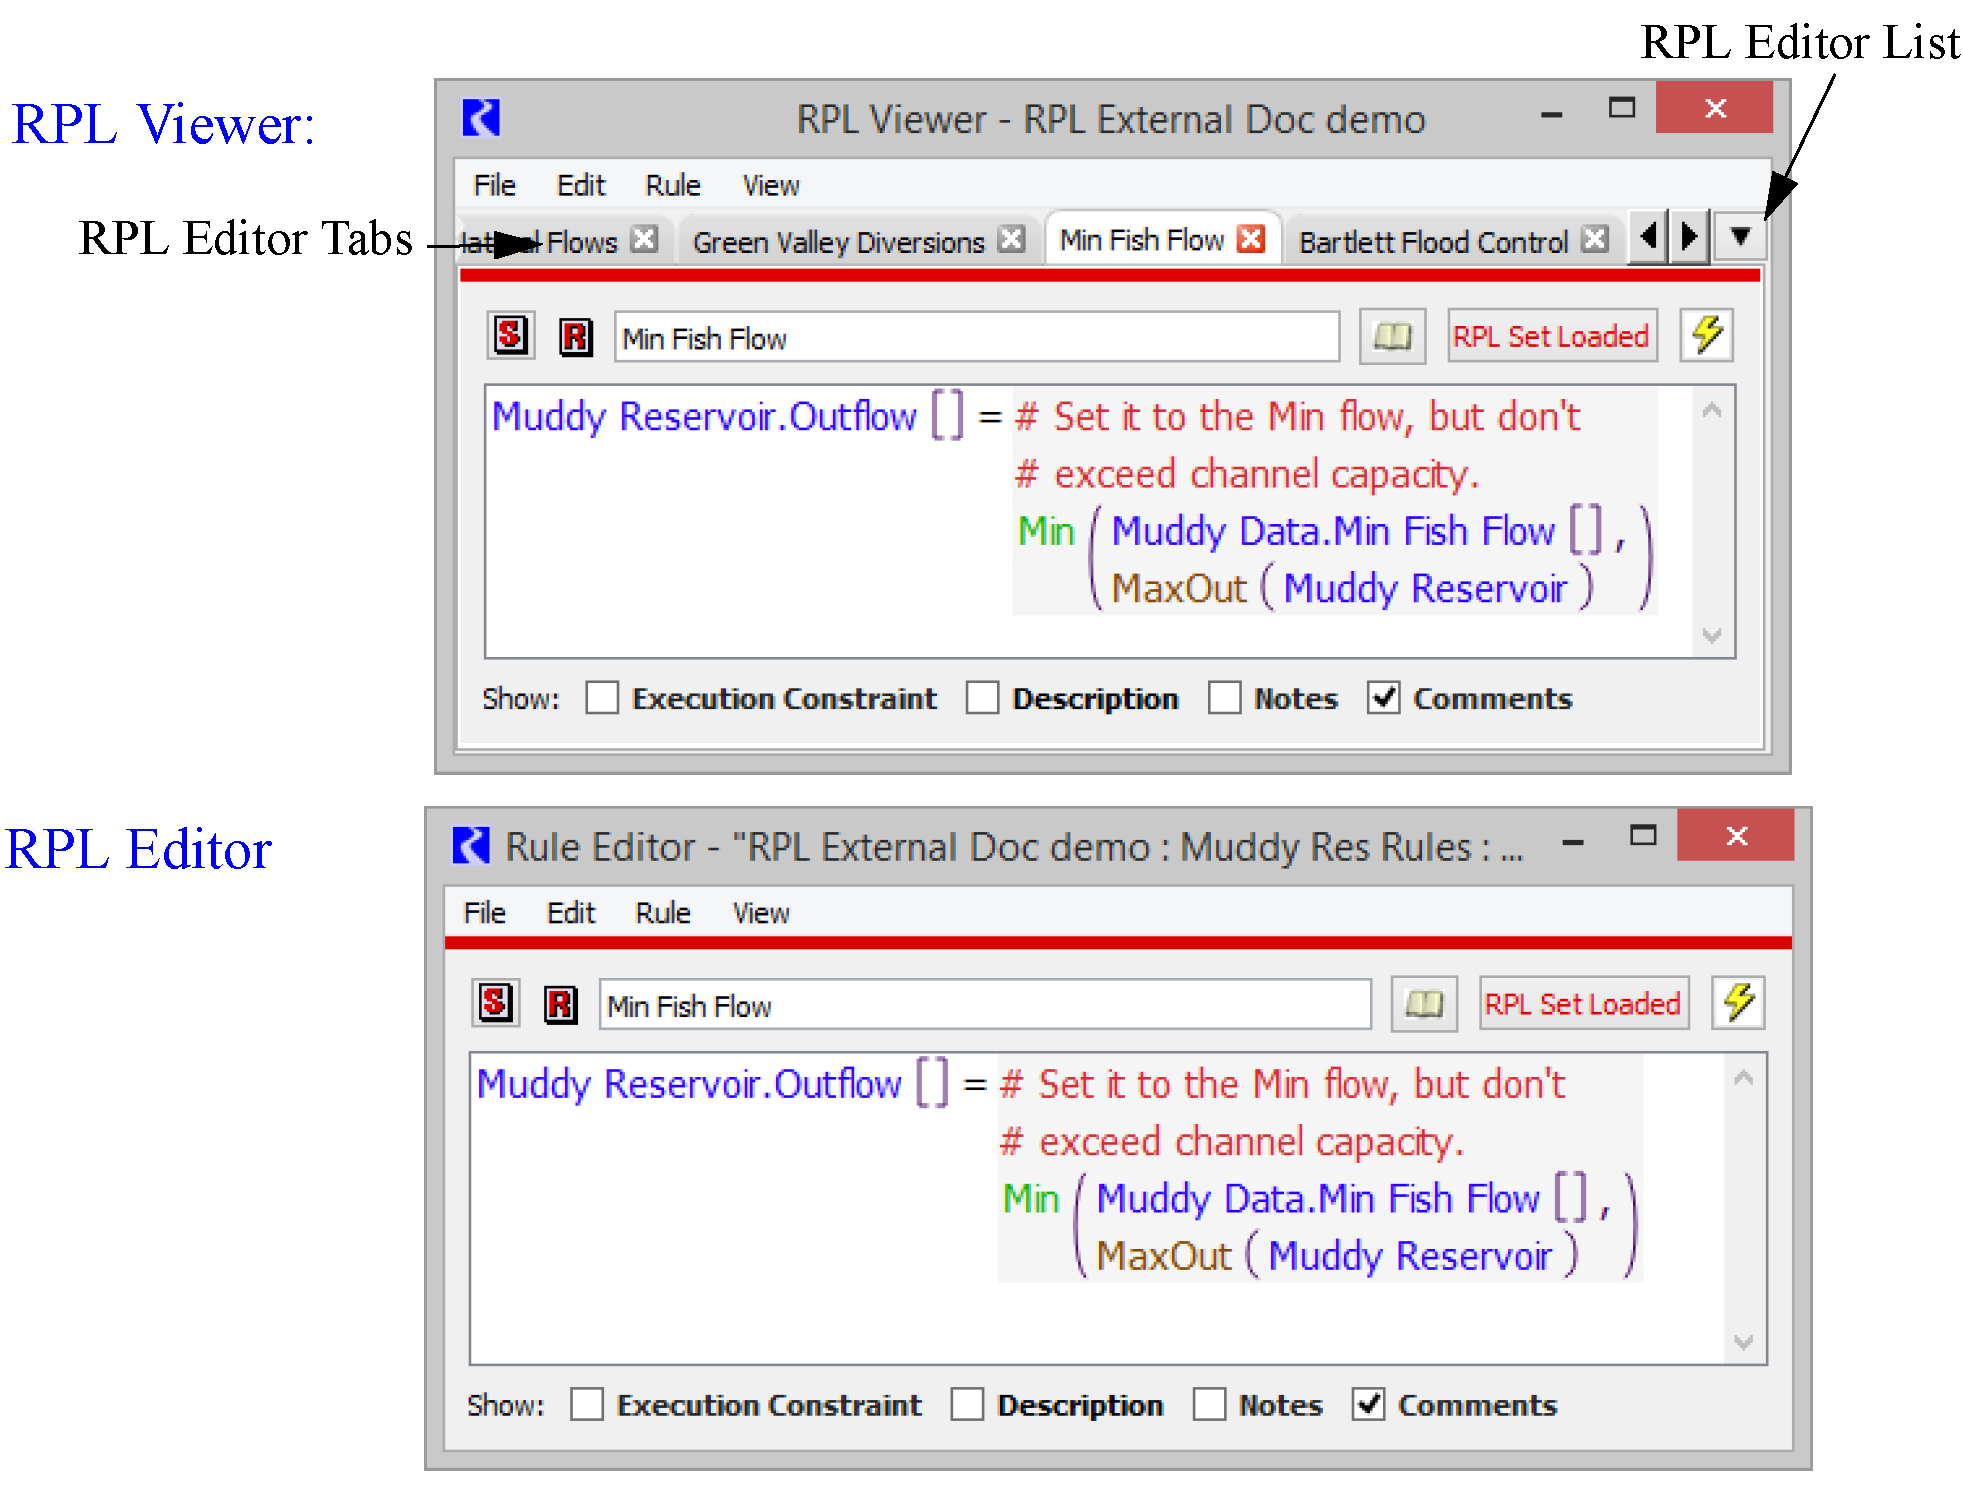
When you open a function, rule, method, goal or any other block, the item will open as a new tab in the RPL Viewer. Opening subsequent RPL Items will add tabs to this RPL Viewer. This allows you to have one dialog where all RPL editors are shown. But, you can undock any item into its own RPL Editor. Figure 2.14 shows the RPL Viewer and the RPL Editor with the same rule shown. Notice the tabs in the viewer.
Figure 2.14
Note: The menu bar options will be the same. They are dynamically updated in the viewer based on the tab selected.
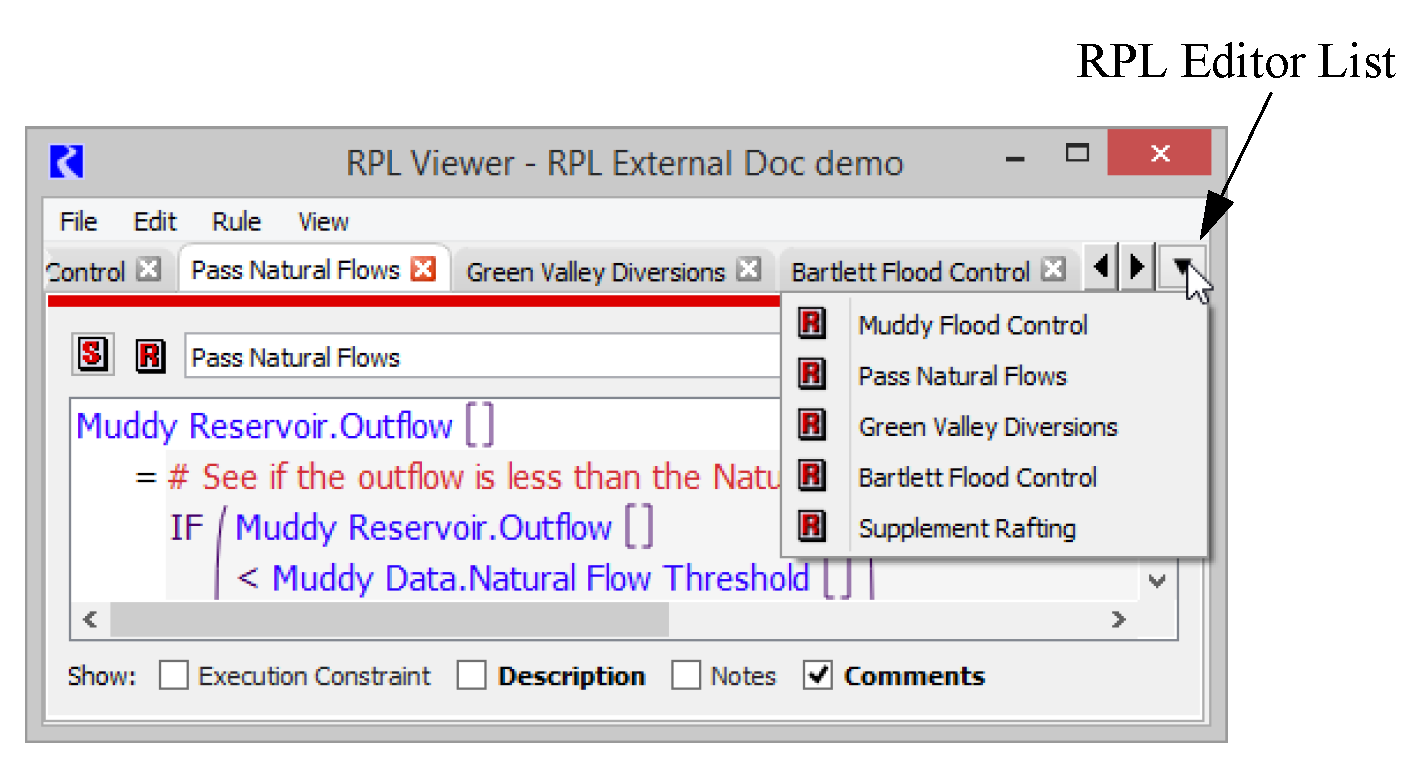
The RPL Viewer is the default dialog used to look at a RPL editor. It is convenient as all RPL editors open in the one dialog. Select the tabs to switch between items. Or use the RPL Editor List menu on the right of the tabs. This is particularly useful if you have many items in the viewer. Tooltips on the tabs give the full name and priority, or index, where relevant.
Arranging Tabs
Drag the tabs left and right to rearrange. Use the left and right arrows to scroll to tabs that are not shown.
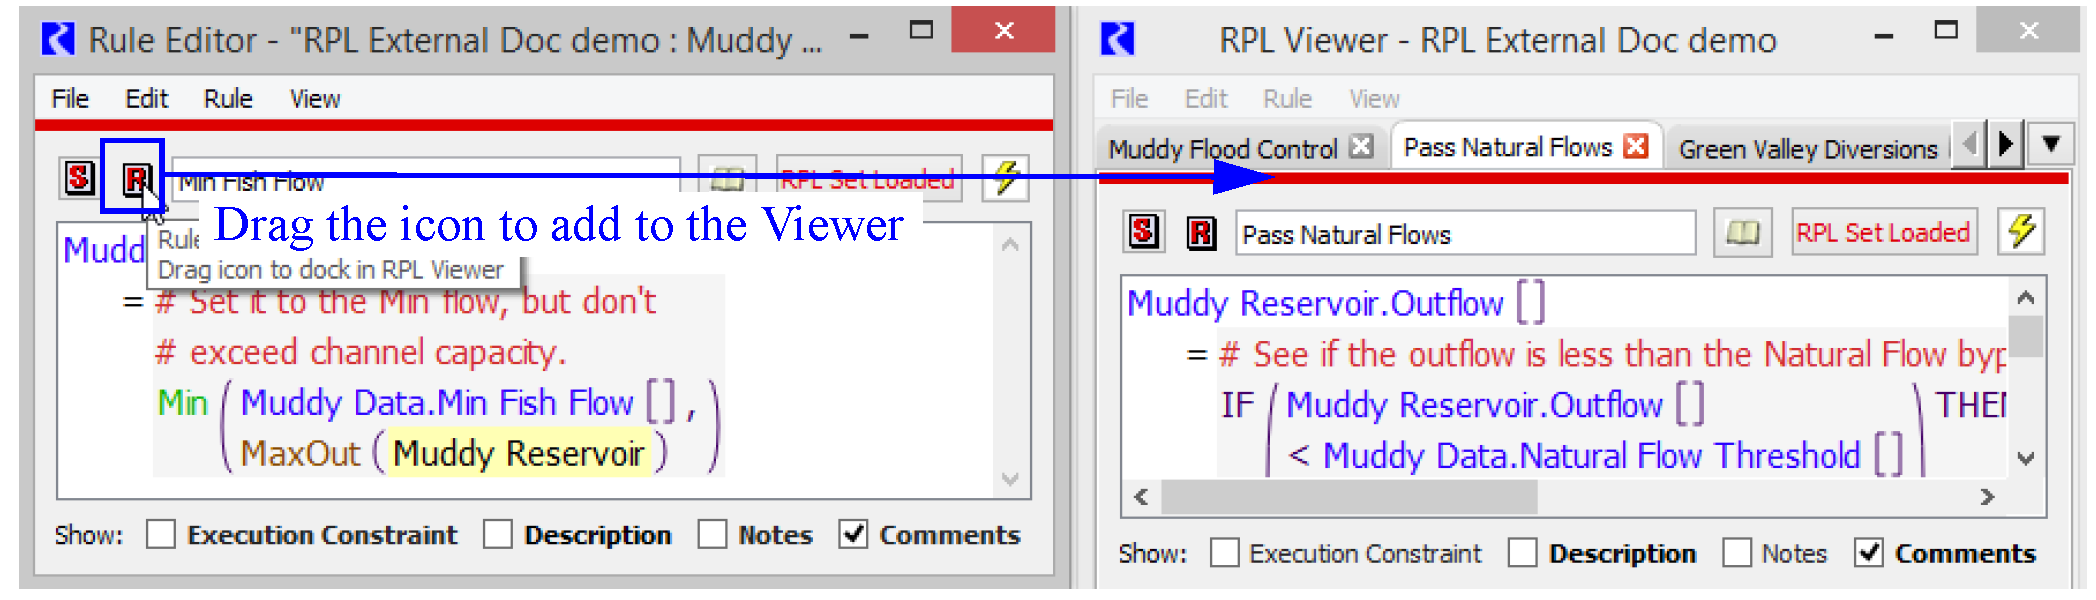
Undocking RPL Editors
To look at two editors at once, drag the tab off of the viewer to create a RPL Editor dialog for that item. Or use the File, then Undock menu.
Redocking RPL Editors
To move a RPL Editor dialog back onto the viewer, grab the R, F, G, Icon and drag it anywhere onto the viewer. A new tab will be created. Or use the File, then Dock In RPL Viewer menu. Also, from the viewer, you can use the File, then Redock All to move all RPL Editors to the viewer.
Closing a RPL Editor tab
Use the red X on the tab to close a tab that is on the viewer.
Note: The RPL Viewer is transient; once it is closed, the configuration of items shown and their order is not saved.
Working With RPL Dialogs
Whether you are looking at the editor or the viewer, the RPL dialogs consist of menus, name and buttons, the expression, and optional additional panels. Figure 2.15 illustrates, and these items are described in this section.
Figure 2.15
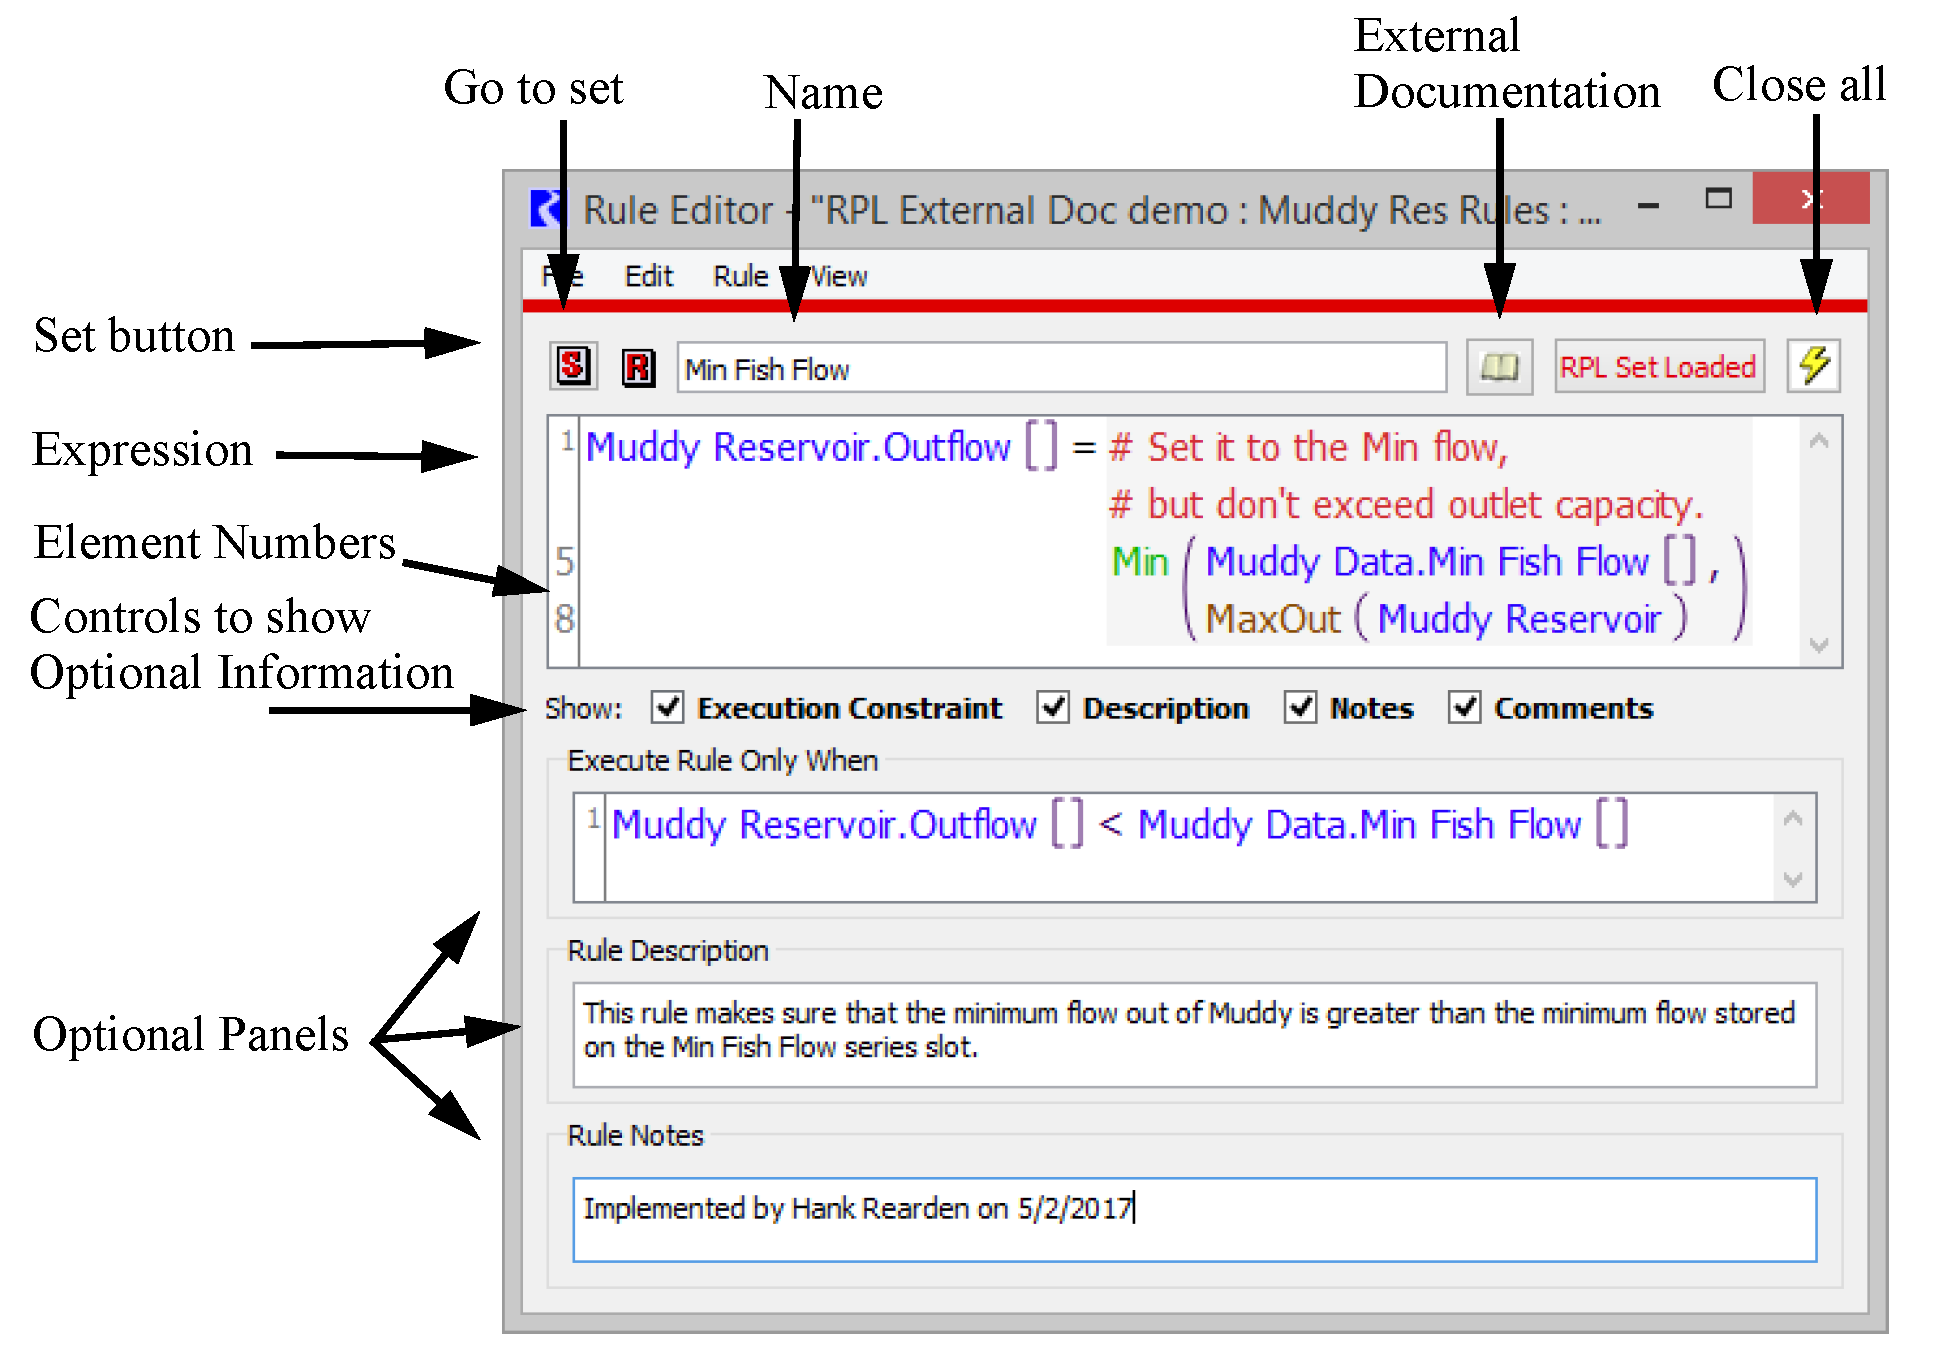
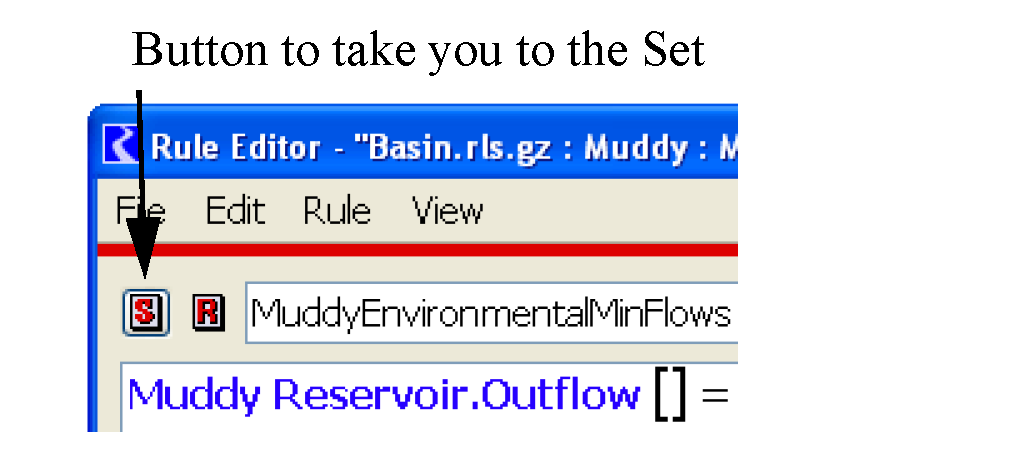
• Type of Set. The icon indicates the type of set to which this editor belongs.
• Name. The name field is where you specify the name.
• External Documentation. The button, when configured, opens the external documentation; see “RPL External Documentation” for details.
• Close All. The button invokes a dialog in which you can close all open RPL dialogs except the top level editor.
• Set Button. Icon buttons allow you to show the containing set for each RPL dialog.
• Expression: This area contains the expression.
• Element Numbers: This column shows the first element shown on that line. See “Element Numbers” for details.
• Optional Information: Optional information can be shown for various types of RPL dialogs. These are described in the following sections. If there is an entry in these panels (or a non-default value) a box is drawn around the toggle.
Execution Constraint / Execute Block Only When
A block can be set up to execute only when a given condition is true. This functionality can be used to increase performance or it may be necessary to implement your RPL set correctly.
• From a RPL editor, select View, then Show Execution Constraints or select the Execution Constraint toggle.
An area is added to the bottom of the window. By default, the block executes only when TRUE. This means that the block will always execute when it comes up on the agenda. You may want this block to execute only when some other condition is true. The TRUE expression can be replaced with any logical structure that can be constructed from the palette
Note: If you enter a boolean expression to replace the default TRUE, then clear this expression, an unspecified expression will remain. This unspecified expression will invalidate the rule. To prevent this, if you clear out this boolean, make sure you re-type TRUE to get the default behavior.
Descriptions
A special expanded area of the RPL dialog is used to enter a description of the block. The area is opened and closed by toggling the View, then Show Description in the menu bar or selecting the Description toggle at the bottom of the window.
Note: If there is any description entered, the Description toggle will have bold text. Mouse over the word Description to see up to 140 characters of the description as a tooltip. Descriptions can be optionally included in Model Reports.
Description can be included in Model Report RPL items (RPL Group, RPL Rule/Goal, RPL Set) with the Show Descriptions settings. See “RPL Group” in Output Utilities and Data Visualization for details.
Notes
Notes, like Descriptions, can be entered in a panel at the bottom of the dialog. Notes can be used when you have information that you want to enter that doesn’t belong in the Description field. For example, development notes or change logs could be entered in the Notes panel.
The area is opened and closed by toggling View, then Show Notes in the menu bar or selecting the Notes toggle at the bottom of the window.
Note: If there is any note entered, the Notes toggle will have bold text. Hover over the word Notes to see up to 140 characters of the note as a tool tip.
Notes can be included in Model Report RPL items (RPL Group, RPL Rule/Goal, RPL Set) with the Show Notes settings. See “RPL Group” in Output Utilities and Data Visualization for details.
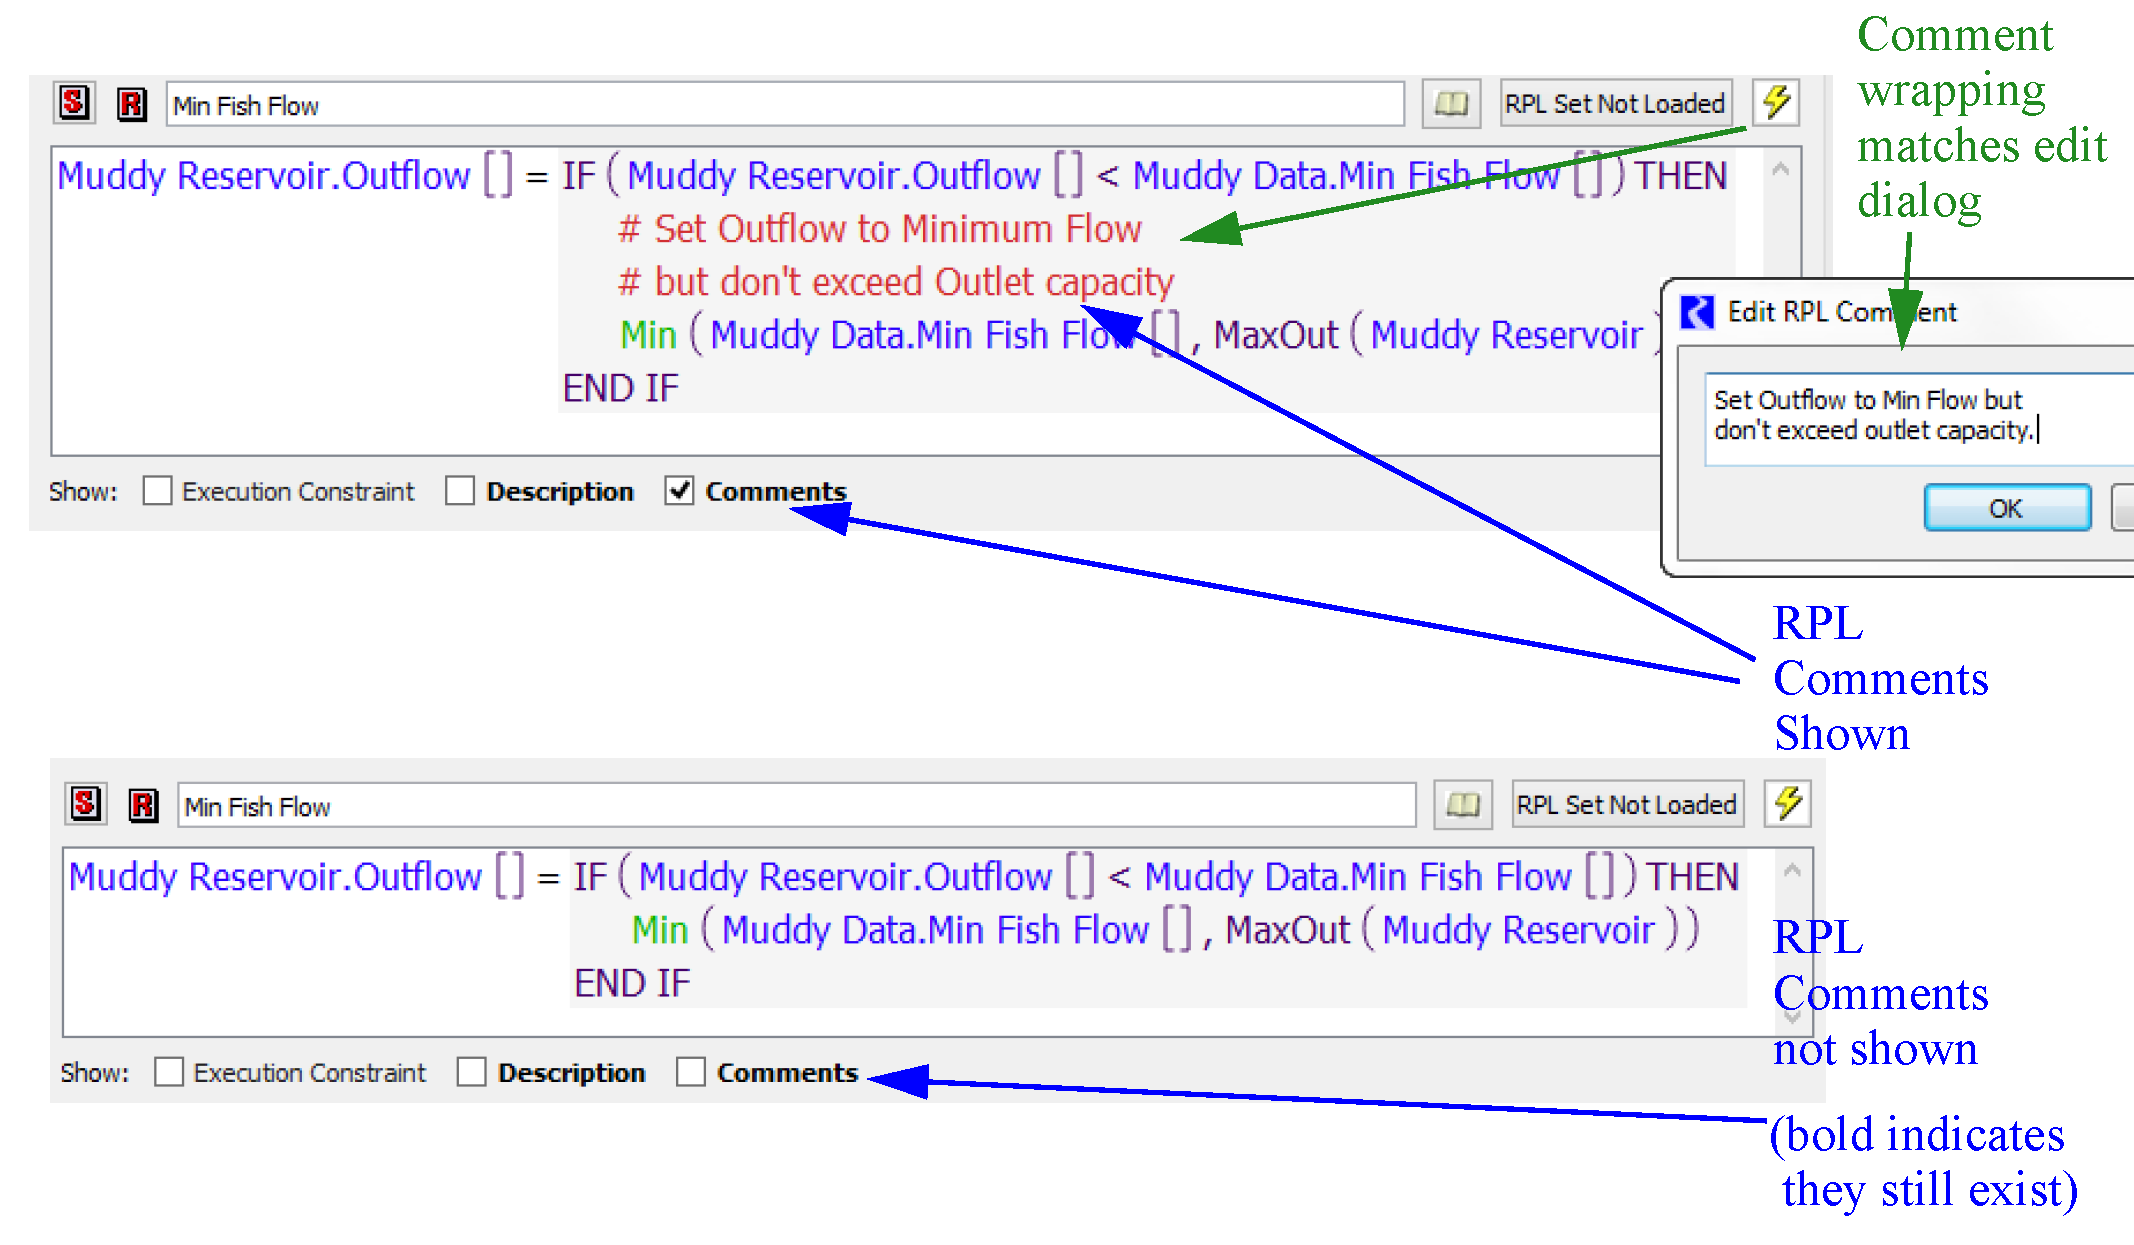
Comments
Inline Comments are added from the palette using the Add Comment button. A separate dialog is opened that allows you to type in a comment. In the RPL editor, the comment is displayed with # characters on the left, lines are wrapped as they were in the comment editor dialog. Double-clicking the comment reopens the edit dialog.
Inline RPL comments can be optionally shown/hidden using the View, then Show Comments menu or the Comments toggle.
Note: If there are any comments defined, the Comments toggle will have bold text. Also, Comments are shown by default; if you do not want to see them, you must explicitly hide them. Figure 2.16 illustrates.
Figure 2.16
Executing DMIs From Blocks
RPL blocks can be used to execute DMIs or DMI groups. See “DMI User Interface” in Data Management Interface (DMI) for details.
To add a DMI, Select Rule/Method, then Add Pre-execution DMI or Rule/Method, then Add Post-execution DMI. Then, select the name of a DMI or DMI group that is defined in the model.
To remove a DMI, use the Rule/Method, then Remove Pre/Post-execution DMI menu.
A pre-execution DMI is executed as the first step of the execution, a post-execution DMI is executed as the last step of execution. Values imported by the pre-execution DMI are available for use by the statements. The order of execution for a rule is as follows:
1. If the Execution Constraint evaluates to TRUE, continue. Otherwise terminate the rule early.
2. Run the Pre-execution DMI.
3. Evaluate the body of the rule.
4. If the rule evaluation is successful, run the Post-execution DMI. If the rule is empty, terminates early, or is ineffective, the Post-execution DMI is not run.
To prevent unexpected solving of objects and/or conflicts between values, input DMIs executed from RPL blocks can only import values to unlinked series slots on data objects. Furthermore, values imported from a DMI executed from a RPL block are given the following flags:
• Control File-Executable DMIs. Imported values are given the INPUT (I) flag (priority zero).
• Database DMIs. Imported values are given the OUTPUT (O) flag and the priority of the rule executing the DMI.
An example application of this feature is executing an external water quality model at each timestep. In this example, the water quality model might take as input RiverWare values which reflect the current state of the system and return a recommended reservoir release value. At each timestep the block would first execute an output DMI to export current values from relevant RiverWare slot(s), e.g., inflow on a reach. An input DMI then runs the external water quality model (which reads the data from the output DMI) and then imports the resulting recommended reservoir release values.
Note: You can turn on Diagnostics to see when rules and Rule DMIs execute. Use the Rule Execution and DMI, then Rule DMI diagnostic categories; see “Rulebased Simulation Diagnostic Groups” in Debugging and Analysis for details.
Stop On NaN
Typically, when a RPL block accesses a slot but the slot is NaN, the block terminates early but the run continues. Under certain conditions, you may wish to specify that a block does not terminate early but instead stops the run when a NaN is encountered. This could be useful for data checking rules; if the referenced slot value has not been specified, then you wish to stop the run and fix the data error.
To specify that a block should Stop On NaN, use the Block, then Stop On NaN menu. When enabled, a check mark is added next to the menu. Any time a slot expression accesses a NaN, the run will stop and a diagnostic will be posted that explains which block referenced a NaN.
Note: In the context of initialization rules the run is not stopped immediately when an invalid value is encountered, but rather it is stopped only after all of the rules have executed. This allows RiverWare to report on all missing data with a single run.
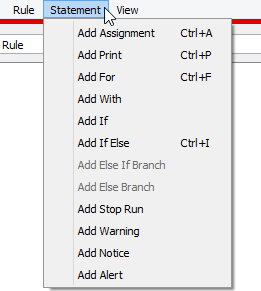
Statements
Blocks are the upper-level construct of a RPL set. For example, rules and accounting methods are blocks. Blocks are made up of statements which are different structures depending on the desired result. See “Types of RPL Sets” for details
In the RPL set editor, open a block by double-clicking or right-clicking its icon. This will bring up the <block> Editor dialog. Rename the block by typing in a new name in the Name text field.
Blocks are constructed from statements at the top level, and statements are constructed from expressions. The following statements are available for RBS, Initialization and MRM rules and accounting methods. They can be selected from the Statement menu in the RPL Viewer or the individual rule or accounting method dialog.
Assignment
An assignment statement assigns to the slot on the left-hand side (LHS) of the equality the numeric value evaluated on the right-hand side (RHS) of the equality. The basic assignment is:
<numeric expr> = <numeric expr>
where the LHS <numeric expr> is a slot and the RHS <numeric expr> is any expression which evaluates to a value in the unit type of the LHS slot.
Note: RBS rules, MRM rules, and accounting methods can assign values on series slots only. Initialization Rules can assign values on series slots, table slots, and scalar slots; see “Initialization Rules” in Solution Approaches for details.
For
Iterative loops can be very useful for computations and multiple assignments. For loops are available to make multiple slot assignments from similar logic and calculations. An index variable is assigned a new value for each iteration of the loop. The inside of the loop is one or more regular assignment statements which should use the index variable to perform a different assignments for each iteration of the loop. This variable may be used in both the LHS slot assignment and the RHS evaluation to affect slightly different behavior within each pass. The default For loop is:
FOR (NUMERIC index IN <list expr>) DO
<numeric expr> = <numeric expr>
END FOR
where the number of loops/assignments is determined by the number of elements in the <list expr>, the NUMERIC label indicates the expression data type of the elements in the <list expr>, and the index is the variable name which will take on the value of each element for use inside the loop. All of these parts of the for statement may be modified.
Note: There is also a For expression on the palette; see “Conditional and Iterative Operations Buttons” for details.
With
A With statement evaluates an expression and sets the result to a local variable with the given name and type. It then evaluates the contained statements, which may reference the variable. The default WITH syntax is
WITH (NUMERIC val = <numeric expr>) DO
<numeric expr> = <numeric expr>
END WITH
Note: There is also a WITH expression on the palette; see “Conditional and Iterative Operations Buttons” for details.
If
An If statement makes a statement conditional on a boolean expression without an ELSE.
IF(<boolean expr>) THEN
<statement>
END IF
Note: There is also an IF expression on the palette; see “Conditional and Iterative Operations Buttons” for details.
If Else
An If Else statement makes a statement conditional on a boolean expression with an ELSE.
IF(<boolean expr>) THEN
<statement
ELSE
<statement>
END IF
Note: There is also a IF ELSE expression on the palette; see “Conditional and Iterative Operations Buttons” for details.
Else If Branch
Although not a statement by itself, you can add one or more ELSE IF branches to an IF or IF ELSE statement. The ELSE IF is available when the boolean condition or a consequence statement is selected (except when an ELSE consequence statement is selected). An ELSE IF branch is added after the selected branch.
IF(<boolean expr>) THEN
<statement>
ELSE IF(<boolean expr>) THEN
<statement>
END IF
Note: There is also a ELSE IF expression on the palette; see “Conditional and Iterative Operations Buttons” for details.
Else Branch
Although not a statement by itself, you can add a single ELSE branch to an IF Statement or ELSE IF statement. This part of the statement will be evaluated when none of the other IF or ELSE IF boolean conditions are true.
IF(<boolean expr>) THEN
<statement
ELSE
<statement>
END IF
Note: There is also a ELSE expression on the palette; see “Conditional and Iterative Operations Buttons” for details.
Print
A Print statement evaluates its expression and formats the result into a message. The blue message is displayed in the Diagnostics Output Window only when the Print Statements diagnostics group is enabled.
Print <expr>
where the <expr> is any expression or concatenated expressions which can be fully evaluated and represented as a string. See “Print Statements” in Debugging and Analysis for details.
Notice
A Notice statement posts a purple message to the Diagnostics Output Window regardless of diagnostics settings.
NOTICE <expr>
where the <expr> is any expression or concatenated expressions which can be fully evaluated and represented as a string. See “Notice, Warning, and Alert Statements” in Debugging and Analysis for details.
Warning
A Warning statement posts a message with a pink background to the Diagnostics Output Window regardless of diagnostics settings.
WARNING <expr>
where the <expr> is any expression or concatenated expressions which can be fully evaluated and represented as a string. See “Notice, Warning, and Alert Statements” in Debugging and Analysis for details.
Alert
An Alert statement posts a message with an orange background to the Diagnostics Output Window regardless of diagnostics settings.
ALERT <expr>
where the <expr> is any expression or concatenated expressions which can be fully evaluated and represented as a string. See “Notice, Warning, and Alert Statements” in Debugging and Analysis for details.
Note: The Notice, Warning and Alert statements all have the same behavior. They simply post messages with different colors. This allows you to define messages with three different levels of severity.
Stop Run
A Stop Run statement aborts the run and posts the provided message as a diagnostic error message in red text. When executed from within an iterative MRM rule, this statement aborts the MRM run.
STOP RUN <expr>
where the <expr> is any expression or concatenated expressions which can be fully evaluated and represented as a string. See “Stop Run Statements” in Debugging and Analysis for details.
Execute Script
Available for Iterative MRM Rules only, an Execute Script statement executes the named script.
Caution: This statement should be used with extreme caution as scripts can modify many parts of your model.
EXECUTE SCRIPT <string expr>
where <string expr> is the name of the script to be executed. See “Script Management” in Automation Tools for details about scripts.
Editing a RPL Expression
Expressions in the RPL editor are displayed as <expr>, <numeric expr>, <boolean expr>, <list expr>, <string expr>, <object expr>, <slot expr> or <datetime expr>. The type of the expression indicates the valid values that can go in that expression. See “Expression Data Types” for details on each data type.
There are two ways to enter data into an unspecified expression, typing and using the palette. Any expression can by typed by first double-clicking then typing in the expression. There are many problems with this approach. First, you must know the exact syntax to be typed. Second, you must type all strings perfectly as typos in strings may not be caught on validation. A better approach is to use the palette to build expressions. You only need to type when they are specifying the inner most expression like exact numbers (100 cfs), boolean (true, false), datetimes (@“t”), or strings (“Entering Runoff season”). Following is a description of using the palette.
Using the Palette
See “RPL Palette” for descriptions of the Palette buttons. Each of the buttons in the RPL Palette represents an expression. These expressions are convenient operations which evaluate to one of the expression data types just mentioned. Buttons on the RPL Palette are enabled and disabled dynamically. When an expression is highlighted in the Editor, the Palette buttons that satisfy the expected data type are enabled. Thus, you create expressions in the following manner: select an unspecified expression, select a palette button or function. Select another unspecified expression and select a palette button or function. Repeat this process until the expression is created. Then, if necessary, double-click any remaining unspecified expressions that cannot be created from the palette (like entering numbers) and type in the value.
When
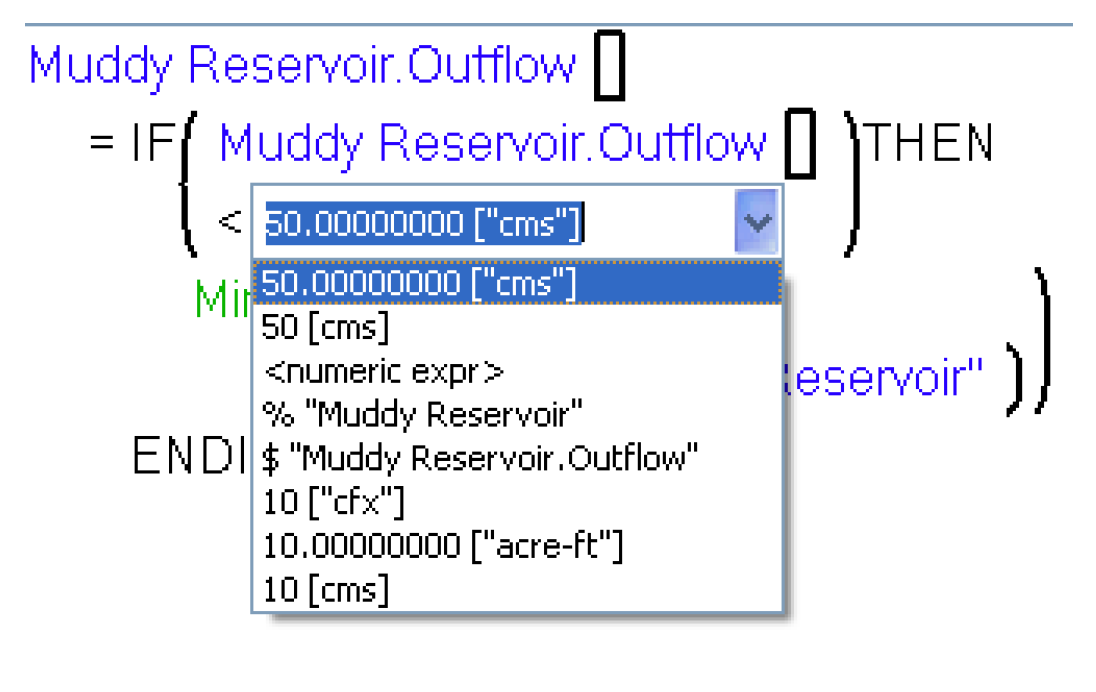
Entering Values
To replace an unspecified expression with a literal value (like 10 “cfs” or TRUE) double-click the expression and type in the value. For NUMERIC data types, you may also enter a unit. If the unit has a “-” or “/” in it, you must include the quotes when typing the unit, like “acre-feet”. Without these special characters, you can type the units and no quotes. Here are some examples of correctly specified units: 10 cms, 100 “acre-ft”, 50. Illegal entries include 100 acre-ft/day (no quotes) and 100 “cfx” (no unit of that type). See “NUMERIC” for details on entering units.
Another illegal entry is 1,000 “acre-ft”. This is because the comma (a thousands separator) is not allowed as an input. Instead, RiverWare gives the option of whether or not to display a comma as a thousands separator for all values throughout the model and RPL set. This option is selected or deselected by selecting the main Workspace, then Show Commas in Numbers option; see “Show Commas in Numbers” in User Interface for details.
Note: After typing a literal value, you do not need to hit Enter to commit the change. Pressing Enter or any selection outside of the editor will signal completion of the editing.
Auto-Correct
When typing values, if the value you provide is not a valid replacement for the expression, RiverWare attempts to coerce the specified string into one that is valid. This auto-correction process is guided by the types which can legally replace the existing expression. RiverWare tries a series of variations on input, where each variation is an attempt to coerce the input into a different value type. Types are considered in the following order: DATETIME, OBJECT, SLOT, SRING, and LIST. If a valid auto-correction is found, it is used to replace the existing expression; if no valid auto-correction is found, an error notification is presented describing the problem with the input.
For example, consider the statement.
WITH (STRING val = <string expr>) DO
PRINT "value: " CONCAT <expr>
END WITH
If the text t + 1 is entered as the variable value in the WITH expression, it is interpreted as a STRING "t + 1" because that is the only legal type for that expression; whereas the same text entered as the right-hand side of the CONCAT expression is interpreted as the DATETIME @"t + 1", because all types are valid in that location and a DATETIME conversion is considered first.
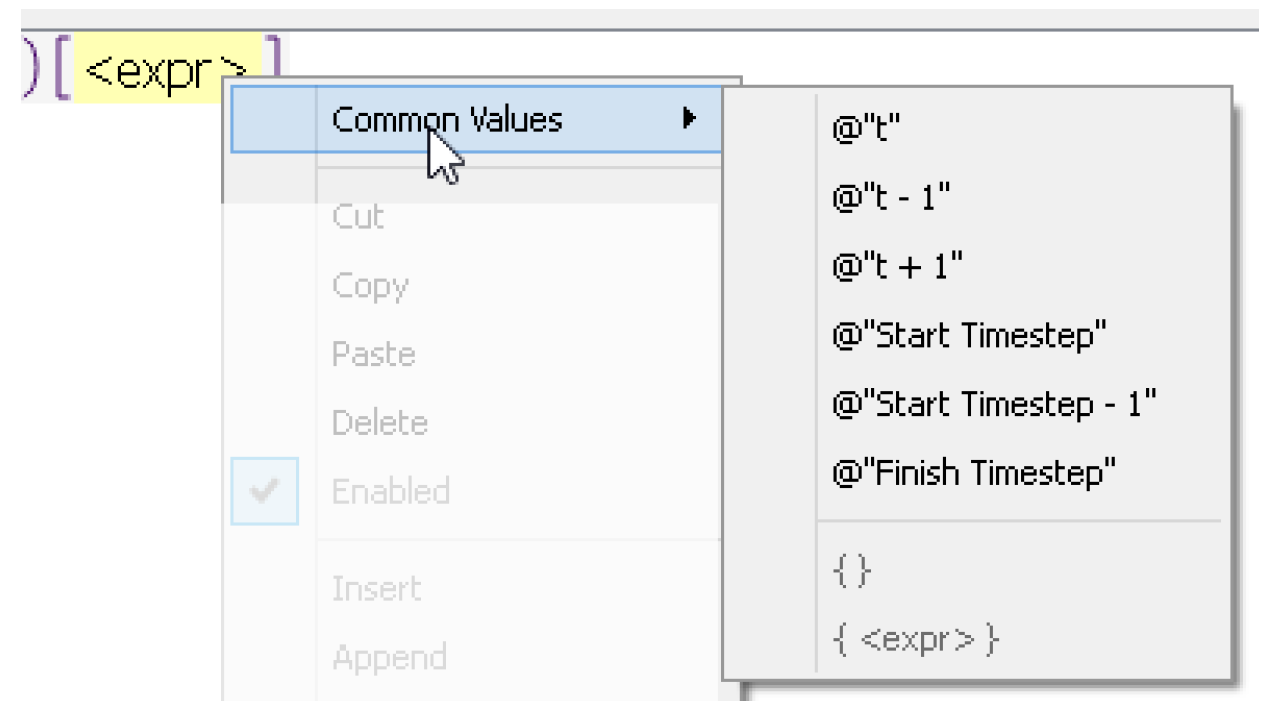
Common Values
Common values are also available by right-clicking the selected expression and choosing the Common Values menu. These include common DATETIME values and list expressions.
• @“t” - Current Timestep
• @“t-1” - Previous Timestep
• @“t+1” - Next Timestep
• @“Start Timestep” - First timestep in the run period
• @“Start Timestep - 1” - Initial timestep
• @“Finish Timestep” - Final Timestep in the run period
• { } - Empty list expression
• { <expr> } - List containing one empty expression.
Undo and Redo
When editing RPL expressions, undo and redo are available as follows:
• Edit menu on RPL dialogs
• Right-click context menu
• Keyboard shortcuts
– Undo is ctrl-z
– Redo is ctrl-shift-z
• Expression menu on Expression slots.
Any action that edits a RPL expressions can be undone or redone, including the following:
• Replacing the selected expression with a new expression by selecting a palette button
• Cutting or deleting the selected expression.
• Pasting an expression in the place of the selected expression.
• Adding or removing a statement from a block.
• Adding or removing a constraint from a function.
• Double-clicking an expression and changing it via an inline editor.
Undo and redo are on a per-dialog basis; the dialog must be selected before the undo/redo operation is performed. Also, the history of changes is preserved if a RPL dialog is closed and re-opened, but is not preserved if the set is closed. On expression slots, the history of changes is lost when the slot is closed.
The number of undos/redos is only limited to take you back to the original expression; there is no artificial limit imposed.
Finally, edits on the RPL set level cannot be undone including adding or deleting rules and re-arranging rule priorities.
Using the History
When you double-click an unspecified expression or literal value, a menu appears to the right of the inline editor. This menu tracks the history of past edits that have been used in this dialog you can then use the menu to choose a value from the list. The arrow keys can also be used to scroll through the list.
The history can also be used as a starting point if you type in an invalid expression. It provides an opportunity to correct the entry and try again without having to type it from scratch. For example, you wish to enter “Flood Season” into a string, but when you type, you only enter the string “Flood S” and hit Enter before finishing typing Season. RiverWare will not issue an error as “Flood S” is valid. You can then select “Flood S” from the pull-down history, and complete the desired text.
Note: The saved history it is a per-dialog history only but does persist when the dialog is closed and reopened. It does not persist if the RPL set is closed.
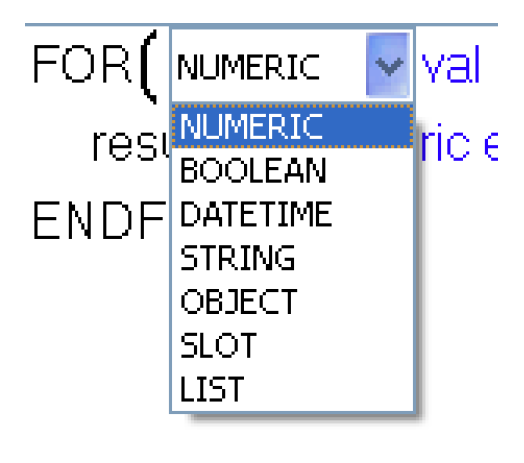
Data Types for Looping Variables
In the looping expressions, FOR, WHILE, WITH, SUM, AVE and in the FOR and WITH statements, you specify the data type of the looping variable. See “Expression Data Types” for details on data types.
For example, the first line of a default FOR statement looks as follows:
FOR (NUMERIC val IN <list>) WITH NUMERIC result = <numeric> DO
You can change the type of the looping variable NUMERIC and the name of the variable. Menus provide an easy way to do this. You double-click the NUMERIC and are provided with a menu listing the 7 data types in RPL. A second menu is provided for the looping variable; this provides a history of all string values that have been previously entered in the dialog, similar to the history described in the previous section.
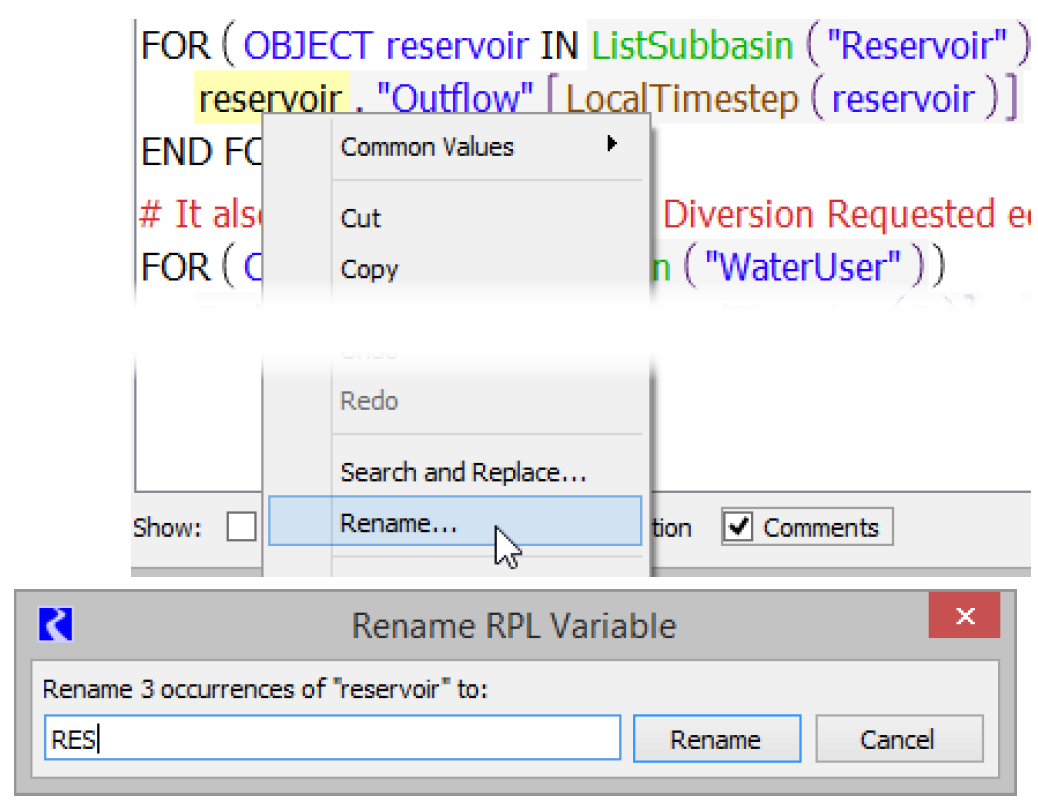
Renaming Looping Variables and Function Arguments
When a looping variable or function argument is selected, you can right-click and choose to Rename all of the occurrences of that variable or argument within the expression and the definition.
Note: Variable names can be associated with statements (FOR and WITH), expressions (FOR, WITH, SUM and AVE), or functions (argument names).
To initiate a rename, use the right-click context menu and choose Rename. A dialog displays the number of occurrences of the name to be replaced, and allows you to type in the new name. Selecting Rename then makes the replacements.
In Figure 2.17, three occurrences of the looping variable reservoir will be renamed RES.
Figure 2.17
RPL Short Cuts
If part of an expression can be used in another assignment, rule, or function, rather than repeating the above process for each new expression, highlight the portion of the expression that can be used elsewhere. From the menu bar, select Edit, then Copy or type <Ctrl C> to copy the highlighted portion. Right-clicking the highlighted portion will bring up a menu with the option to copy. In the location in which the expression is to be pasted, highlight the <expr> and select Edit, then Paste <Ctrl V>, or right-click and select Paste from the menu. This will paste the expression into the new location.
When you copy an expression using <Ctrl C> or the Edit and then Copy menu, the expressions is also placed in the Clipboard tab of the palette. This allows you to use that expression or its subexpressions elsewhere. For more information, see “Clipboard Tab”.
Also, expressions can be deleted using the Cut <Ctrl X> or Delete <delete> operations. The Cut operation, puts the expression in the copy buffer, the Delete operation does not.
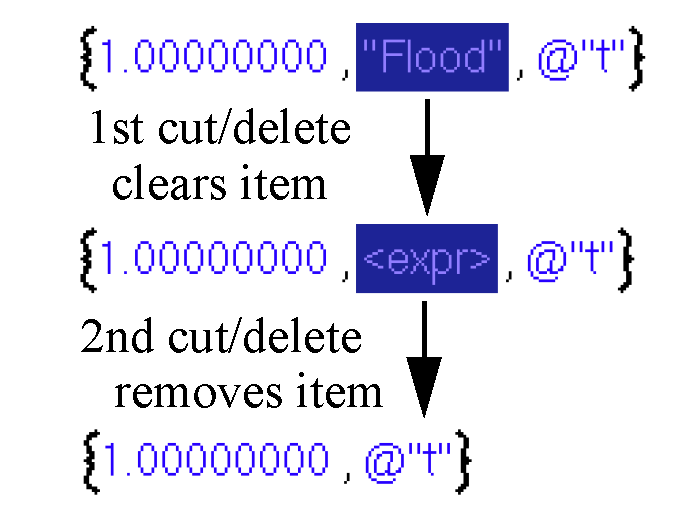
Note: There is one exception to the cut/delete behavior. When deleting an item in a list, the first cut or delete operation removes the expression but leaves a blank expression. A second cut/delete removes the item from the list. Figure 2.18 shows an example.
Figure 2.18
Statements may be cut, copied, pasted from the menu bar of the RPL Editor, using <Ctrl C>, or right-clicking and selecting Copy from the menu. Select Paste to paste over an existing statement, Insert to add it above the currently selected statement, or Append to add below the last statement.
Disabling an Item in a List or a Statement
On the RPL set editor, functions and RPL blocks can be disabled by selecting the green check mark turning it into a red X. Within a block, it is also possible to disable an individual item in a list or an entire statement.
• In the RPL editor, highlight the statement or item in the list that you wish to disable.
• Right-click the selected expression. Notice that there is a check mark next to the word Enabled indicating that the item is enabled.
• Select Enabled to toggle off the check mark thereby disabling the item. The disabled variable now shows up with cross hatching. The crosshatch color is defined in the set layout dialog; see “Colors” for details. When the expression executes, it will skip the disabled item(s).
In general, disabling an assignment or an item in a list should only be used in the debugging and model building process. For example, you might want to have two assignment statements in one block. While debugging the model, it may be necessary to disable one assignment to ensure the other assignment is working correctly.
Open Slots and Objects From RPL Dialogs
When the selected RPL expressions is a valid OBJECT or SLOT, the following right-click context menu selections open that object or slot dialog.
• Open Object
• Open Slot
Note: This only works for expressions for which the workspace object can be determined without evaluation.

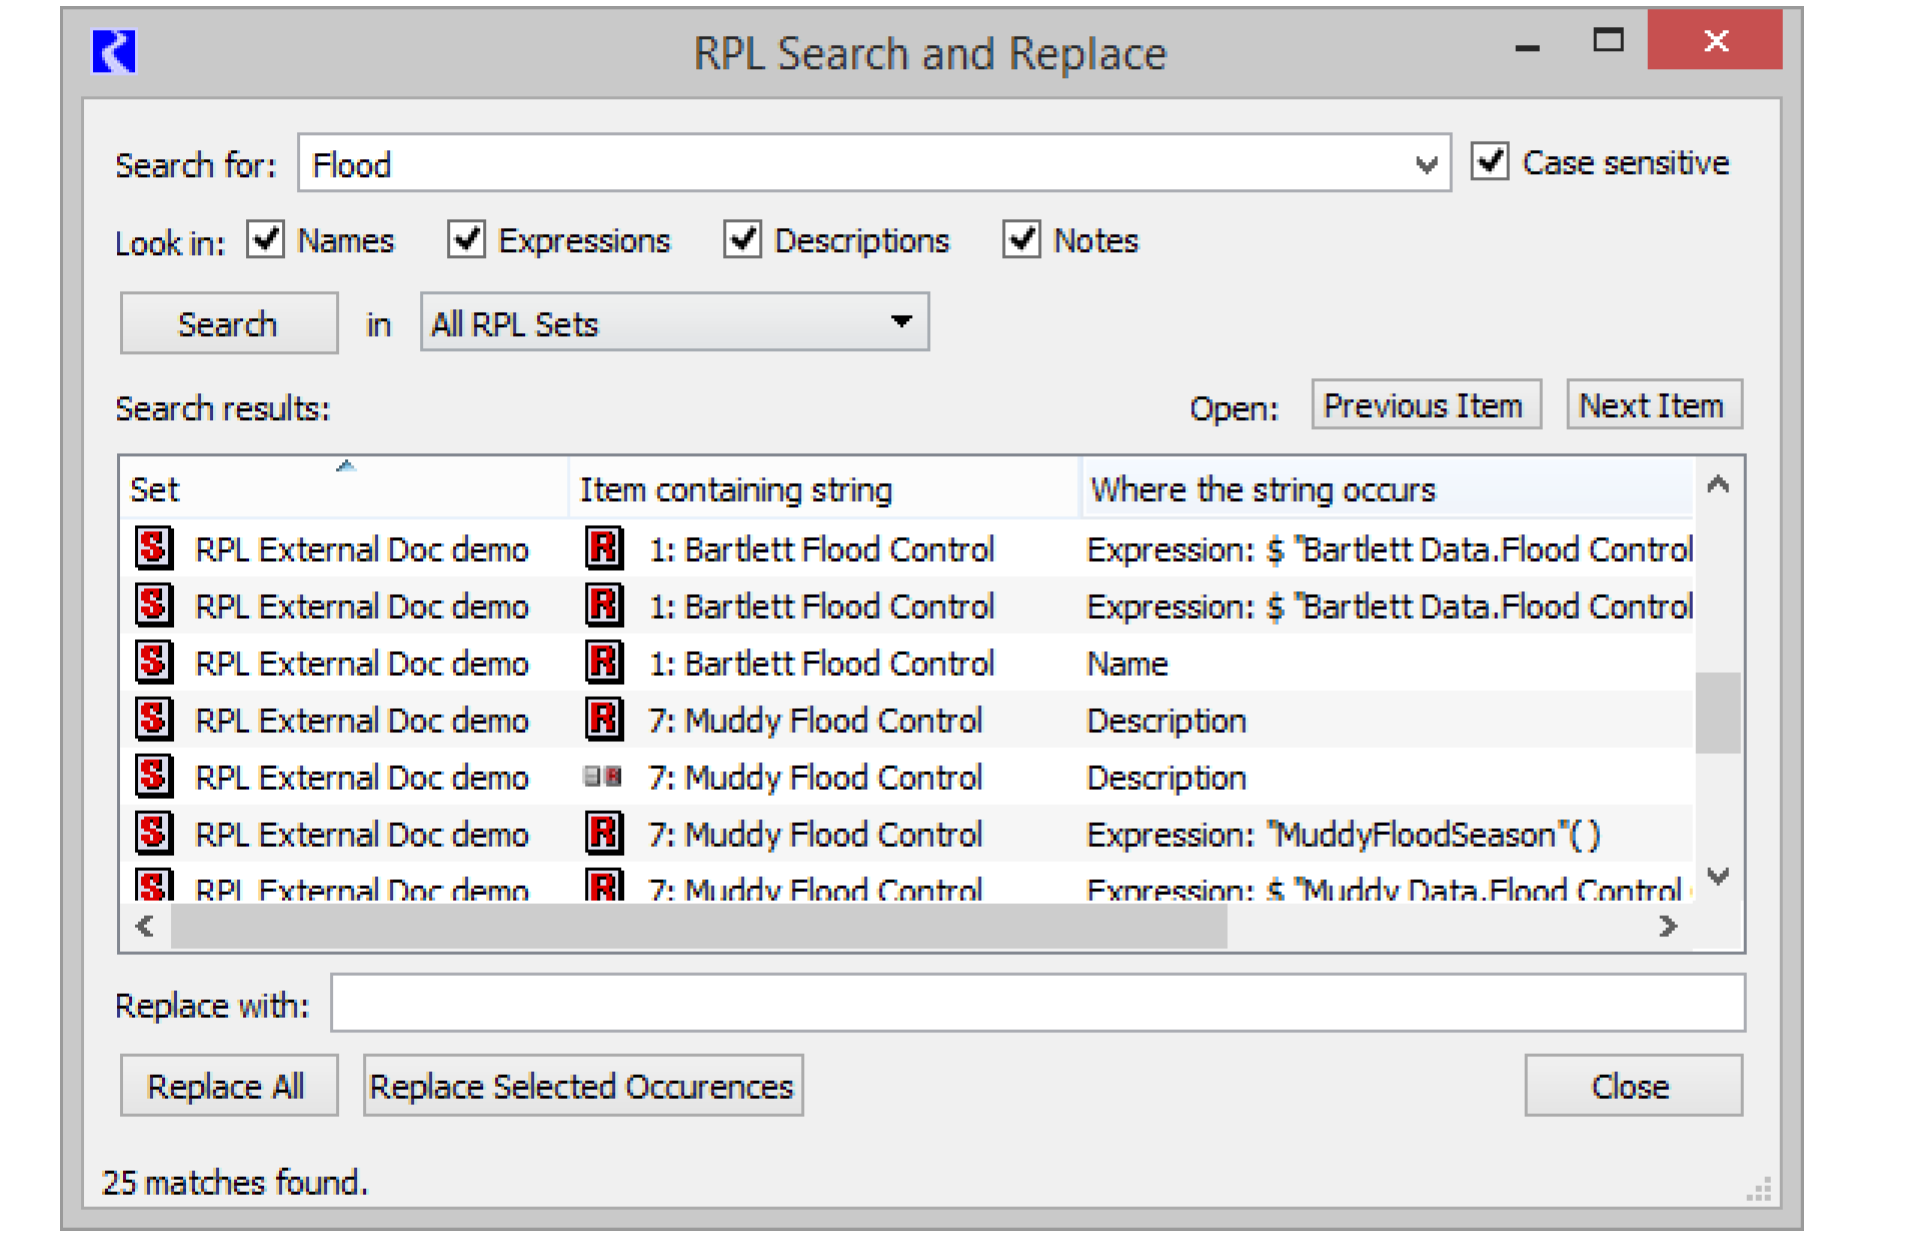
RPL Search and Replace Dialog
The RPL search and replace dialog supports flexible replacement of strings within a single RPL set or all RPL sets. Within this dialog, you can search for all occurrences of a string and replace all or some of them with another string.
Accessing the Dialog
The RPL search and replace dialog is accessible in the following ways:
• From the main workspace, select Policy, then RPL Search and Replace
• Selecting Search and Replace from the Edit menu of the RPL editor and its children dialogs (the RPL Set, Function, and Rule/Method editors) or from the RPL Set analysis dialog.
• Pressing the F4 key from any of the RPL editors or the analysis dialog.
• Right-clicking when editing any RPL expression and selecting Search and Replace from the resulting popup menu.
Searching for Occurrences of a String
To search for occurrences of a string, begin by typing the search string into Search for: field and then either hit Enter or select the Search button.
When you initiate a search, the search string is added to a history of searches. To re-select a previous string, select the triangle just to the right of the search string. This will present a menu containing previous search strings, allowing you to select one as the current search string.
Exactly where and how a search is conducted can be controlled by selecting various options.
• Case sensitive. When checked, RiverWare searches for strings which match the search string exactly, otherwise it will ignore case.
• Look in Names. When checked, RiverWare tries to match occurrences of the string within the names of RPL items in the set. This includes the names of the RPL set and its contained groups, rules/methods, and functions.
• Look in Expressions. When checked, RiverWare tries to match occurrences of the string within all expressions in the RPL set. Eligible sub-expressions within an expression include values of type DATETIME, NUMERIC, BOOLEAN, STRING, OBJECT, and SLOT, as well as function calls (the name of the function being called is eligible for a match)
• Look in Descriptions. When checked, the contents of all descriptions (set, group, and rule/method) are searched for matching strings.
• Look in Notes. When checked, the contents of all notes (set, group, and rule/method) are searched for matching strings.
• Search in. If the dialog is accessed from the workspace Policy menu, it starts with All RPL Sets selected. Otherwise it will be configured to search in the RPL set corresponding to the dialog through which it was accessed. The name of the set selected will be displayed in a box to the right of the Search button. You may switch from this set to any other open set or to all sets by selecting the set name and choosing a new set (or all sets) from the menu.
Note: When you search in the Expression Slot Functions Set (or All RPL Sets), the expression slot expressions (i.e. the RPL expressions shown on the expression slot dialog) are searched along with the functions in the Expression Slot Functions Set. In this case, the parent is the object containing the expression slot.
The results of the search are displayed in the Search results table which contains one row for each string that matches the search string. Each row displays the name of the item containing the string (a set, function, group, rule/method, or expression slot) as well as where within that item the matching string was found (the object name, description, or one of its expressions). In the case of a match within an expression, the actually matching sub expression is also displayed.
Note: A search string can match multiple times within a given item. For example, when searching for the string “res”, a rule named “Forrest Reservoir Flood” will match twice.
Double-clicking a row of the Search results table will open an editor for the item containing the matching string corresponding to that row. If the match is within an expression, the matching sub-expression will be the selected expression in the editor and the dialog will be scrolled to that expression. Use the Previous Item and Next Item buttons to step through matches and opening/scrolling the dialog containing the match.
Tip: If you want to change the name of a function argument or looping variable (within a FOR or WITH), select the variable and use the right-click Rename menu. This utility will rename all instances of that variable within the expression or function. See “Renaming Looping Variables and Function Arguments” for details on this utility.
Replacing Matching Strings With Another String
Once a search has been conducted, one can replace all or some of the matching strings with another string. First, type the replacement string into the field labeled Replace with:. To replace all of the occurrences then select the Replace All button. To replace only some of the matching strings, select those that you wish to replace in the Search results list (click selects a single row, Ctrl-click allows multiple independent selections, Shift-click selects a range of contiguous rows), then select the Replace Selected Occurrences button.
Functions
Following is a description of functions and their use in RPL sets.
Predefined Functions
Predefined functions are also useful in constructing rules, methods, and functions. Predefined functions are a set of mathematical, look-up, and mass balance routines that may be accessed from within any other expression. Predefined functions are coded into the RiverWare source code. Because of this, predefined functions cannot be modified. All predefined functions return their results in one of the standard data expression types; they can be substituted for any unspecified expression of that type. Predefined functions are accessed in the RPL Palette, “RPL Palette”, under the Predefined Functions tab at the top of the Palette dialog. Once added to a RPL expression, double-click the function to gets its editor. The documentation for the function is shown to help you specify the arguments and understand the evaluation.
See “RPL Predefined Functions” for details on the predefined functions.
Figure 2.19

Writing a User-defined Function
Functions are constructed in much the same way that blocks are constructed, using the RPL Palette. Expressions are simplified by using functions to perform logical and computational operations. To make a function flexible so that it may be used in a variety of situations, arguments are added to the function. Arguments permit the same function to behave differently, depending on from where it is called or by which object. For example, an internal function could be created which forecasts the evaporation from a reservoir based on the reservoir’s surface area. This function could be of use at several reservoirs, but would have to know at which reservoir data to look. The reservoir for which the function should compute the evaporation could be an argument to the function.
Arguments to functions can be of any data expression type. There is no limit to the number of arguments a function may take, but the number of arguments is not dynamic with respect to block execution. The exact number and type of argument(s) is fixed in the function definition. Dynamic argument lists and default argument values are prohibited.
• Add a function to the desired Policy or Utility Group by selecting Set, then Add Function.
• Name the function and press <Enter> after naming.
Note: If you are renaming a function that is called by other RPL expressions, a dialog asks if you want to rename calls to this function in the applicable RPL sets. Answering yes will update existing calls to the function with the new name. For the Expression Slot set, the Initialization Rules set, the Iterative MRM sets, the Object Level Accounting Method set, Optimization Goal sets, and Rulebased Simulation sets only function calls within the set are affected. For Global Function sets, calls in any of the above sets will be affected. Calls to a global function from DMIs, scripts, or other places outside of RPL sets are not renamed. Answering No continues the name edit but does not update any calls to the function. Answering Cancel stops the name change all together.
• In the field Return Type, select the data expression type you wish the function to return. For example, if NUMERIC is selected the function will return a numeric value to the block in which the function is called.
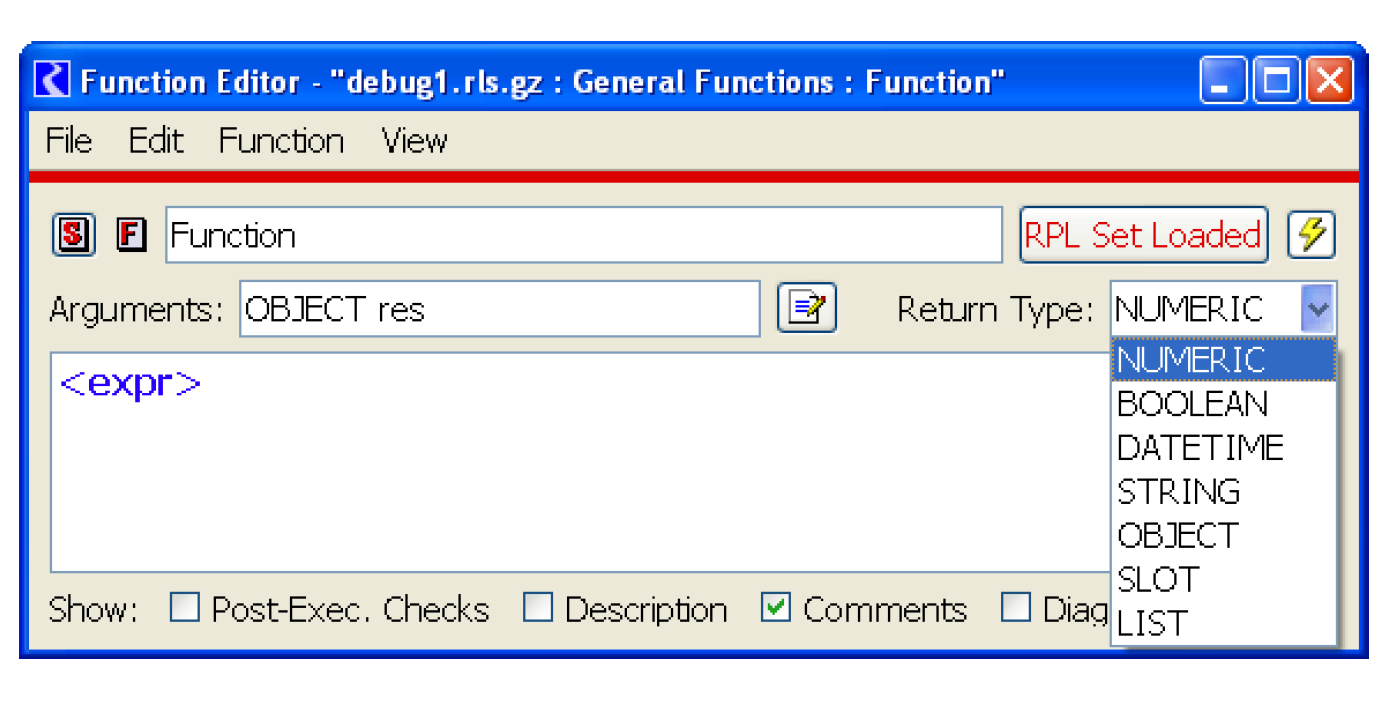
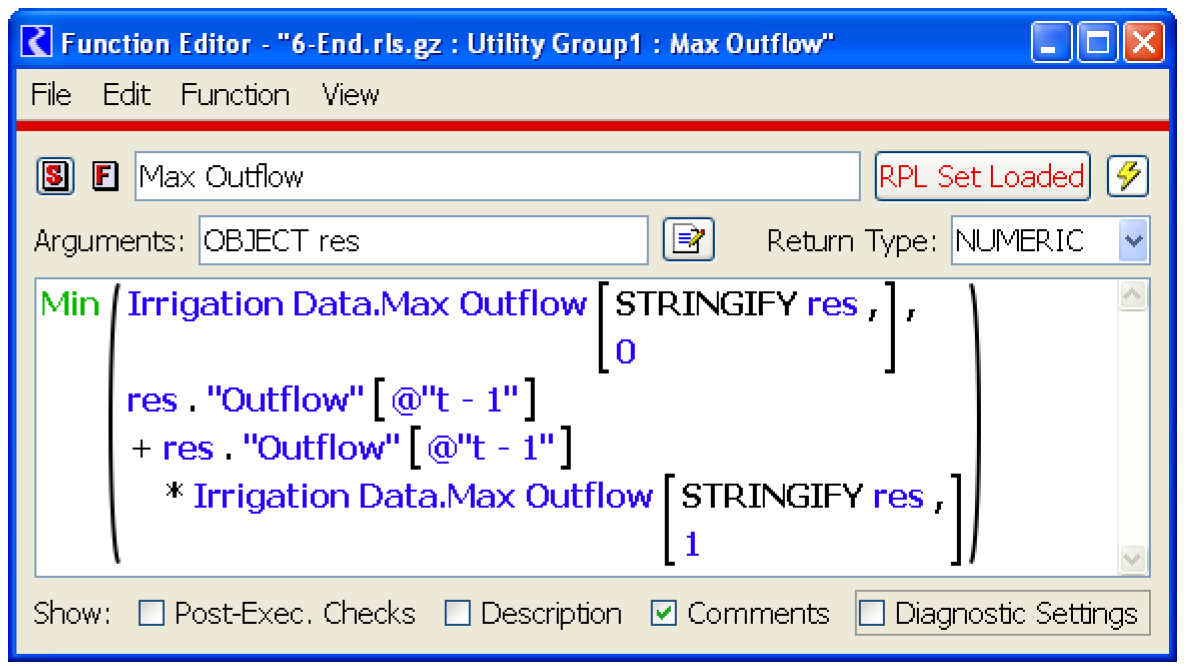
If the function is going to be general to other functions or blocks, adding an argument might be useful depending on the return type of the function. In the above graphic, the Arguments: OBJECT res allows the variable res to be used inside of the function anywhere an <object expr> is allowed. This will allow the function to look at different reservoirs’ data without creating a separate function for each reservoir. If the function is going to be used only in a limited manner, arguments are not necessary.
Arguments to functions can be entered in two ways, using the editor and by typing. The editor is accessed from the Arguments button  to the right of the Arguments line as shown to the right: Initially, the dialog is blank. You add arguments by selecting the green check button.
  The red minus
  is used to remove arguments and the arrows
  are used to re-order arguments. The default type of an argument is NUMERIC. To change this, use the menu and select a different type. To change the name of the argument, double-click the name and type a new name. Select OK when finished. Figure 2.20 results in the argument shown below.
to the right of the Arguments line as shown to the right: Initially, the dialog is blank. You add arguments by selecting the green check button. The red minus is used to remove arguments and the arrows are used to re-order arguments. The default type of an argument is NUMERIC. To change this, use the menu and select a different type. To change the name of the argument, double-click the name and type a new name. Select OK when finished. Figure 2.20 results in the argument shown below. Figure 2.20
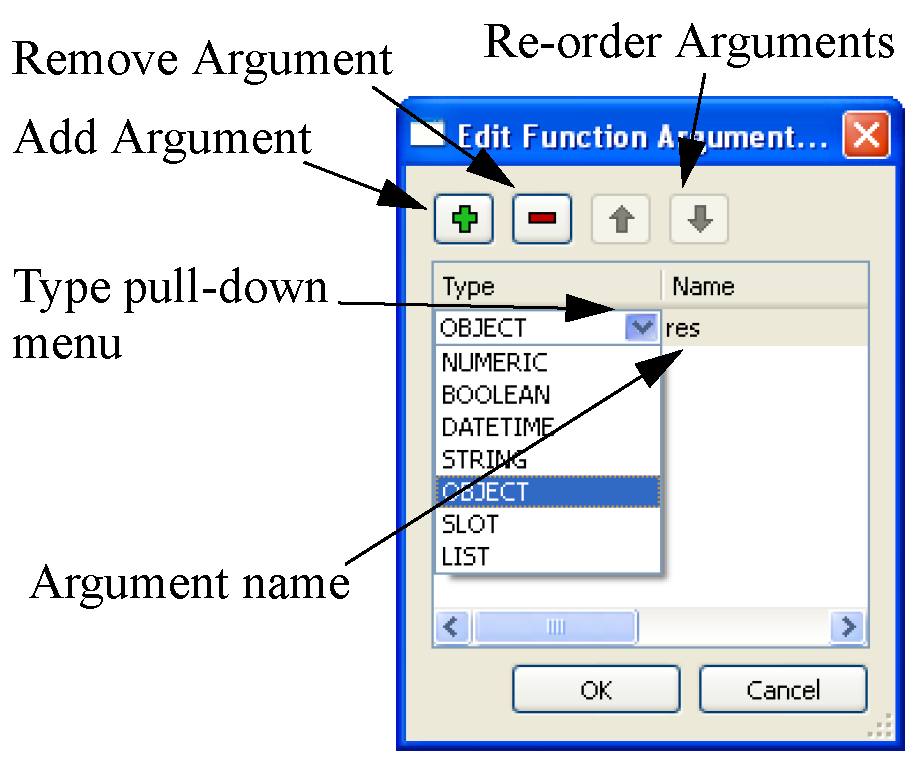
Typing was the original way to enter arguments. You type into the Arguments line using the syntax TYPE argument. Multiple arguments are separated by commas. For example, NUMERIC flow, LIST elevations, OBJECT res. The syntax, spelling, and capitalization must be exact or an error will be issued.
Note: To change the name of a function argument, select the argument in the expression and use the right-click Rename option. This utility will rename all instances of that argument within the function’s expression and definition. See “Renaming Looping Variables and Function Arguments” for details on this utility.
Functions are constructed like blocks and use the RPL Palette to build arguments. Figure 2.21 shows a sample function constructed using predefined functions and RPL Palette buttons.
Figure 2.21
The same short cut copy and paste abilities seen in blocks apply to functions as well. Any time an expression is used multiple times, whether within a function or between functions, time can be saved by copying and pasting that expression into the other locations in which it is used. As with blocks, it is wise to check the validity of an individual function after it is built and fix it rather than wait until the beginning of a run to check the validity of all blocks and functions.
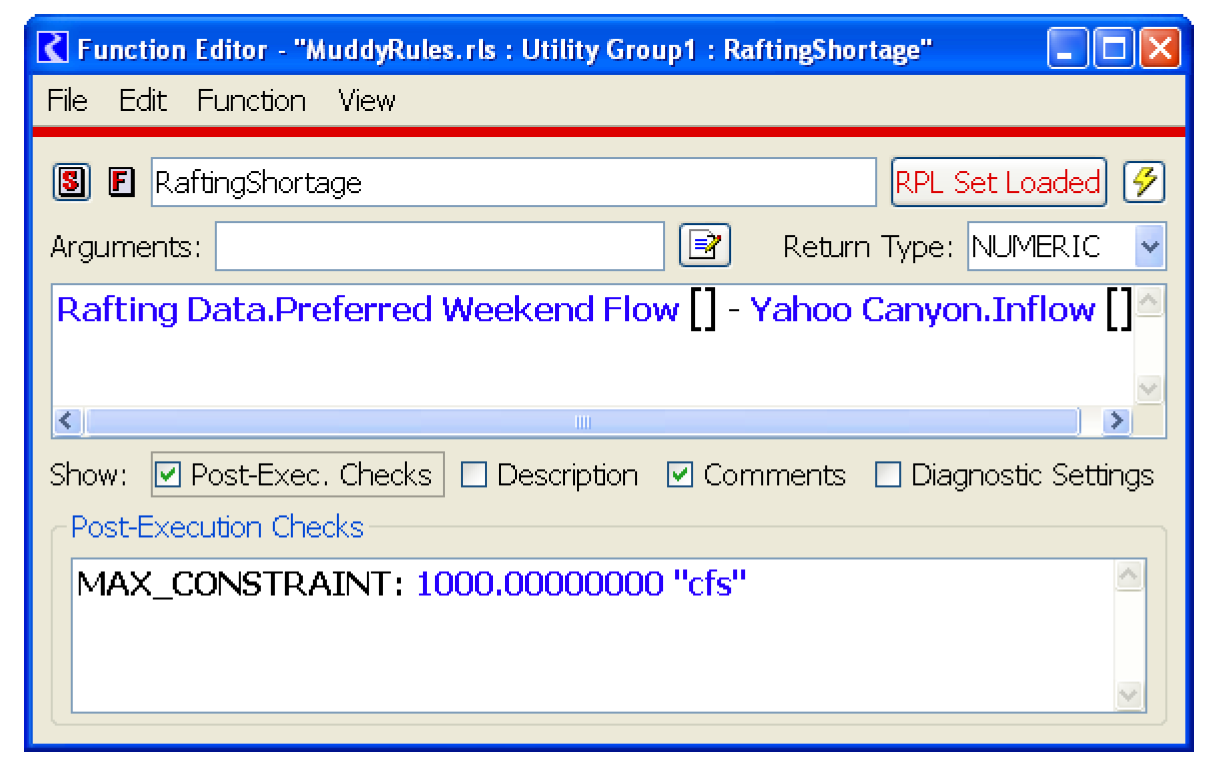
Constraints on Functions
Functions can be constrained to evaluate to either a minimum or maximum value. Or they can be configured to flag an error if a minimum or maximum constraint has been violated.
• From the Function Editor, Select View, then Show Post-Execution Checks or select the Post-Exec Checks toggle.
A constraint can be added using the Function menu item.
• Select Function, then Add Min Constraint or Add Max Constraint (as shown in the screenshot). The palette is then used to set up the conditions of the selected constraint.
Time Invariant Functions and Function Value Caching
The function editor Edit menu provides a toggle control labeled Set Time Varying which is set to on by default. Toggling this property off communicates to RiverWare that the function is guaranteed to evaluate to the same value each time it is evaluated, i.e., it is time invariant. If a function with no arguments is time invariant, then the first time the function is called within a run, the body will be evaluated and the result saved internally. For all subsequent calls of that function within the run, the cached value will be returned without further computation, reducing computation time.
Note: Functions with arguments will almost certainly not be time invariant; if a function has an argument, then presumably there are some argument values for which the function will evaluate to different values.
Note: Incorrect application of caching to a time varying function will lead to incorrect results, so we recommend that the time varying property be toggled off for a function only when it is definitely time invariant, run time is critical, and RPL set analysis has indicated that a significant portion of the run is spent evaluating the function.
Note: During block evaluation (e.g. within a rule or accounting method), the workspace remains unchanged (because RPL expressions evaluate without side effects), so it is safe to cache values for functions without arguments within a single block. RPL does this automatically for all functions without arguments; multiple evaluations of such a function within the same block execution will cause the function to evaluate only once.
Selecting RPL Items
The RPL Item selector dialog is used whenever groups, rules, or functions (i.e. RPL items) are to be selected. For example, in diagnostics, you may select the rules for which you want to print messages.
Figure 2.22
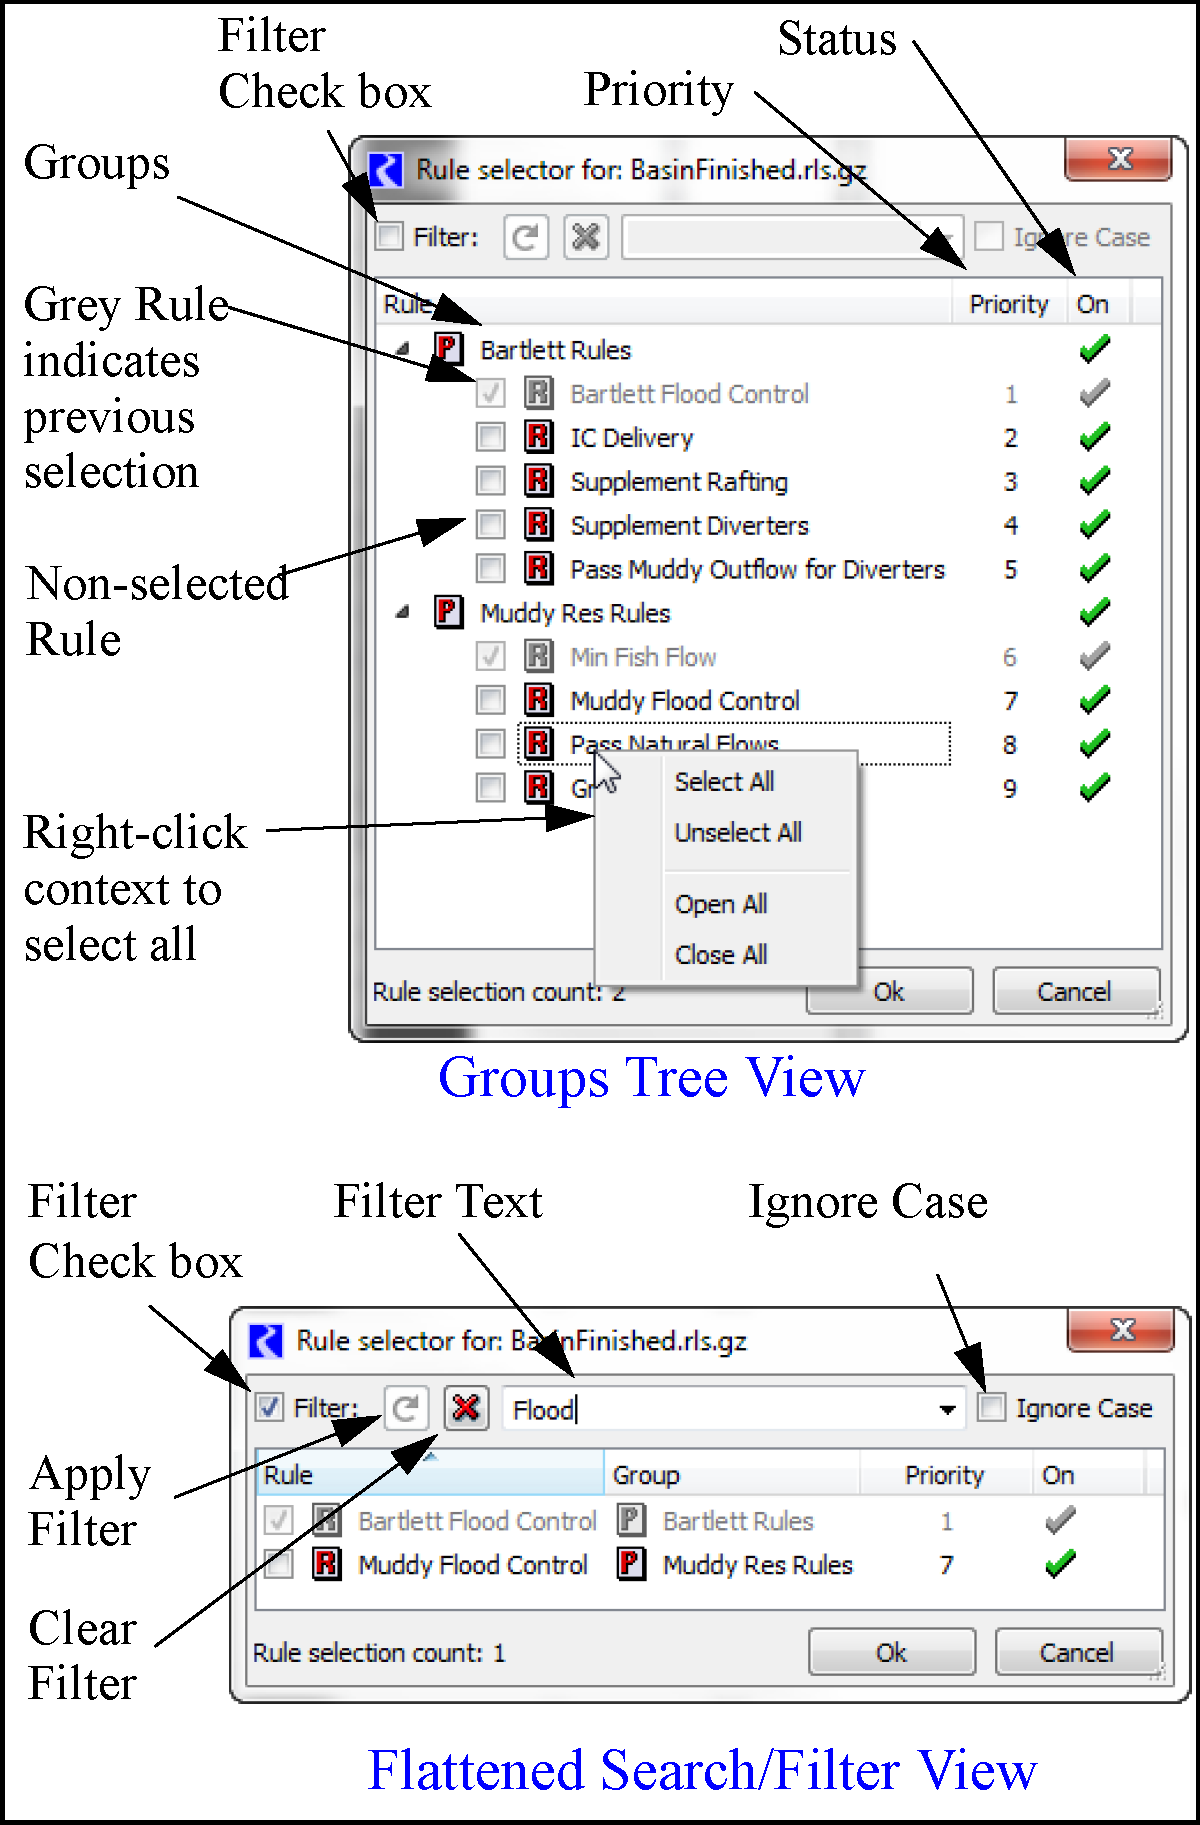
This dialog initially shows the groups and rules in a tree view. Also shown are the rule priority and rule status. In this dialog, you select the RPL items by selecting the boxes to add check marks next to one or more items. Depending on the context from which this dialog is called, you may be able to select one or many items. Items that have been previously selected for display are shown in grey and cannot be deselected. They can only be removed from the dialog from which this dialog was called.
Tip: All items can be selected by right-clicking and choosing Select All.
You can also select the Filter check box to show a flattened list of the rules. Then you can sort by column heading or filter by entering a text string at the top. Use the green arrow to refresh, red X to clear the filter, and the Ignore Case check box to do a case insensitive filter. Select RPL items by checking the boxes as described above.
Developing Efficient RPL Expressions
RPL expressions are built using the Palette; see “RPL Palette” for details. Together with user and predefined functions, these provide all of the pieces necessary to create a simple or complex RPL expression; see “RPL Predefined Functions Reference” for details. Typically, an analysis of your RPL set performance is necessary to locate slow or inefficient items. See “RPL Analysis Tool” in Debugging and Analysis for details on the tools, particularly the RPL Analysis Tool.
Following are some suggestions to writing efficient RPL sets in terms of performance.
• Use predefined functions or operators when available. In general, always prefer a built-in operator or predefined function to a user-defined function (or complex expression) which performs the same computation.
• Move complex logic to user defined functions. This not only makes the logic more readable and easier to debug, but it makes performance analysis easier. This is because the RPL set analysis tool reports the times for function calls but not for other parts of expressions (i.e., the granularity of the performance information is per function).
• Use WITH expressions to avoid re-evaluating expensive expressions.
• Make sure there is no unnecessary LIST processing or STRING manipulation.
• OBJECT and SLOT representations of workspace objects and slots are generally more efficient than string representations of them. For example, the expression
GetSlot( (STRINGIFY reservoir) CONCAT “^” CONCAT account CONCAT “.Storage” )
takes significantly longer to evaluate (and is more complex) than
reservoir ^ ( account CONCAT “.Storage” )
This also is slower and harder to read than
reservoir ^ account . “Storage”
When accessing accounting slots, the final option is preferred for performance and readability.
• For a large model, it is computationally expensive to obtain a SLOT given the full slot name (i.e., a STRING representation of the slot) because RiverWare must first break the string into its components, then look for an object with the appropriate name. Once the object is found, then for accounting slots RiverWare must search through the accounts. Finally a search is conducted for a slot on the object/account with the given slot name. Thus when referencing slots, one should take special care to apply the suggestions mentioned above.
• Make sure that time consuming functions like FloodControl() or the hypothetical simulation functions are not being called more than necessary.
• Use functions with no arguments to cache values. If a function has no arguments, then the first time it is executed in a block (a rule, accounting method, optimization goal, initialization rule, MRM rule or expression slot), the return value is cached. For the remainder of the block execution, the function need not be evaluated again, the cached value is used. Thus, if you have multiple assignments within one rule that call the same argument-less function, the function will be evaluated once and the value will be used for all function calls.
• If you are sure that a function with no arguments is always going to return the same value regardless of the timestep, set the Set Time Varying toggle to be off. This will lead to the function’s first return value being reused throughout the run. See “Time Invariant Functions and Function Value Caching” for details.
• MAPLIST is an efficient expression which operates on a list and returns a list, but if one wants to operate on a list and compute a single value, FOR expressions (or a variation of FOR, like SUM or AVE) are more efficient. E.g.
Sum( MAPLIST (...))
is slower than
FOR ( ... ) SUM
...
END FOR
Revised: 11/11/2019