
RiverWare Policy Language (RPL)
RPL User Interface
RPL Sets
This document describes basic rule, function, method, or constraint construction with the RPL Set Editor. The RPL Set Editor is the main window through which policy is managed. From this window:
• Rules, functions, or methods, may be added, deleted, opened, named, prioritized and turned off or on.
• Entire RPL sets may be opened, closed, saved, loaded, exported, imported and unloaded.
Types of RPL Sets
This document refers to all of the RPL sets in RiverWare as follows. Table 2.1 shows information about each set that will be referred to later
RPL Set | Set Color | Save Location | Link to More information |
|---|---|---|---|
Expression Slot Set |  Orange Orange | In model file | |
Global Function Set |  Brown Brown | Separate file OR in model file | |
Initialization Rules |  Teal Teal | In model file | |
Iterative MRM Ruleset |  Navy Blue Navy Blue | In model file | |
Object Level Accounting Method Set |  Green Green | In model file | |
Optimization Goal Set |  Purple Purple | Separate file OR in model file | |
Rulebased Simulation (RBS) Ruleset |  Red Red | Separate file OR in model file |
When dealing with specific menus, this document will use the terminology set in place of any type of set. Each set has a unique menu name and should be used accordingly.
Set Name
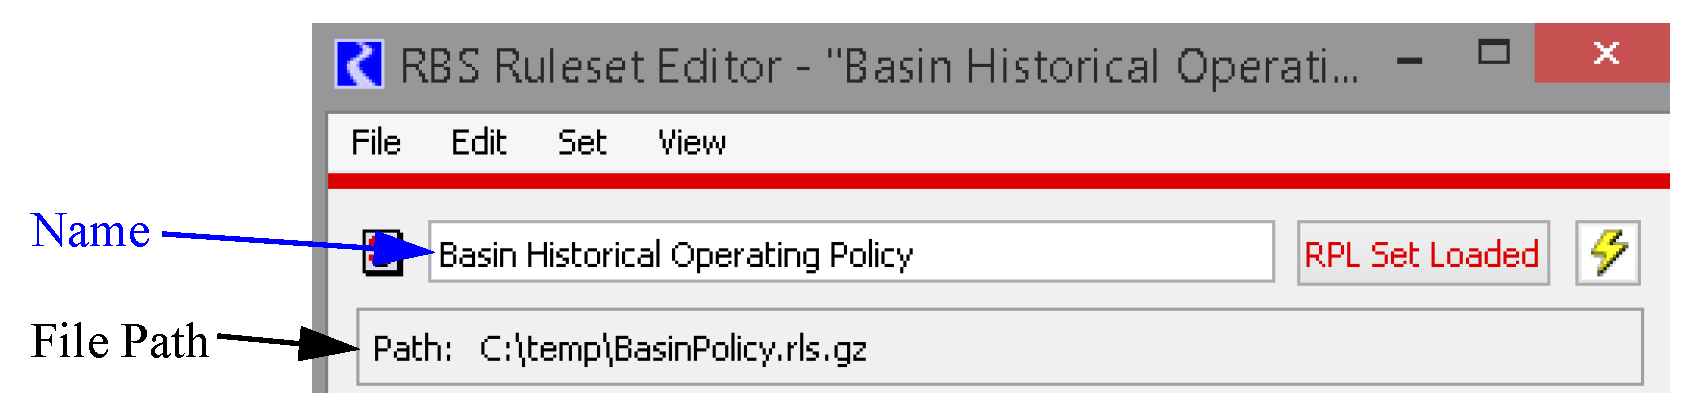
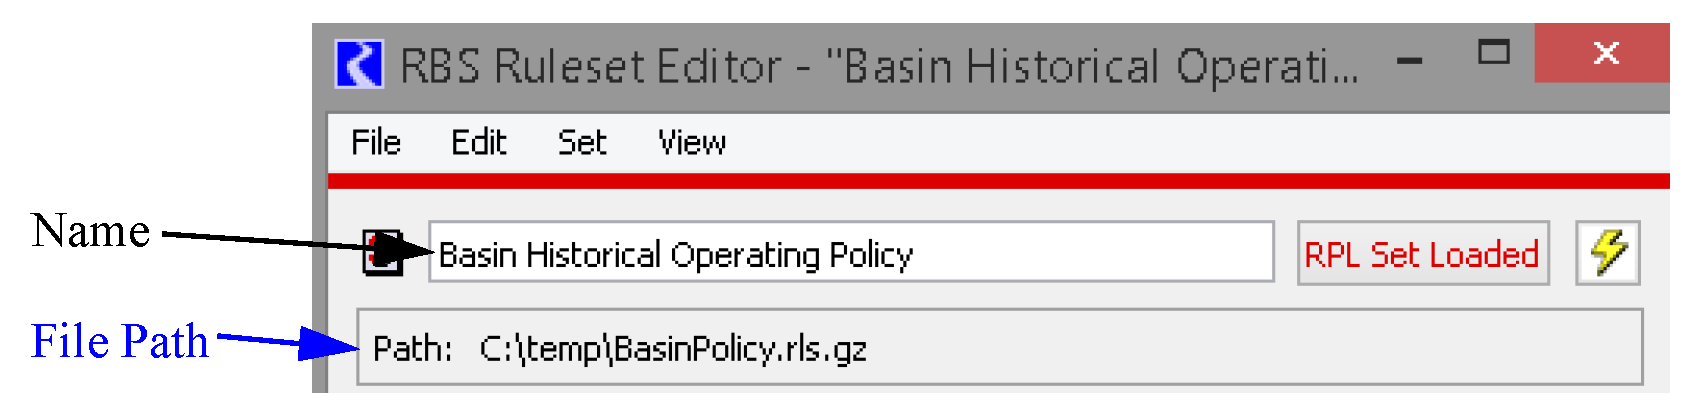
Each set can have a user-specified name that is separate from the file path. The default for a newly created set is RPL Set N. Enter your desired name in the field shown in Figure 2.1.
Figure 2.1
Note: Prior to RiverWare 7.0, the name and the file name were the same. When loading an old set into 7.0, the name defaults to the file name. You can change the name if desired.
Save Location
Based on the type, the set is saved in one of two locations, as shown in the Table 2.1.
• In the model file or
• In an external file
Four of the sets (expression slot set, initialization rules, iterative MRM rulesets, and accounting method set) are always saved in the model file. Global functions sets, Rulesets and Goal sets may be saved in either location as specified in the Run Parameter for the appropriate controller. This is accessed from the Run Control dialog. When the Rulebased Simulation or Optimization controller is selected, then the View, then Optimization/Rulebased Simulation Run Parameters menu opens the parameter dialog.
The Save Loaded RPL Set with Model checkbox controls where the set is saved. By default, this option is disabled, meaning the set is saved in a file external to the model. Enabling it will save the Loaded set with the model file.

Note: This toggle only applies to the loaded set. Any other opened sets will not be saved with the model file.
All of the Run Parameter dialogs contain an option to Save All Global Functions Sets with Model toggle. By default, this option is disabled, meaning that all global functions sets are saved in files external to the model. Enabling it will save all open global functions sets with the model file.
Once a set is saved with the model file, there is some risk that it may be lost if:
• The toggle above is unchecked and the model is saved.
• The set is unloaded and the model is saved.
• Another set is loaded and the model is saved.
• Closing the set and the model is saved.
In each case, a warning message is presented to allow you to confirm that the action is intended. A set saved with the model is automatically loaded when the model is opened. The set is then minimized. You can bring it to the front at anytime using the workspace Policy menu or the buttons on the bottom of the workspace.

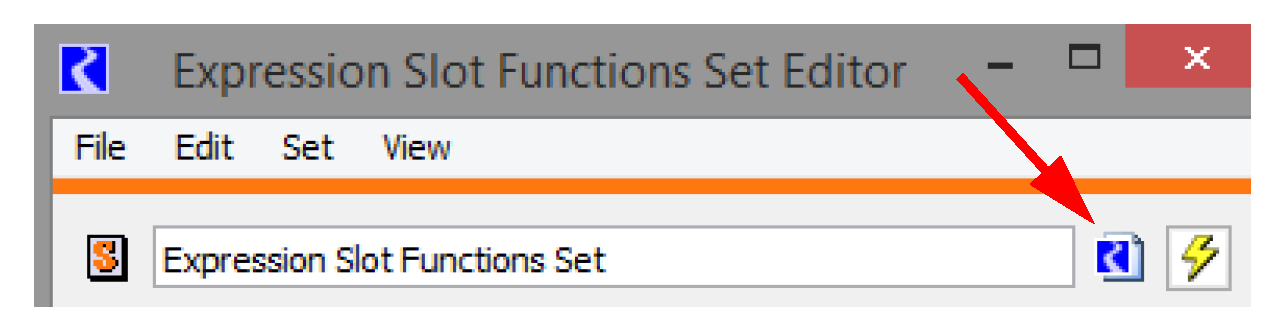
Further, for any set that is saved with the model, a model file icon is displayed at the top right of the dialog.
Sets that are saved in an external file have the path shown below the set Name.
Managing RPL Sets
Following is a description of managing RPL sets. Much of this information is specific to the RPL set in question.
Actions Specific to Rulesets, Optimization Goal Sets, and Global Function Sets
The following actions are specific to managing a set (either Ruleset, Optimization Goal Set, or Global Function Set) and are performed on an entire set. Figure 2.2 illustrates.
Figure 2.2
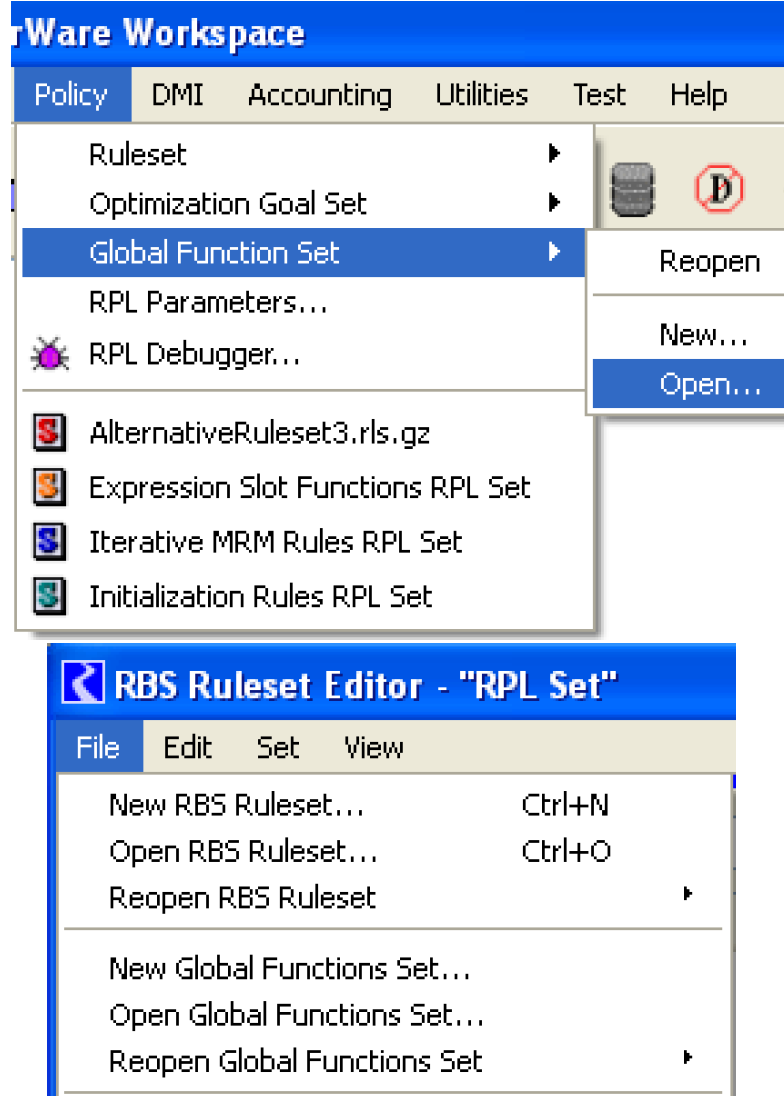
• New. A new RPL set is created by selecting Policy, then Set, then New from the main RiverWare workspace or File, then New Set from an already opened set.
• Open. An existing RPL set (saved as a file) is opened by selecting Policy, then Set, then Open from the main RiverWare workspace or File, then Open Set from an already opened set. Either of these commands invokes a file chooser in which the desired set is selected. Each set is saved in a separate file. Several sets may be opened at once. Each opened set and any windows opened from these sets are identified by a unique color band across the top of their windows.
• Reopen. An existing RPL set (saved as a file) can be reopened by selecting Policy, then Set, then Reopen from the main RiverWare workspace or File, then Reopen Set from an already opened set. Either option then presents a cascading menu of recently opened sets and folders.
• Reopen and Load. An existing RPL set (saved as a file) can be reopened and loaded by selecting Policy, then Set, then Reopen and Load from the main RiverWare workspace. Then, a cascading menu of recently opened sets and folders is presented.
• Show RPL set. When a set is opened, the name of the set is added to the workspace Policy menu as shown in Figure 2.3. Only the short name is shown in the menu, but the full path is shown in the workspace status bar. Use this menu to raise/show the desired set. When the set is saved with the model file, the menu will show it as RPL Set.
Note: The expression slot, initialization rules, MRM and accounting methods sets (saved with the model) are always shown too. Also, the workspace has buttons to show the loaded RBS ruleset  or optimization goal set
  . The bar is colored when there is a loaded set, grey when there isn’t. Select one of the buttons (when a set is loaded) to raise that set to the top.The workspace also shows color coded buttons for all the opened sets. Tooltips indicate their names, as shown in Figure 2.4.
or optimization goal set . The bar is colored when there is a loaded set, grey when there isn’t. Select one of the buttons (when a set is loaded) to raise that set to the top.The workspace also shows color coded buttons for all the opened sets. Tooltips indicate their names, as shown in Figure 2.4. Figure 2.3
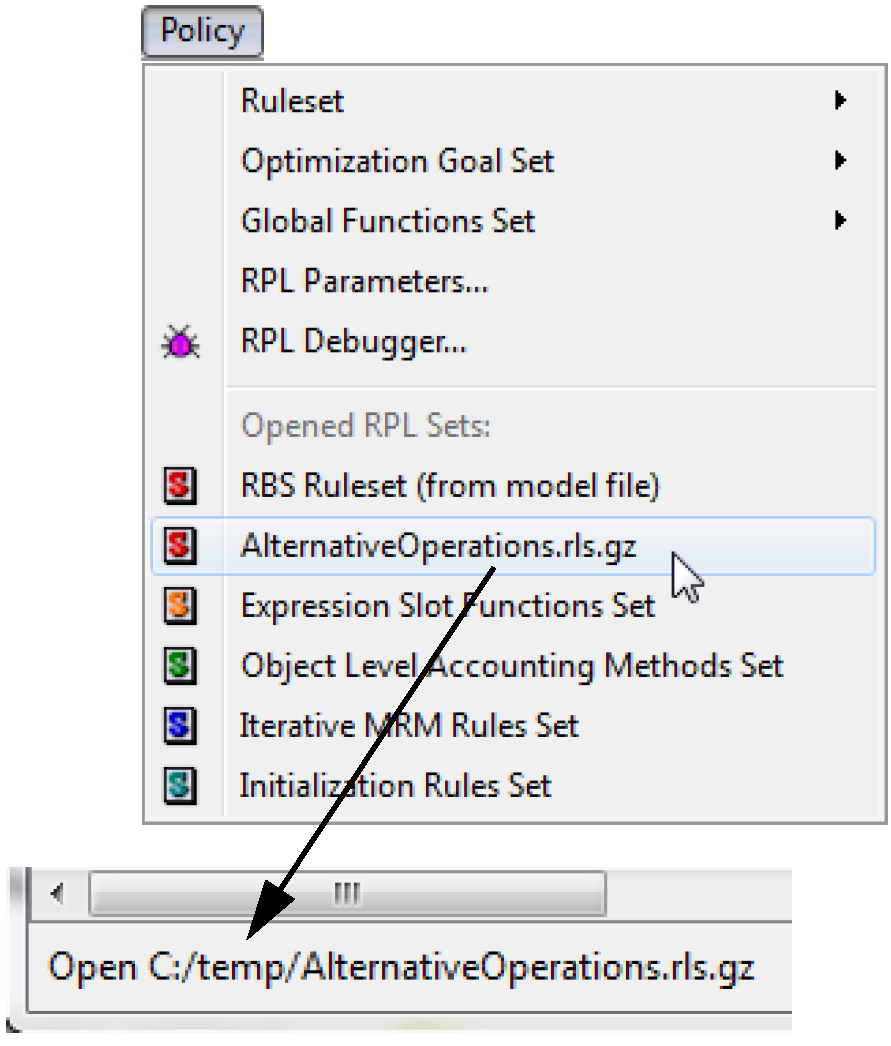
Figure 2.4

• Save. The RPL set is saved to a file by selecting File, then Save Set in the Set Editor menu bar. The name and directory of the file to which the RPL set is saved is that from which it was last loaded or to which it was last saved.
• Save As. A new RPL set must be given a name and saved for the first time by selecting File, then Save Set As in the Set Editor menu bar. This command is also used to save an open RPL set to a different filename and/or directory from which it was last loaded or saved. The Save Set As command invokes a file chooser in which the RPL set’s new path and filename must be specified.
• Load. A ruleset or goal set is loaded into a model for use during a run by selecting the RPL Set Not Loaded button on the right side of the Set Editor menu bar. When the set is loaded, the button text changes to RPL Set Loaded and the colored bar along the top of the Set Editor becomes red. Only one ruleset at a time may be loaded for use by a model. Loading a set when another is already loaded will unload the first ruleset. Global Function Sets are not loaded, any open set applies to all other sets.
• Unload. A loaded set is unloaded from a model by selecting the RPL Set Loaded button on the right side of the Set Editor menu bar. When the set is unloaded, the button text changes to RPL Set Not Loaded, and the red bar along the top of the Set Editor reverts to its original color (blue, green, yellow, purple, etc.).
• Close Window (Ctrl+W). An opened RPL set is closed but not removed by selecting File, then Close Window in the Set Editor menu bar. It can be re-shown using the Policy menu on the workspace.
• Close (and Unload) Set. An opened RPL set is closed by selecting File, then Close (and Unload) Set in the Set Editor menu bar. Closing a loaded set automatically unloads the set from the model. Closing does not automatically save changes to the set since the last save. This option is not available for those sets always saved with the model file.
Actions specific to Accounting Method Set, Expression Slot Set, Initialization Rules, and Iterative MRM Sets
The following actions are specific to the Object Level Accounting Method set, the Expression Slot set, Initialization Rules, and the Iterative MRM set. Each of these RPL sets is saved with the model so they do not need to be opened or saved separately.
To show the Object Level Accounting Method set (when accounting is enabled):
• From the Workspace choose the Policy, then Accounting Methods RPL Set or choose Accounting, then Open Accounting Methods RPL Set
To show the Expression Slot RPL set:
• From the Workspace choose the Policy, then Expression Slot RPL Set
To show the Initialization Rules RPL set:
• From the Workspace choose the Policy, then Initialization Rules Set
To show the Iterative MRM RPL set:
• From the Workspace choose the Policy, then MRM RPL Set. The MRM RPL set can also be opened from the MRM run control dialog. See “Iterative Runs” in Solution Approaches for details.
These sets are always active in their respective context so it is not necessary to load or unload the sets. The dialog for the sets can be closed using the File, then Close Set menu. Again, each of these sets is saved with the model file so do not need to be separately saved.
The Initialization Rules Set Editor dialog does have a File, then Save Initialization Rules Set As menu item to save the initialization rules to a file. A File, then Replace Initialization Rules Set from File menu item allows the initialization rules set to be replaced by the contents of a specified file. These menu items allow an initialization rules set to be moved between models via a file. However there is only a single instance of initialization rules in a model and this set is still saved and loaded with the model file. See “Initialization Rules” in Solution Approaches for details on Initialization Rules.
Tour of a RPL Set
In RPL sets there is an upper level construct specific to the RPL set. For example, in a ruleset, a rule is the construct; in an object level accounting method set, a method is the upper level construct. In this document, a block refers to the upper level construct for each of these sets and will be used in all descriptions. Table 2.2 lists the block for each type of set.
RPL Set | Upper-level Block | |
|---|---|---|
 | Expression Slot Set | N/A |
 | Global Function Set | N/A |
 | Initialization Rules Set | Rule |
 | Iterative MRM Ruleset | Rule |
 | Object Level Accounting Method Set | Method |
 | Optimization Goal Set | Goal |
 | RBS Ruleset | Rule |
Note: Expression Slot and Global Function Sets do not have the paradigm of a block. For Expression Slot Sets, the analogous upper level construct is the expression slot itself. Global Function Sets do not have the concept of a block as they contain only global utility groups and functions.
This remainder of this section describes the components of a RPL set when using the RPL set editor.
Elements
A RPL set includes the following general elements:
• Policy Groups: Policy groups are containers for blocks and functions. The functions within a policy group are available only to blocks and functions within that policy group.
• Utility Groups: Utility groups are containers for functions. The functions within a utility group are available to blocks and functions within any policy group.
• Blocks: Blocks (Rules/Goals/Methods) are prioritized expressions of policy which assign slots and/or generate diagnostic messages.
• Functions: Functions are subroutines called from blocks or other functions, which evaluate to a value in one of the expression data types.
• Report Groups: Report groups provide an organizational grouping of related RPL and workspace objects.
• Report Items: Report items refer to blocks or functions in the RPL set or to workspace objects.
Table 2.3 shows all the RPL elements and their icons. The icons are shown in grey, but each set has its own color that is used for the letter.
Letter | Icon | Item | Letter | Icon | Item | |
|---|---|---|---|---|---|---|
G |  | Goal | R |  | Rule | |
M |  | Method | S |  | Set | |
P |  | Policy Group | = |  | Statement | |
 | Report Group | F |  | User-defined Function | ||
 | Report Item | U |  | Utility Group |
Predefined functions use the F icon but always have the light blue color.

RPL Set Editor View
Information about a RPL set is displayed in the RPL Set Editor dialog. Each policy group, utility group, block, and function is represented in the RPL Set Editor on a different line. Figure 2.5 illustrates.
Figure 2.5
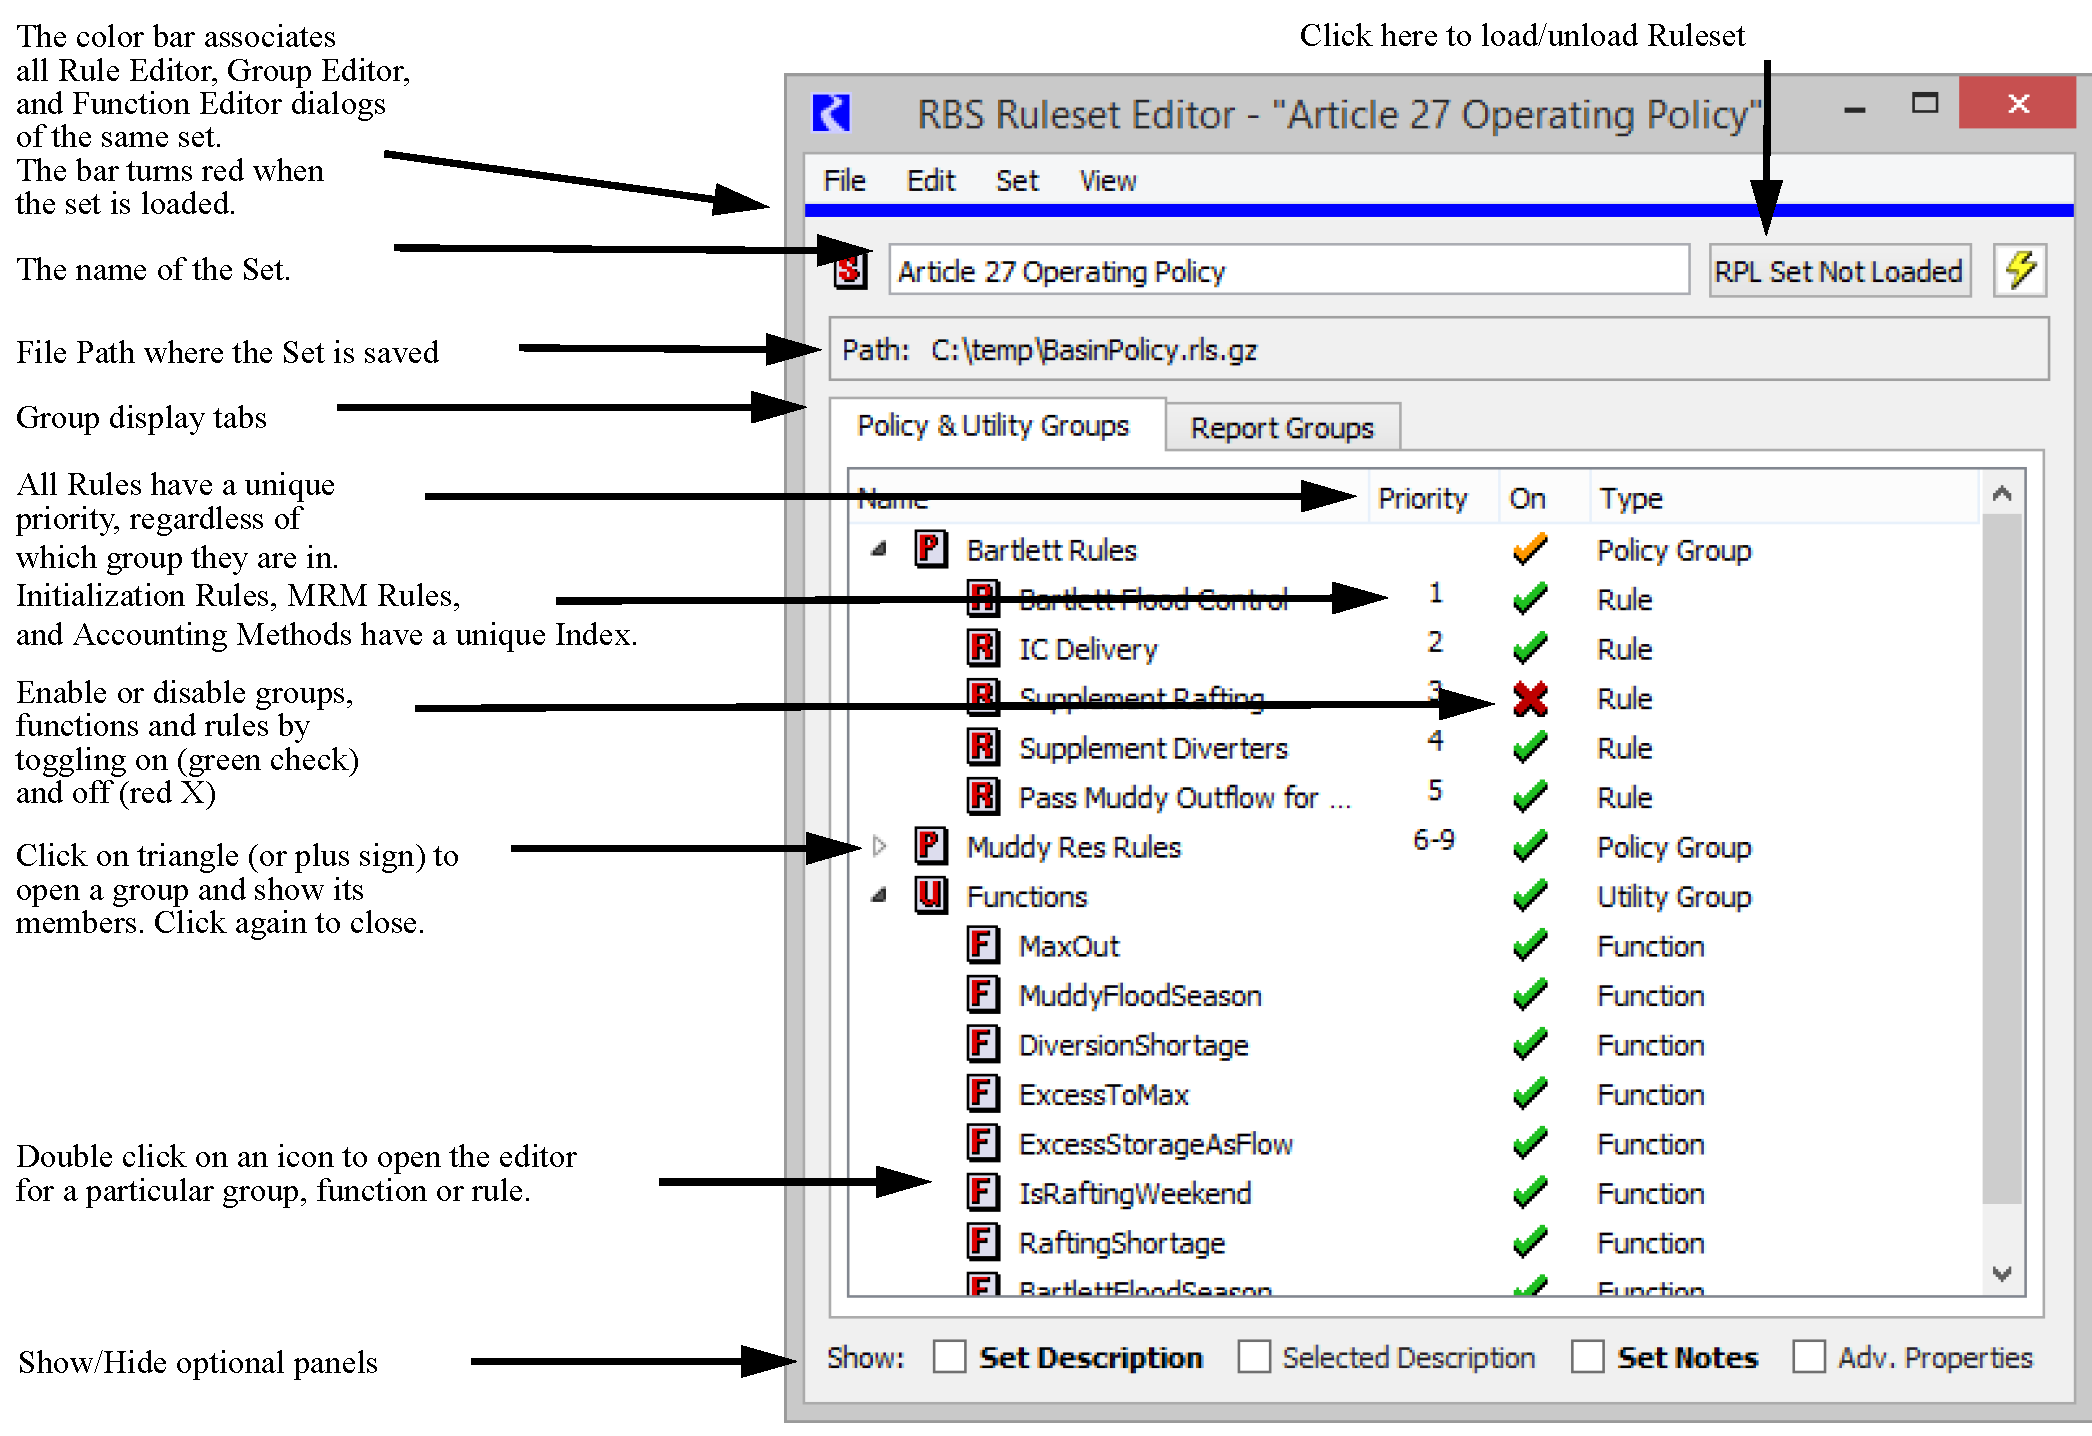
Each line includes the following information:
• Name: The name column contains an icon representing the type of the element and its name. All elements are assigned a default name when created.
• Priority: A priority is shown to the right of an element name, when appropriate. Policy groups, utility groups, and functions do not have priorities but policy groups display the range of priorities of its member rules. Priorities number indicates the relative importance of the block.
• Index: For Initialization Rulesets, Object Level Accounting Method Sets, and MRM Rulesets, the Index column is shown. The priority column may not be shown. Rules or methods have a unique Index which is how the rules and methods are referenced.
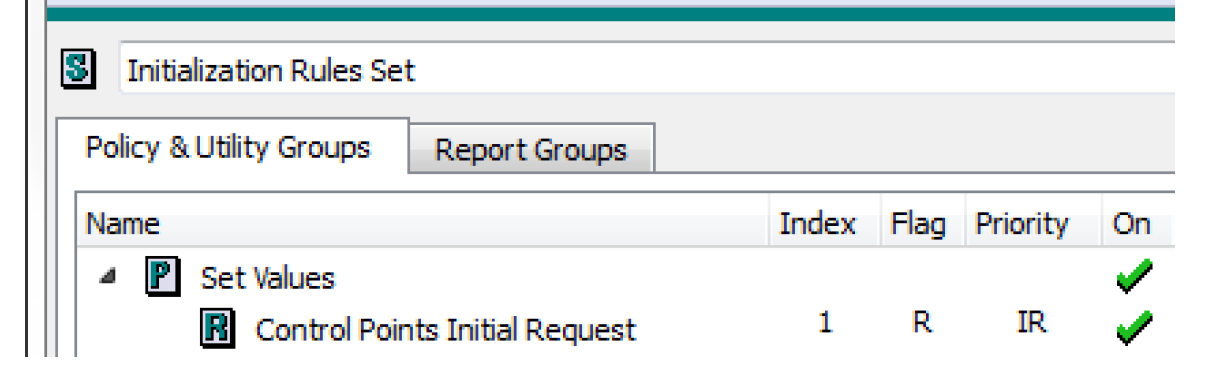
• Flags: Initialization Rules allow you to specify the flag that is set. For initialization Rulesets, a Flags column is shown.
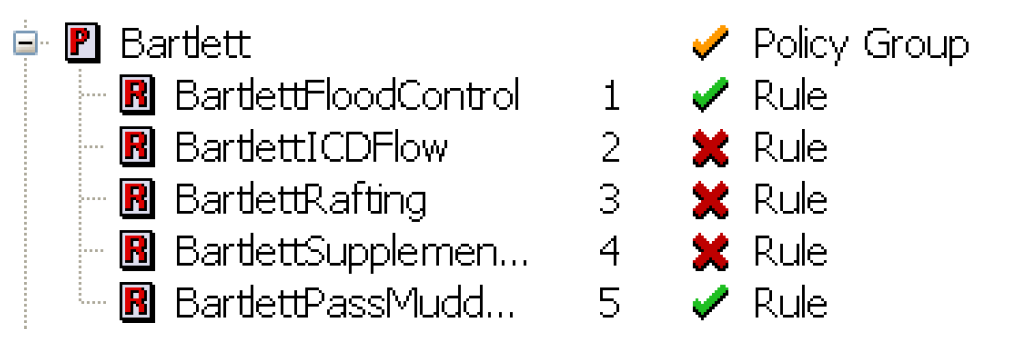
• On/Off Status: All elements may be turned on or off independently by selecting the green check mark or red X in their line, unless mouse editing has been disabled. If mouse editing has been disabled, a block or function can be enabled or disabled by right-clicking. This will bring up a menu to enable or disable the element. A green check mark indicates that an element is enabled. A red X indicates that an element has been disabled. An element that is disabled cannot be used during the model run. Disabling a policy group or utility group disables all of the blocks and functions within that group. Selecting a group’s red X now enables the entire group without making any changes. This prevents you from inadvertently changing the status of an item in a group that is disabled, only to find that it is now different when the entire group is re-enabled. If all items in a group are disabled (red X), then the entire group is considered disabled and the group will also have a red X. If you select the group’s red X, a warning message will appear to indicate that at least one item in the group should be enabled. An orange check mark on a policy or utility groups specifies that one or more items in that group is disabled, as shown in Figure 2.6. As before, you can select the orange check to disable the entire group. Selecting it again, restores the previous state thus showing an orange check.
Figure 2.6
• Type: The type of each item in a set is shown in the Type column.
There are several additional pieces of information that can optionally be shown from a RPL set as accessed from the View menu.
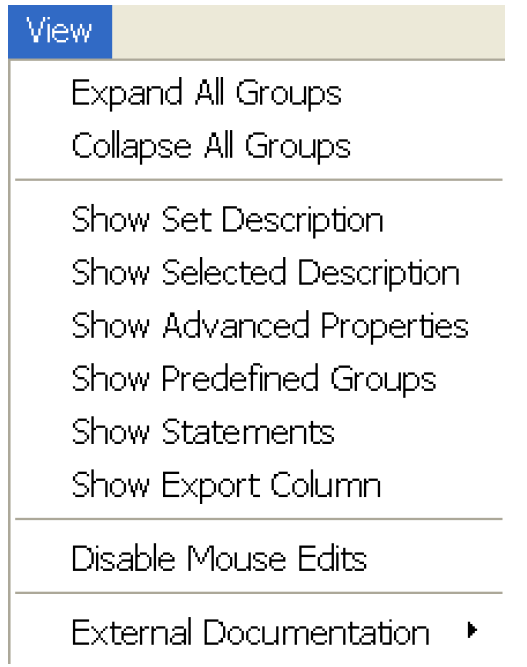
Expand or Collapse All Groups
A RPL set’s contents may be viewed with all groups expanded, some groups expanded, or all groups collapsed. Use one of the following methods to expand or collapse all groups simultaneously:
• Select View, then Expand All Groups or Collapse All Groups item in the RPL Set Editor menu bar.
• To expand or collapse a single group, select the triangle next to the group name.
Note: The following four items can be shown using the View menu or selecting the toggle in the Show: row. If there is an entry in these panels (or a non-default value) the text is bold. For example, in the following screenshot, the Set Description and Set Notes have a non-default entry.

Show RPL Set Description
A description of the RPL set may be typed into the RPL Set Description: text frame and saved in the RPL set file. The description may contain any combination of letters, numbers, spaces and punctuation, except double-quotes (“ ”). The area is opened and closed by toggling the View, then Show RPLSet Description in the menu bar or using the Set Description toggle at the bottom of the window.
Show Selected Description
A special expanded area of the RPL set is used to enter a description of any specific block. The area is opened and closed by toggling the View, then Show Selected Description in the menu bar of the RPL Set Editor dialog or using the Selected Description toggle at the bottom of the window. Select a block name to view the description of that specific block.
Show Set Notes
Notes about the RPL set may be typed into the Set Notes text frame and saved in the RPL set file. The Notes may contain any combination of letters, numbers, spaces and punctuation, except double-quotes (“ ”). The area is opened and closed by toggling the View, then Show Set Notes in the menu bar or using the Set Notes toggle at the bottom of the window. Notes are often used for commenting on development practices; they provide a place to annotate when/why/who changed the set.
Show Advanced Properties
The Advanced Properties are accessed from the View, then Show Advanced Properties menu or using the Adv. Properties toggle at the bottom of the window The Advanced Properties area has the following components.
• Agenda Order. Rulesets can be configured to execute in either ascending or descending Priority/(it called Index in Initialization Rulesets) order. Descending order executes the highest priority block first, then each of the lower priority blocks (1,2,3,...). Ascending order executes the lowest priority block first, then each of the higher priority blocks (...,3,2,1). Ascending Priority (...3,2,1) is the default selection and the recommended priority order. The agenda order is only applicable and shown for RBS rulesets, initialization rules, iterative MRM rulesets and optimization goal sets. Also, optimization goal sets always must execute in the 1,2,3... order and cannot be changed.
• Precision. The precision spinner determines the number of digits after the decimal which are displayed for numbers in blocks and functions. 8 is the default value. The displayed precision has no effect on the 17 significant figures of internal precision used for calculations.
Show Predefined Groups
In the View, then Show Predefined Groups menu, you can choose to show the groups for the predefined functions. When you also show Selected Description above, the documentation for that predefined function is shown in the description panel.
Show Statements
In the View, then Show Statements menu, you can choose to show statements (assign, print, etc) as another level in the RPL dialog tree-view. You can also change the name of statements once shown. To do this, right-selects that item to show the context-sensitive menu. Then, selecting Rename will open an inline name editor and you can enter a new name. In addition to the RPL Set view, this statement name will be shown in the RPL debugger and RPL Analysis Tool.
Show Export Columns
The View, then Show Export Column menu allows you to specify if the selected row should be exported. See “Exporting and Importing RPL Sets” for details on Import and Export of RPL sets.
Disable Mouse Edits
It is easy to rename a group, block or function, change the priority of a block, and turn a block on or off. To prevent accidental changing of a block priority or turning the block on or off in the Set Editor as a result of mouse clicks, select View, then Disable Mouse Edits. This will prevent editing with mouse clicks in the RPL Set Editor. To edit a block or group after mouse editing is disabled, double-click or right-click the block, function, or group name to bring up an editor dialog. We highly recommend disabling mouse editing to prevent accidental changes to a RPL set.
External Documentation
View, edit, or configure the external documentation; see “RPL External Documentation” for details.
Editing RPL Sets
Following is a description of how to manage and edit RPL sets once they are open. This includes creating, naming, and editing blocks/groups, adding statements, and validating blocks or the entire set. See “Editing a RPL Expression” for details on editing individual expressions.
When a RPL set dialog opens, the Policy & Utility Groups tab is initially selected, presenting a comprehensive high-level view of the policy. Switching to the Report Groups tab provides a more selective, user-defined view.
Note: Many actions described below are appropriate only for one or the other main tabs (e.g., adding a new Report Group), and these actions are disabled when they do not apply.
Blocks and Groups
Naming Groups
To name a block or group, right-click or double-click the Name field of the block or group. Right-clicking will bring up a menu from which the editor dialog can be opened. Double-clicking will bring up an editor dialog directly. Type the name in the name field.
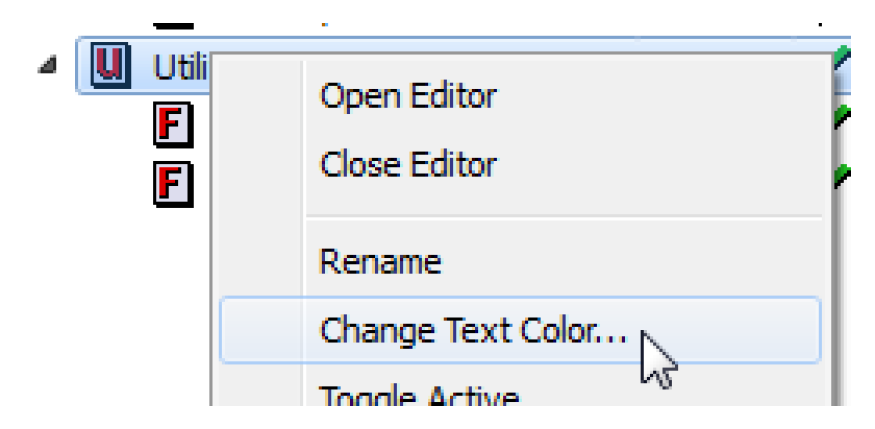
Name Color
The color of each name in the set can be specified by right-clicking an item and choosing Change Text Color. The selected color is then used by the RPL set editor, the RPL set analysis tool, and the RPL object selector dialogs for the name of the selected object. For groups, the color is changed for the group name and all members of the group that have the default black color.
Adding Groups
Groups (of type Policy, Utility, Global Utility, or Report) are added to a RPL set by selecting the appropriate item from the RPL set Set menu (e.g., Set, then Add Policy Group, Set, then Add Utility Group, Set, then Add Report Group, or Set, then Add Global Utility Group, for global function sets). New policy and utility groups are added to a set directly below the currently highlighted group of that type.
Add Blocks and Functions
Blocks and functions are added to a RPL set by highlighting the group they are to be placed in and selecting Set, then Add Block, Set, then Add User-Defined Function, or Set, then Add Global User-Defined Function (for global function sets) from the RPL set menu bar. New blocks and functions are added to a RPL set directly below the currently highlighted element of that type or at the bottom of a highlighted policy or utility group.
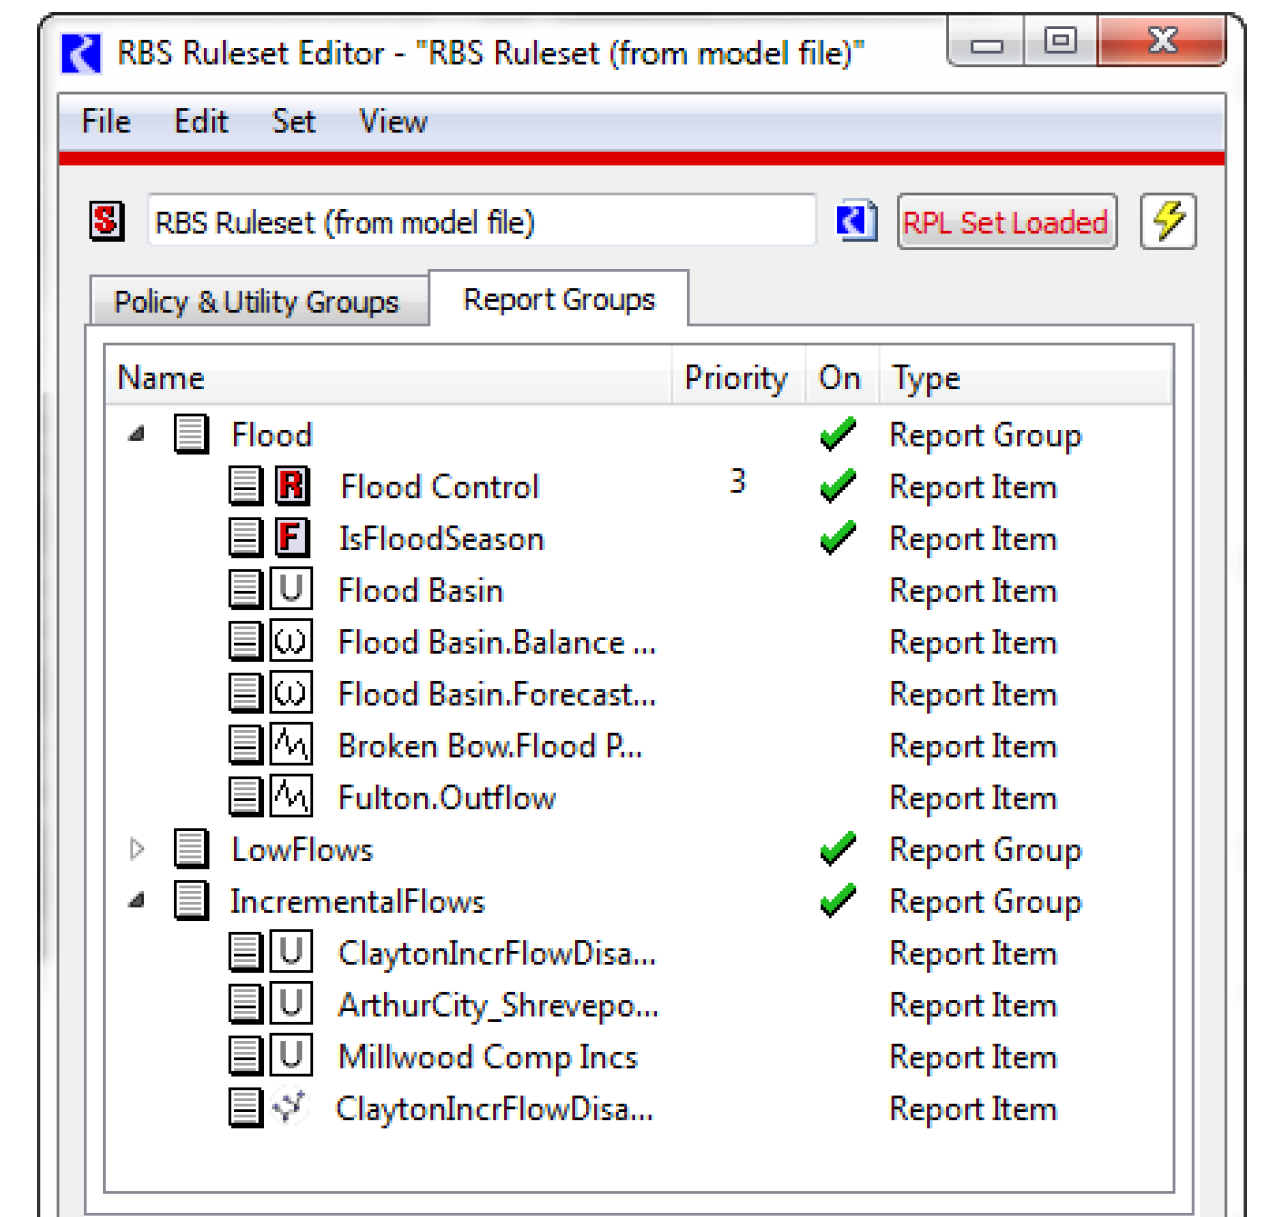
Add Report Items
The Report Groups tab, shown in Figure 2.7, provides a more selective, user-defined view of the policy/slots and object. Items are added to a RPL report group (visible in the Report Groups tab) by highlighting the group they are to be placed in and selecting the desired action from the Set, then Add Report Items menu, which contains an option to open a selector for each of the following types of objects.
• RPL Object Items Blocks and functions in the current set. See “RPL Printing and Formatting” for details on using the RPL Object selector.
• Object Items objects on the workspace.
• Slot Items slots on objects or accounts.
• Subbasin Item a single subbasin (automatic or user-defined).
Selecting the Ok button in the selection dialog will append the items for the selected objects to the end of the selected report group, but can be moved to any position by using the drag/drop technique.
Figure 2.7
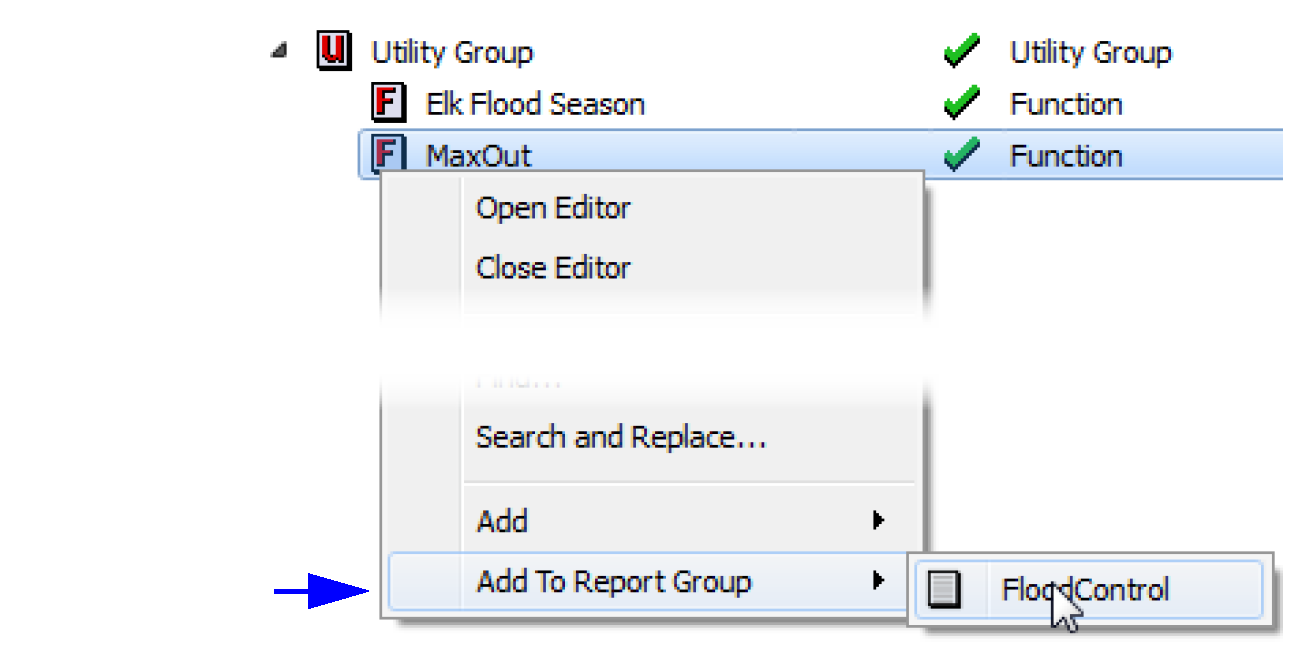
You can also right-click any RPL item (rule, function, etc), and choose Add to Report Group and select an existing Report Group. This will append the selected RPL item to the Report Group, as shown in Figure 2.8.
See “Report Layout Area” in Output Utilities and Data Visualization for details on including a Report Group in a model report.
Figure 2.8
Change Priorities
Blocks and functions may be rearranged in a set. By changing the relative priority of blocks, the order of firing, success of slot assignments, and order of dispatching is altered. Changing of priorities is often used to evaluate the effectiveness of different operational policies. Rearranging blocks and functions in a set is simple. To move a block in the list, select its icon and drag the block to the new desired location within the set. If you place it on another block, it will append after that block. Then, simply release the mouse button to drop the block in its new location. A dialog will ask you to confirm that you wish to complete the move. Select OK to confirm the move. All other blocks will be shifted to comply with the new priority structure. There is no need to reload a loaded set when rearranging blocks. Moving a block or a function is done in an identical manner. Predefined functions cannot be moved.
Delete Groups, Blocks and Functions
Groups, blocks and functions are deleted from a RPL set by highlighting them and selecting Edit, then Delete. Deleting a policy or utility group deletes the contents of the group as well. A confirmation dialog is shown.
Open and close Policy, Utility, and Report Groups.
Policy and utility groups which contain at least one block or function can be opened in a separate window by double-clicking their  ,
,  , or
, or  icon or highlighting them and selecting Set, then Open Editor They may also be expanded within the RPL Set Editor window by selecting the white tree-view triangle to the left of their icon or selecting View, then Expand. An expanded policy or utility group can be collapsed by selecting the white tree-view triangle again or selecting View, then Collapse.
, , or icon or highlighting them and selecting Set, then Open Editor They may also be expanded within the RPL Set Editor window by selecting the white tree-view triangle to the left of their icon or selecting View, then Expand. An expanded policy or utility group can be collapsed by selecting the white tree-view triangle again or selecting View, then Collapse.Open and close Rules, Functions, Methods, Goals, and Report Items.
Blocks and functions are opened in a RPL Viewer by double-clicking the icon or highlighting the item and selecting Set, then Open Editor. An opened block or function in the RPL Viewer may be closed by selecting red X on the tab or by selecting File, then Close Window from an individual RPL Editor.
Copy and Paste Groups, Blocks, and Functions
Groups, blocks and functions may be copied and pasted within a set or between open sets. An item is copied into memory by highlighting it and selecting Edit, then Copy. An item in memory is pasted just below any highlighted item in a RPL set by selecting Edit, then Append. An item may also be copied and pasted just below the item by selecting Edit, then Duplicate. Copy/Paste/Duplicate is only available within a single model; you cannot copy/paste items from RPL sets that are opened in separate instances of RiverWare. See “Exporting and Importing RPL Sets” for details on Import and Export to perform this task.
Note: A copied group/block/function can be pasted (or dragged and dropped) as a text representation into any text editor such as a word processor (Word), text editor (notepad), or email program (thunderbird). This includes all information about that group, block, function including the logic, description, active state, etc.
Exporting and Importing Groups and Blocks
In addition to copy and paste operations, it is also possible to export and import all or part of a RPL set. This is useful to share user-defined functions between two RPL sets. Using the export and import utility, you can share groups, blocks, and functions amongst these sets. See “Exporting and Importing RPL Sets” for details on the dialogs.
Validity
Before loading a newly built set into a model (or running with one of the other types of sets), the validity of the set must be checked. This can be done manually or is automatically done at run start. Manually validating a RPL set, however, allows you to perform these checks without having to bring up the Run Control dialog, start the run, and stop the run or wait for it to finish. Validating a RPL set checks for unspecified expressions, illegal object and slot names, conflicting expression types, and syntax errors. It does not check the consistency of unit types in mathematical expressions. Unit consistency is done while the block is evaluated during the run.
• To check the entire set, in the RPL Set Editor, select Set, then Check Validity.
• To check a single block or user defined function, select Block, then Check Validity.
If the block or set is valid, a confirmation window appears. Select OK and continue. Otherwise, a validation error dialog appears and the diagnostic window posts the location of the invalid expression. You then must fix the block.
Comparing RPL Sets
When developing RPL sets, it is often desirable and/or necessary to compare two RPL sets and see what is different between the sets. Following are some examples of when you might want to compare two RPL sets:
• You have multiple copies of similar RPL sets that represent different policy alternatives. You need to determine what is different to make sure they represent the correct policy alternative.
• Your co-worker has made changes to the RPL set and you want to know what changes have been made. Perhaps then you will incorporate the changes into a master version.
• You need to identify all of the changes that have been made to the set since some previous version.
The RPL Set Comparison Tool compares two RPL sets and shows you the differences between the sets. This allows you to see where items are different, what the specific differences are, and allows you to easily access the RPL set dialogs so that you can change one or both sets. Although this tool doesn’t support automatic merging, it provides quick access to the RPL dialogs and the ability to copy and paste from the utility to the RPL editors.
Accessing the Comparison Tool
From the RiverWare workspace, use the menu: Policy, then RPL Set Comparison Tool
Or from any RPL set editor dialog select Set, then Compare Set
Selecting RPL Sets to Compare
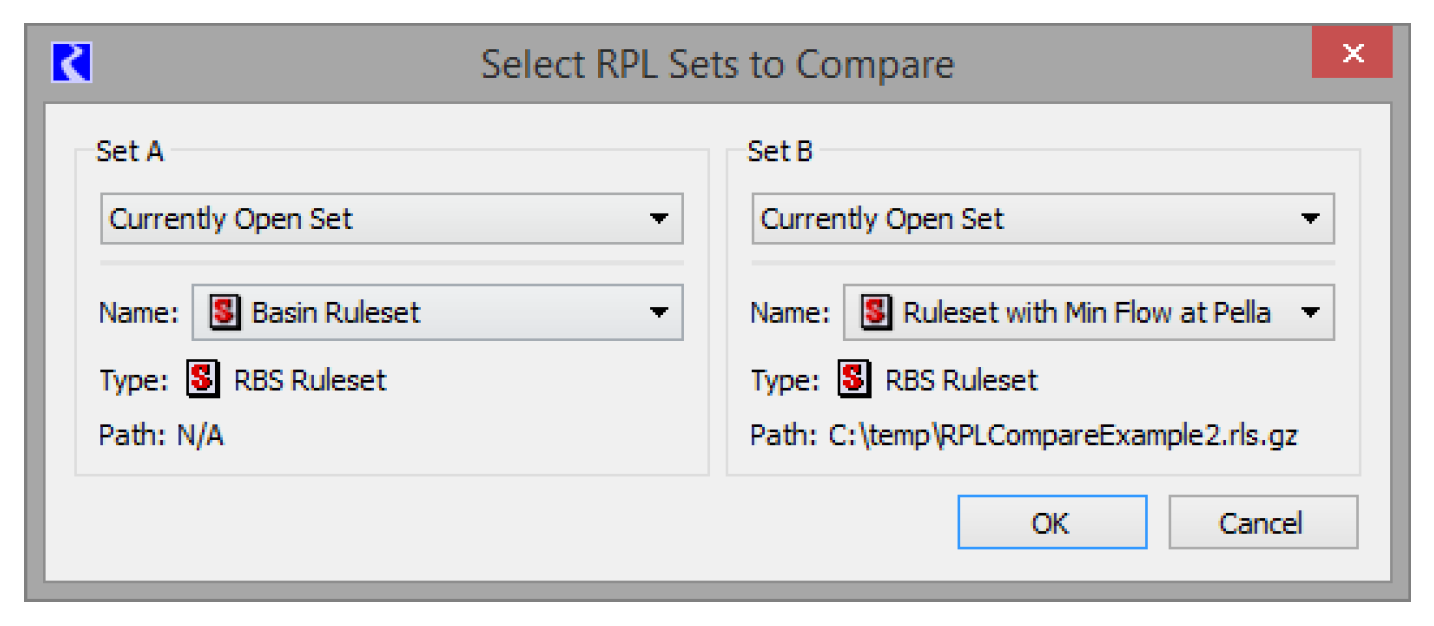
The tool opens and shows a dialog where you specify the two sets to compare. The two sets are referred to as Set A and Set B. For both sets, choose one of the following:
• Currently Open Set: Choose any of the sets that are open in the current model.
• Read Set from File: Choose a RPL Set on the file system.
• Read Set from Model: Choose a RPL Set that is embedded in another model file on the file system.
Next, choose the set.
For the Currently Open Set option, select the name of the RPL set. For the Read Set from File option, choose the type and file path. Use the More button to open a file chooser. For the Read Set from Model option, first select the model file. Then select the name of the set.
Note: If reading the set from another model file that was last saved with a RiverWare version prior to 7.0, you will get a notification that you must specify the type of the RPL set.

When finished, select OK. The main RPL Set Comparison Tool opens.
Tour of the RPL Set Comparison Tool
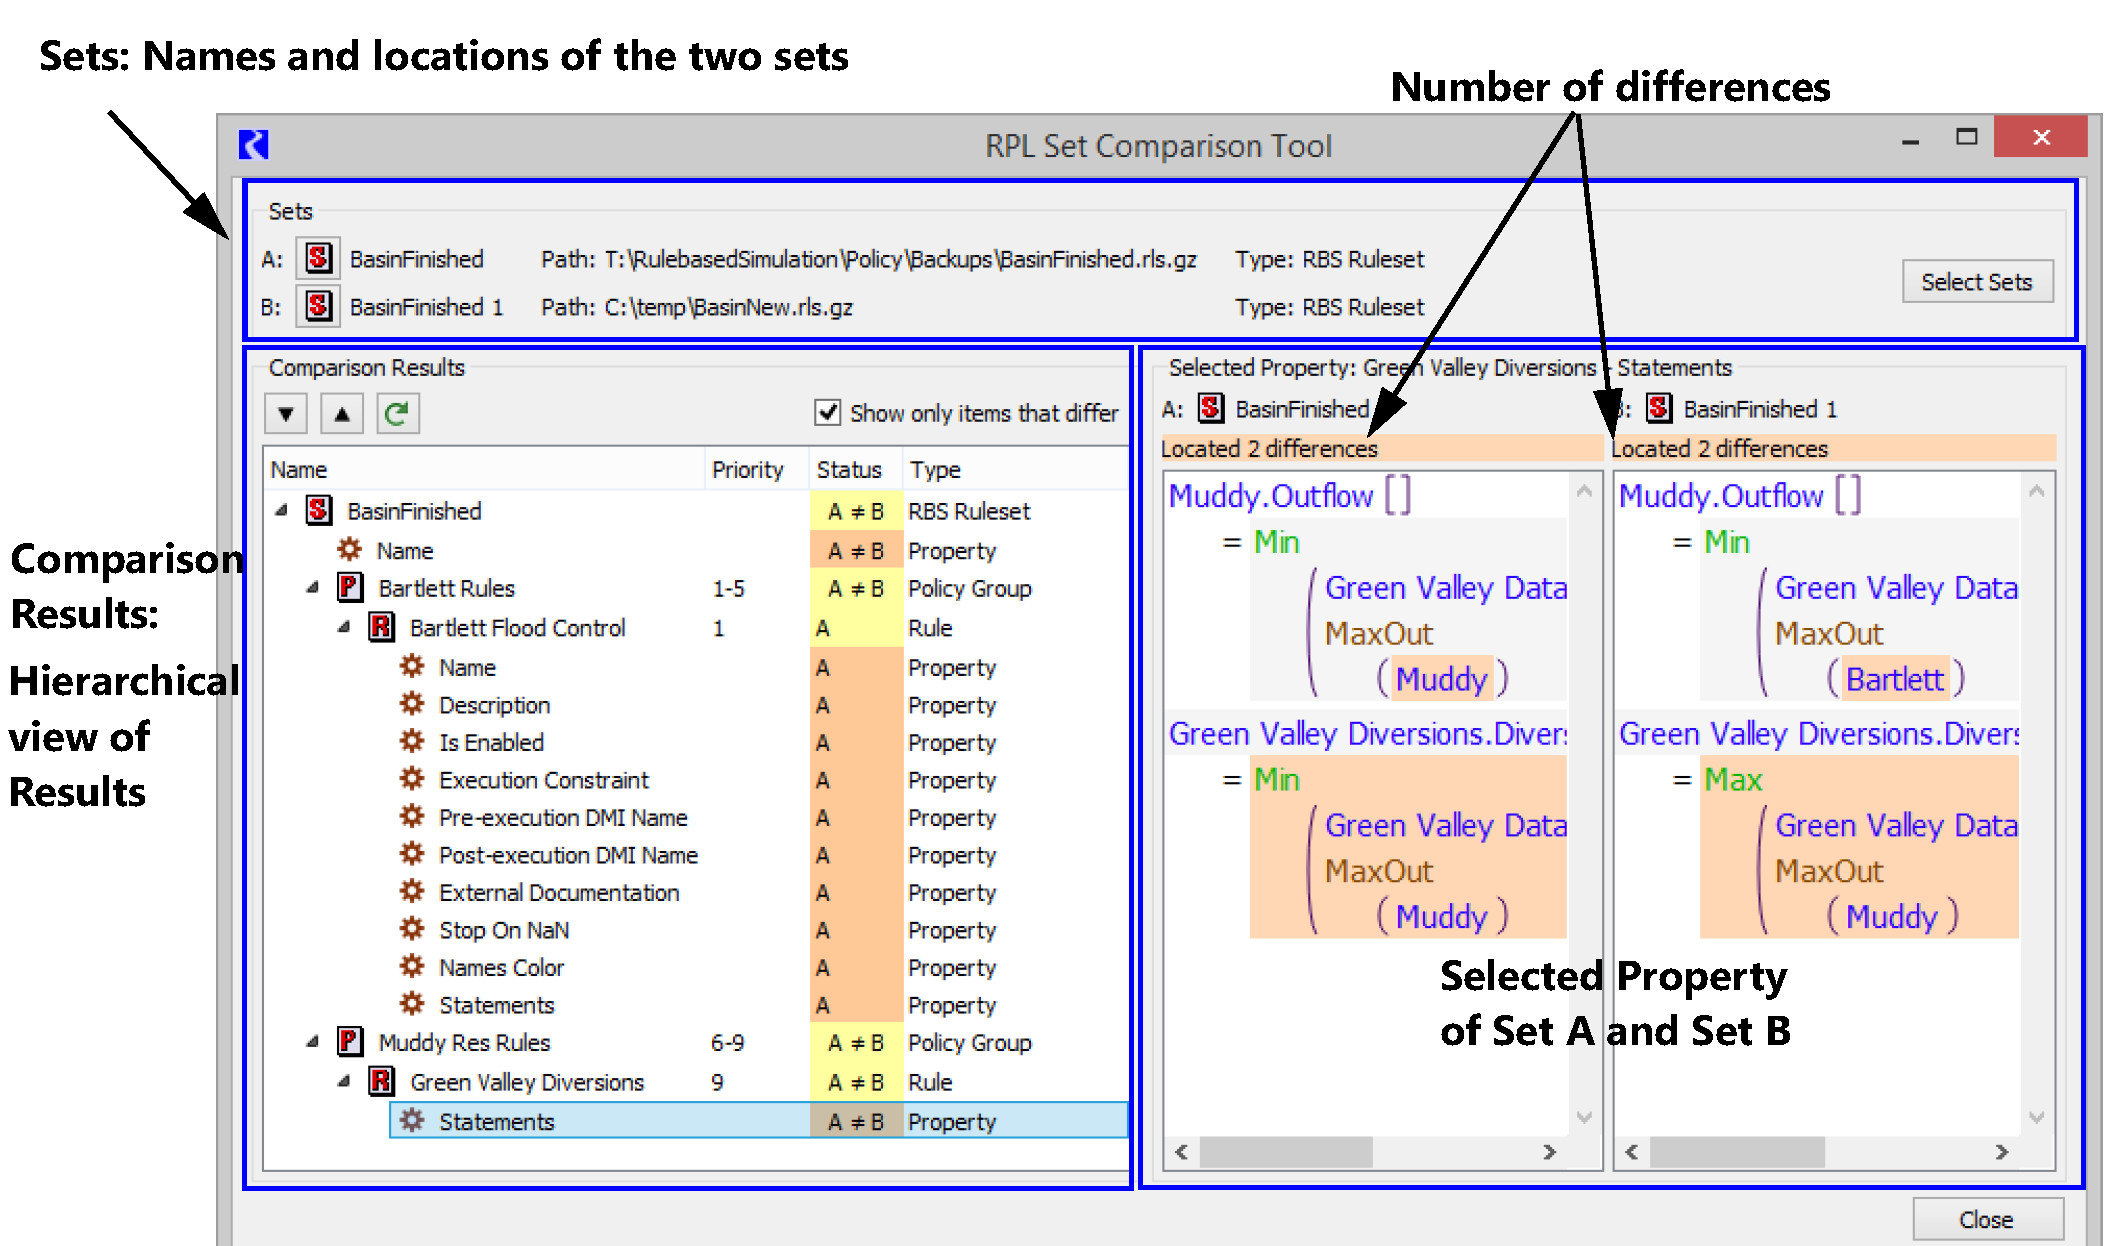
The RPL Set Comparison Tool contains three main areas, as shown in Figure 2.9.
• The Sets panel shows the names, locations and type of the selected Sets.
• The Comparison Results area shows a hierarchical view of the sets and the comparison results. This shows where there are differences between the two sets
• The Selected Property panel shows the values for the selected row for both Set A and Set B. This shows the differences for the selected item.
The following sections describe these areas and how to use the tool.
Figure 2.9
Sets Panel
The Sets panel shows the sets that are being compared. It shows the set Name, Location, and type. Use the Select Sets button to choose alternative sets. See “Selecting RPL Sets to Compare” for details on the dialog that is displayed.
Comparison Results Panel
The Comparison Results panel shows a hierarchical view of the results of the comparison. The hierarchy is based on the structures of the two set. Columns include the Name, Priority/Index, Status and Type. The Set, Groups, and Rules/Goals/Methods show their particular icon. The Status column shows the results of the comparison. Table 2.4 lists the possible statuses and their meanings.
Status | Meaning |
|---|---|
A = B | The item is identical in Sets A and B. |
A ≠ B | The item is different in Sets A and B. |
A | The item exists in set A but not in Set B. |
B | The item exists in Set B but not in Set A. |
A -> | The item exists here in Set A and elsewhere in Set B and/or the item has been renamed. |
<- B | The item exists here is Set B and elsewhere in Set A and/or the item has been renamed.. |
The Type column lists the type of that row, either a Set, Group, Rule, or Property. The comparison tool ultimately compares Properties of the items, not the items themselves. In the Status column, the color indicates the following meaning, This is also shown in Figure 2.10:
• Yellow indicates that the item contains properties and that within the item there are differences in properties.
• A light orange shading indicates the item’s Name property has changed; that is, the item has been renamed. When an item has been renamed (not copied/pasted or moved), the item will show up twice in the list, once with the name used in set A (the status shows “A ->”) and once with the name used in B (the status shows “<- B”).
• The darker orange color indicates that the value of the property is different.
Figure 2.10 Color legend for the Status column
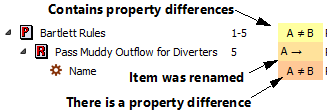
Table 2.5 lists the navigation and control buttons on the top of the Comparison Results panel.
Button | Text | Meaning |
|---|---|---|
 | Next Difference | Select the next property that has a difference |
 | Previous Difference | Select the previous property that has a difference |
 | Recompute Differences | Recompute the differences between the two sets. This is useful if you make changes to Set A or B |
 | Show only items that differ | Show only items that are different in the results panel. This is the default behavior. |
Double-click a row in the Comparison Results to open the RPL dialogs for that item.
Note: If the set was loaded from a RPL set file or another model file, the dialogs cannot be opened. If both sets are opened in the model file, then double-clicking a row will open two dialogs, one for each set.
Note: The RPL Set Comparison Tool compares internal copies of the specified sets. If you make changes to one of the chosen sets, it is not immediately reflected in the comparison tool. Use the Recompute Differences button  to update the status in the tool.
to update the status in the tool. Selected Property
The Selected Property panel shows the values for the selected row. If a yellow row (Rule, Set, Group, etc) is selected, a note is shown that “No Property Selected”. Only properties are shown in these views. When an orange Property row is selected, the panel shows the values for that property. The information shown is based on the property type and can include text, colors, true/false, and RPL expressions. When a statement, function body, or execution constraint is selected, the RPL expression is shown for both sets A and B. For example, in Figure 2.11, a statement is selected and the RPL statements are shown. You can see that Set A has a Max function while Set B has a Min function. The total number of differences found is listed above each Selected Property panel. Multiple differences are highlighted whenever possible.
Figure 2.11

Following are known limitations related to the highlighting of differences:
• When two statements or expression differ only by comment, the tool highlights the entire statement/expression, not just the comment. Ideally the tool would highlight the individual differences in the comment text.
• The tool does not highlight differences in symbol declarations (E.g. NUMERIC num), either in the type or name, but the entire expression is highlighted
• Adding, deleting, or moving a statement within a block (or an item in a list expression) will usually lead the tool to overestimate the number of changes (i.e., every statement after the first difference will be considered different). This is not the case for insertions and deletions within textual properties.
Example of Using the RPL Set Comparison Tool
Following is one use case example where the RPL Set Comparison Tool is very useful.
We have been developing a model and ruleset of our basin and need to add some proposed policy changes to the set. I am busy with other things, so I asked my co-worker to help implement the policy in the ruleset. She did this and sent me the new ruleset on her way out the door for vacation. She left the note that “I added the new rule and had to update a couple other things” but didn’t describe what she changed. I also have been working on the model and now it is time to see what she did and merge it into my work. I use the following procedure.
1. I open my model and load my ruleset. In this case, my ruleset is embedded in the model file; it is called Basin Ruleset.
2. I open (but don’t load) my co-worker’s modified ruleset. This is called Ruleset with Min Flow at Pella.
3. I use the menu: Policy, then RPL Set Comparison Tool
4. I then choose my embedded ruleset, Basin Ruleset, as Set A and my coworker’s modified ruleset as Set B. I then select OK.
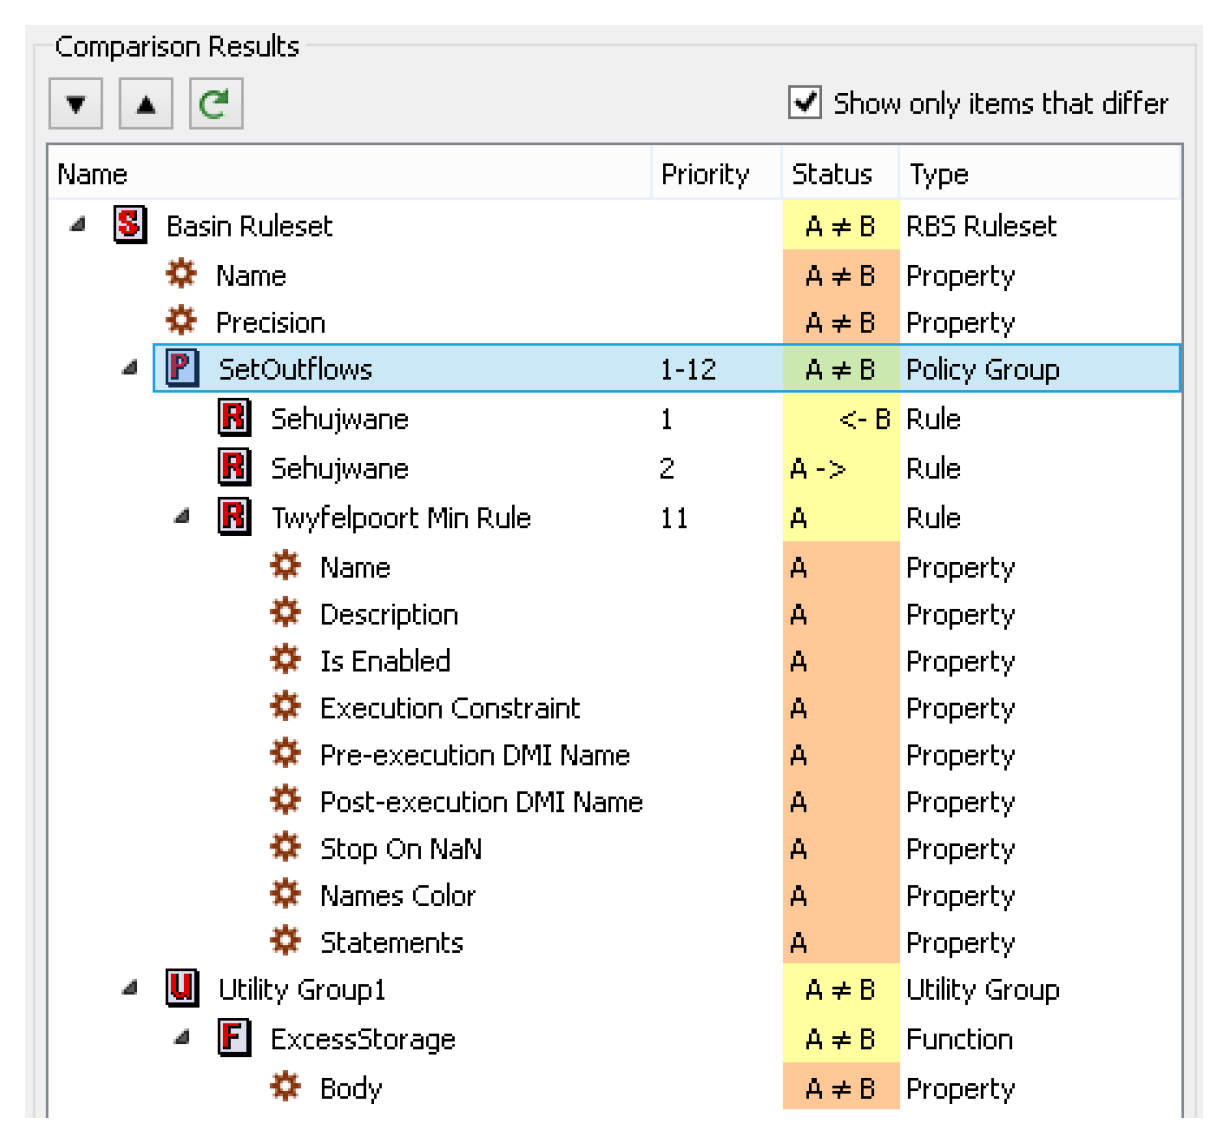
5. The RPL Set Comparison Tool opens and shows that there are differences between the two sets. I can use the Next and Previous to step through the differences. I can also uncheck the Show only items that differ to get a sense of where in the set the differences occur. I usually only like to see the differences, so I reselect the Show only items that differ. Figure 2.12 shows the results.
Figure 2.12
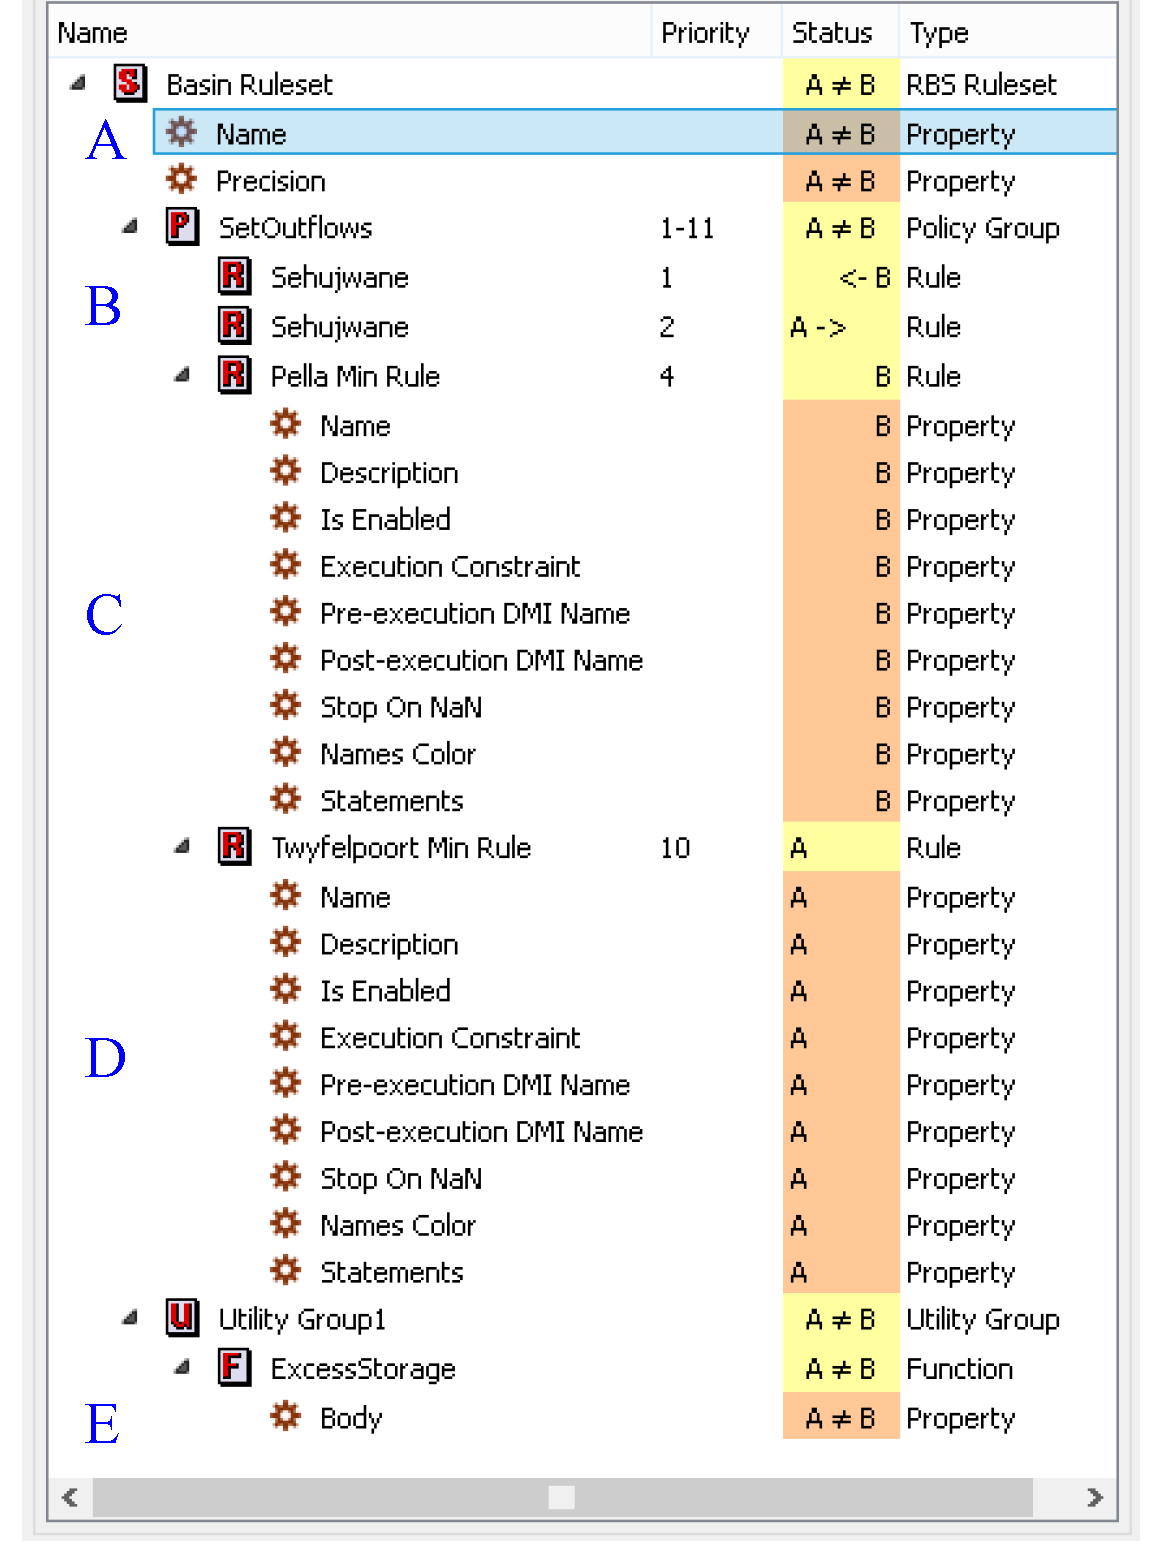
6. It looks like there are five areas of differences. We’ll go through all of the differences in Table 2.6. I select each row to see the property difference in the right hand panel.
Difference | Description |
|---|---|
A | The ruleset name and precision are different. |
 | |
B | Rule 1 and 2 have changed priority.In Set B, Sehujwane is priority 1. In Set A, Sehujwane is priority 2. Since it is strictly the priority order that has changed, there are no property differences, so the right panel doesn’t show any differences. |
 | |
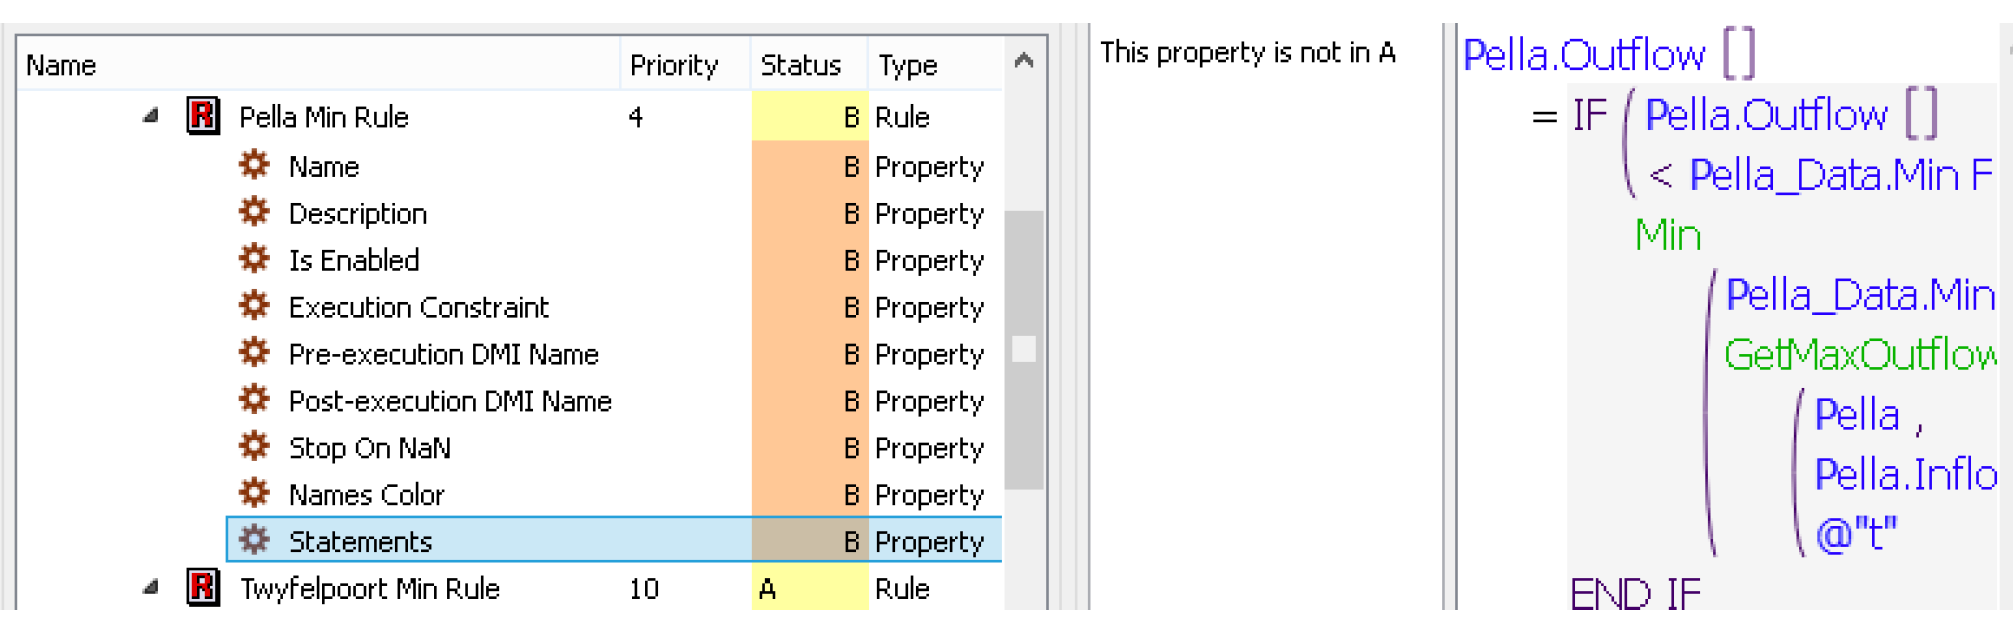
C. | Rule 4 is in Set B but not in Set A. The right panel shows the logic in Set B and lists that the property is not in Set A. |
 | |
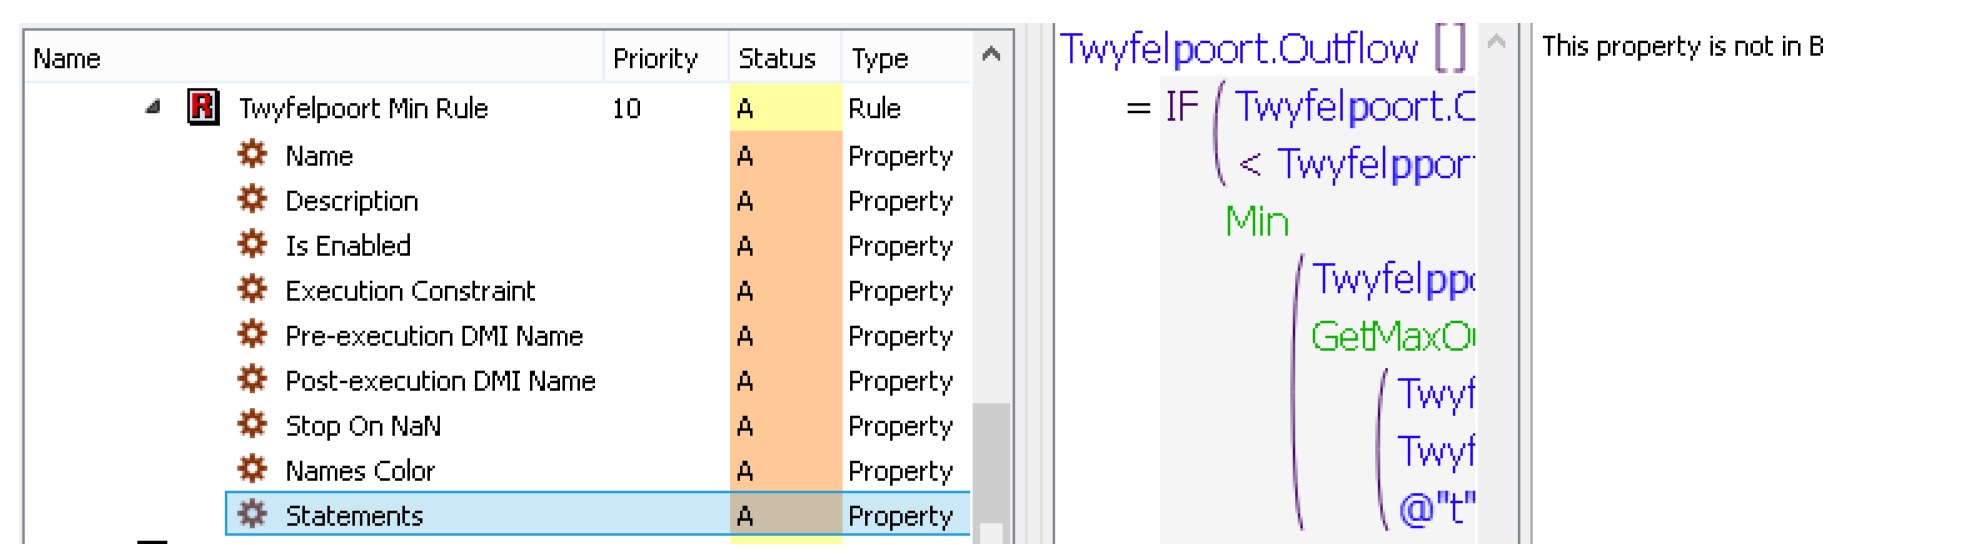
D. | Rule 10 is in Set A but not in Set B. |
 | |
E. | The ExcessStorage function has differences. It looks like my co-worker added a 100 m3 tolerance for the comparison. It would be nice if she had documented why she did this. |
 | |
7. Now I need to combine or merge her differences into my ruleset. First I’ll select the SetOutflows row to open the policy group for both sets.
8. The priority order of the first two rules is correct in my set, so I’ll leave it as is, with no changes.
9. I need to get the new rule that my coworker developed. Since the desired rule is in Set B, I open that set and right-click the Pella Min Rule and Copy. Then append it to that same group in Set A. I’ll rearrange to make it rule 4.
10. The RPL Set Comparison tool hasn’t changed even though I am editing the set. The comparison tool uses copies of both sets so the originals aren’t affected. I must select the Recompute button  to get the changes. As shown in Figure 2.13, I see that both sets have 12 rules in the SetOutflows group.
to get the changes. As shown in Figure 2.13, I see that both sets have 12 rules in the SetOutflows group. Figure 2.13
11. Now I’ll update the function that was changed. I double-click the ExcessStorage function Body row to open both function editors.
12. I copy the entire expression from Set B and paste it over the expression from Set A. Now they are the same.
In this way, I’ve looked at the differences and decided which ones I want to apply to my set. Although I had to manually merge the two sets, the RPL Set Comparison Tool really helped me to identify where there are differences and then present those differences in an organized fashion.
Exporting and Importing RPL Sets
In this section we describe how to export all or a portion of a RPL set to a separate RPL set file, as well as how to import an existing RPL set file. The export and import mechanisms provide a way to incorporate all or some of one policy into another policy, and it is available for all application of RPL within RiverWare, including the following:
• Rule sets. Collections of rules and functions organized into policy and utility groups.
• Optimization goal sets. Collections of optimization goals and functions organized into policy and utility groups.
• The object-level accounting method set. A collection of methods and functions organized into predefined category groups and utility groups.
• The Expression Slot set. A collection of functions organized into utility groups. These functions may be called from an expression defining an expression slot.
• Initialization Rules. Collections of rules and functions organized into policy and utility groups.
• Iterative MRM RPL sets. Collections of rules and functions organized into policy and utility groups.
• Global Function Sets. Collections of functions organized into Global Utility Groups.
There are many situations in which export and import functionality is useful. For example, assume that you are writing a policy which could make use of some functions written as part of an existing policy. To avoid having to rewrite all these functions, you could open both sets and use the Copy/Paste mechanism to copy the functions in question from the existing policy to the new one. However, if you then modify the original functions, you might want to do the copy again to keep the functions identical, but you would have to first remove the copies of the functions before doing this. Furthermore, in the context of the object-level accounting method set it is not possible to have two such sets open simultaneously, so this mechanism would not work. The RPL set export and import functionality provides a simpler and more flexible method to implement sharing of policy elements. Alternatively, you could use Global Utility Groups; see “Global RPL Functions” for details.
Export
The RPL set export mechanism allows you to save a portion of a RPL set as a separate RPL set file. The first step is to show the Export column of the RPL set editor. If this column is not currently shown (between the columns labeled Priority and On), then it can be shown by selecting View, then Show Export Column. Initially no item is selected for export, this is indicated by a red X in the Export column for each item.

Select the Export column of the items that you would like to export. This will convert the red X in that cell to a green check mark.
Note: Selecting a block or function for export automatically selects the containing group, and unselecting a group will clear all of its members.
Tip: To select multiple items, right-click and choose Select Export For All in Group or Select Export For All in Set.
Once the items to be exported have been identified in this way, the export operation is initiated by selecting File, then Export Selected Items. You will then be presented with a confirmation dialog summarizing the items to be exported If you choose to continue the export operation, a file chooser dialog appears, allowing you to specify the file to which the items will be exported. Once a file name has been selected, the file is created and a RPL set containing only the selected export items is written to that file.
Import
RPL set import allows you to incorporate all or some aspects of an existing RPL set policy into a set that you are editing. To initiate an import, select File, then Import Set. You will be presented with a file chooser dialog for specifying the name of a RPL set file. Once you have selected a file and selected the Open button, you are presented with the RPL Import Confirmation Dialog.
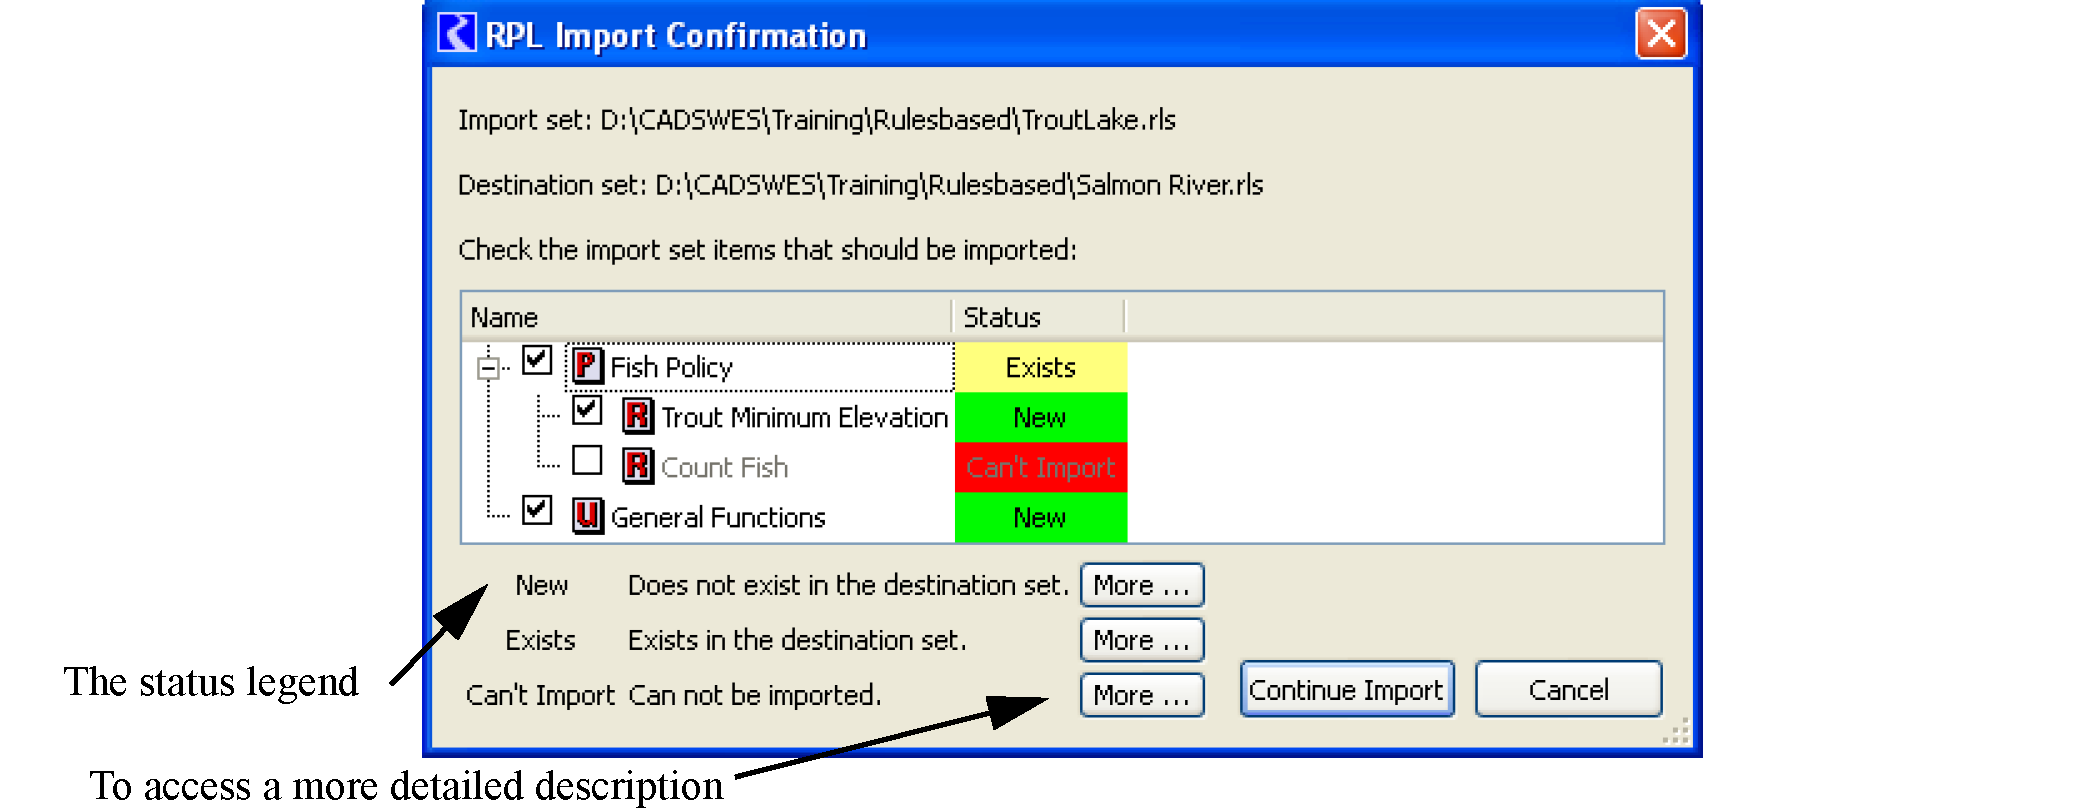
This dialog presents a listing of the import set. This layout is similar to the RPL set editor’s presentation of the set, but each item being imported is classified as having one of the following statuses:
• New. The group, block, or function being imported does not appear to exist in the set into which it is being imported (the destination set).
• Existing. The group, block, or function being imported appears to exist in the set into which it is being imported (the destination set). In the case of a group, there is a group of the same type with the same name in the destination set. In the case of a block (or object-level accounting method), there is a block with the same name in a group which is of the same type and has the same name as the block parent group. Similarly, in the case of a function, there is a function with the same name in a group which is of the same type and has the same name as the function’s parent group.
• Can’t Import. The group, block, or function begin imported can not be imported. There are several reason why this might be the case and a warning is posted to the Diagnostic Output Dialog for each item that can not be imported, explaining the problem. Possibilities include an attempt to import a TCL function (not supported) or an attempt to import a function into a policy group when there is already an item of the same name in the global name space, e.g., a function of the same name exists in a utility group.
Before continuing with the import operation you should review the items being imported and indicate which items should in fact be imported. To select an item for import select the box to the left of its name in the list. Importing a new group will append it to the list of groups; importing a new function or block into an existing group will append it to the groups of functions which already exist. Importing an already existing group will copy its description to the existing group and copying an existing block or function will replace the existing block or function with the imported block or function. Initially new items are selected for import and existing items are not, but these selections can be modified. To complete the import select the Continue Import button. Selecting the Cancel button at any point will cancel the import operation and leave the RPL set unchanged.
Revised: 11/11/2019