
Notes on Series Slots
Annotation of series slots using Notes allows you to comment on data in a RiverWare model. For example, you may use notes for any of the following actions:
• Document certain characteristics of input data such as filled values, storm events, and so on.
• Provide metadata on the source of the input data.
• Call attention to specific operations, decisions, or outcomes for a model run.
Notes are for documentation purposes; they do not affect the solution, and they cannot be accessed (read or assigned) via rules or other RPL sets. In general, notes are available for all types of series slots (Series, Multi, Agg, Series, with Expression) and can be added and edited via the Open Slot dialogs, Slot Viewer, the SCT, and the Edit Account dialogs.
Notes Overview
Notes are short text strings that are associated with one or more timesteps. Each note belongs to a Note Group. Each note has a list of associated slots and the timesteps to which they apply. Each specific application of a note on a slot timestep is referred to as a note instance. The Note Manager utility facilitates creation and management of notes and Note Groups. The display icon for each group can be assigned a color.
Notes
A Note is a text string that can be associated with a series slot at a timestep, and each note belongs to a Note Group. A Note has the following properties:
• Note text - the text string that makes up the note
• Note Group membership - A note belongs to exactly one Note Group.
• Note instances - the specific slots and timesteps to which the note is applied.
• Preserve/Delete when not applied - A note can be configured to either be preserved even when it is not applied to any note instances or to be automatically deleted when no longer applied to any note instances.
Note Groups
A Note Group is composed of the following properties:
• Name
• Icon Color - You can select the color for each Note Group.
• Set of Notes - A Note Group has a set of one or more notes.
Viewing Notes on Slots
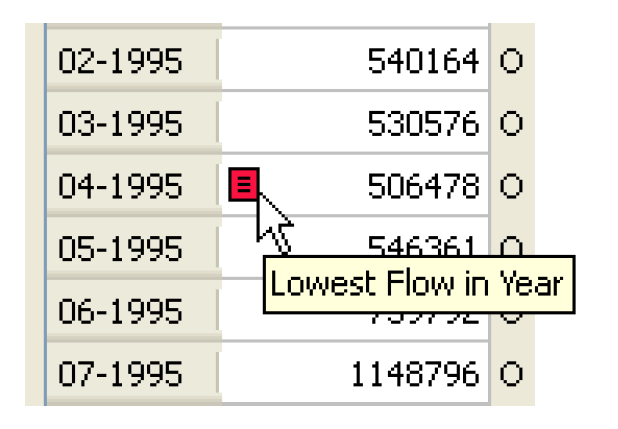
Note text can be seen and reviewed in the series slot dialogs, the Slot Viewer, or the SCT (see Display and edit series slot notes in System Control Table (SCT)). The presence of a note is shown by a small icon to the left of the value. The color of the icon is defined for the Note Group. Hovering over the icon displays a tooltip with the Note text.

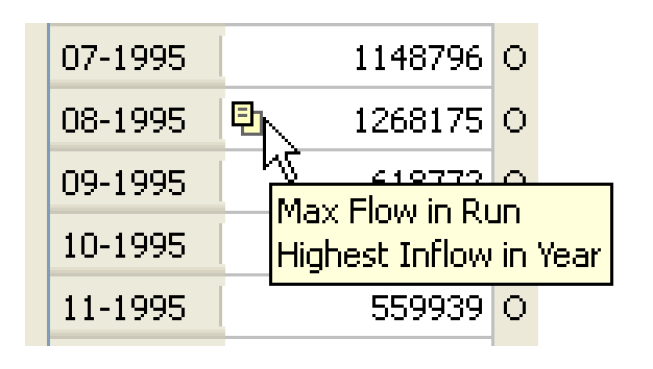
Cells having more than one note have a special icon suggesting one note stacked on the other. The tooltip lists each note, one per line. That icon is always yellow and does not reflect the color of any of the corresponding Note Groups.
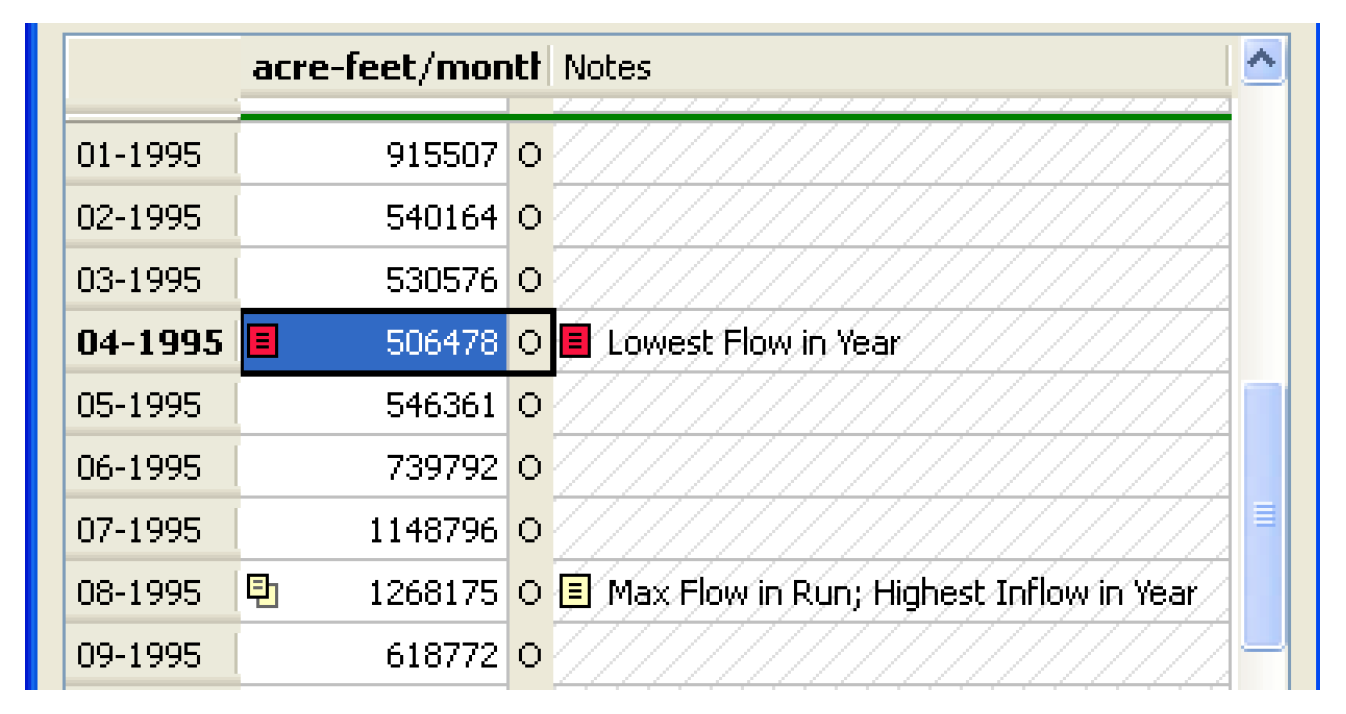
For individual slot dialogs, the note text can be shown in a separate column using the View, then Show Notes Column menu item. A slot displayed in the Slot Viewer must first be undocked from the Slot Viewer in order to display the Notes column.
Note: You can configure your preferences on whether or not to show the Notes column using Slot Dialog Display Preferences; see Slot Dialog Display Preferences.
The time series can be scrolled to the timestep of a note on the slot using the Note Navigation menu button; see Figure 6.52. Items in the Note Navigation menu having a bullet indicate that the timestep of the note matches that of the timestep selector.
Figure 6.52
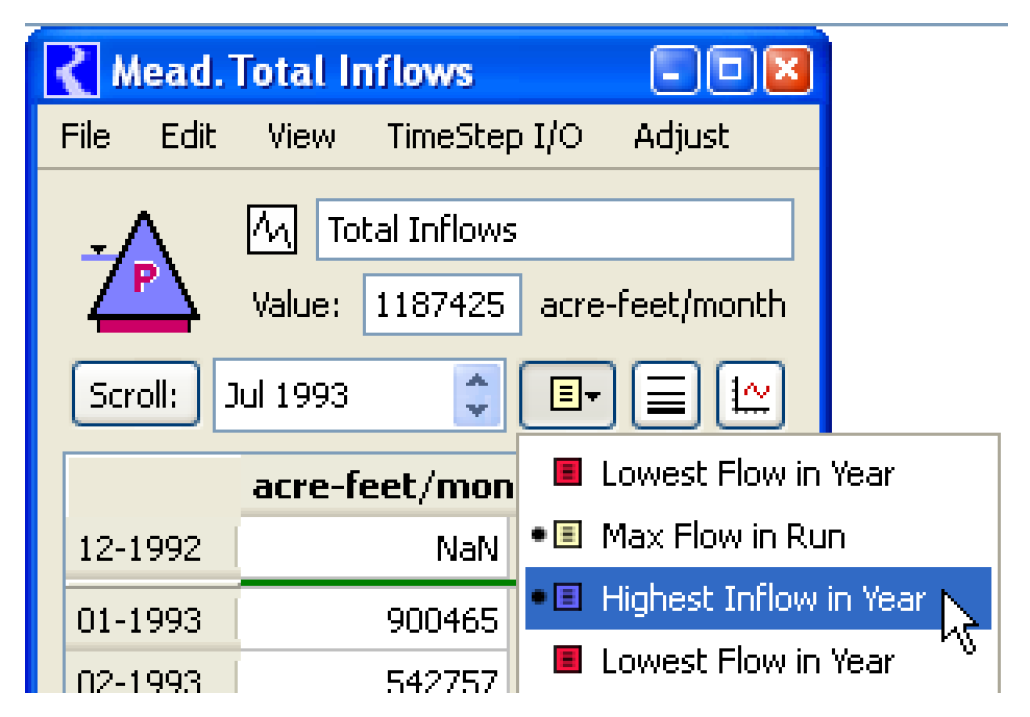
Pressing the Shift key while selecting an item causes a Global Time Scroll (scrolling all open series-related dialogs to the corresponding timestep).
Note Manager
The Note Manager maintains and manages the set of notes on series slots.
To open the Note Manager, select the Utilities menu from the main workspace. Then select Note Management.
The Note Manager is arranged with three hierarchical panels as shown in Figure 6.53: Note Groups, Notes, and Note Instances. The panels are used in a top to bottom order. First you select one or more Note Groups. Then the member Notes are displayed in the Notes panel. Then you select one or more Notes in the Notes panel and the member Note Instances (slots and timesteps on which the Notes are applied) are displayed in the Note Instances panel.
Following is a description of these three panels.
Figure 6.53 Note Manager
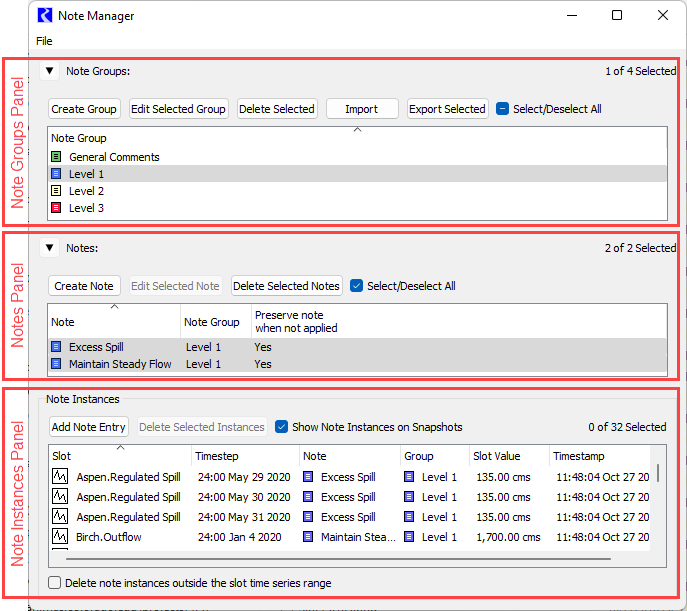
Note Groups Panel
The Note Groups panel shows all the defined Note Groups and has buttons for the following operations.
• Delete Selected
Selecting one or more of the Note Groups will show the notes defined in that group in the Notes panel.
Notes Panel
The Notes panel shows the notes that are a member of the Note Groups selected in the top panel. There are buttons for three operations.
• Delete Selected Notes.
Note Instances Panel
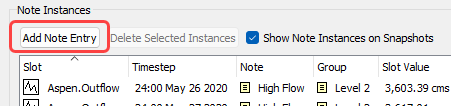
For the selected Notes in the middle panel, the Note Instances panel shows the slots and timesteps to which the note has been applied, the note instances. The panel shows the following columns with information for each note instance.
• Slot - the slot on which the note is applied
• Timetstep - the timestep on which the note is applied
• Note - the note text
• Group - the Note Group to which the note belongs
• Slot Value - the current slot value on the timestep at which the note is applied
• Timestamp - the time at which the note instance was created, based on the system time at the time of note creation
Double-clicking on a note instance will open the slot to that timestep.
The order of the columns can be edited by clicking and dragging on the column headers. Clicking on a column header will sort the note instances based on that column. The column order and sorting is saved in the model file.
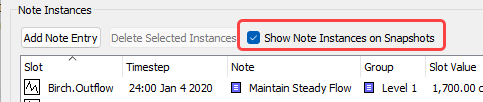
The Show Note Instances on Snapshots option is selected by default. When the box is not checked, note instances that are on snapshot slots will not be shown in the Note Instances panel. This setting is saved in the model file.
The information displayed in the Note Instances panel can be exported in the form of a model report item. See Series Slot Notes Summary in Output Utilities and Data Visualization for more information. When the Note Instances panel information is included in a model report, it displays all of the note instances in the model with the exception of notes on snapshot slots if the Show Note Instances on Snapshots option is unchecked. The order of the columns and sorting in the model report item is based on the ordering and sorting in the Note Manager.
The Delete note instances outside the slot time series range option at the bottom of the Note Instances panel can help prevent old note instances from accumulating in the model. By default this option is not selected. When this option is selected, if the time range of a slot changes, any note instances that are outside the new time range of the slot will be automatically deleted from the Note Manager. This setting is saved in the model file.

Both the Add Slot Entries and Add Entry Using Context buttons bring up the Apply Notes to Slots window. These differ only in the initial selections used in that dialog. The Add Entry Using Context button is available when the Note Manger is opened from the context of a particular slot and timestep, i.e. right-clicking a cell in a slot or SCT then choosing Add (or Edit) Note. See Adding Notes and Note Instances from a Slot and Editing Notes from a Slot for more information.
Creating and Editing Note Groups
To create a Note Group, use the following steps.
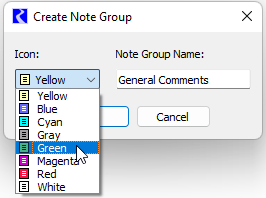
1. In the Note Groups panel at the top of the Note Manager, select the Create Group button. This will open the Create Note Group window.
2. In the Note Group Name field enter the desired name.
3. In the Icon menu, select the desired color for the icon that will be displayed for notes in this group.
4. Select OK. The new Note Group will be added to the Note Manager.
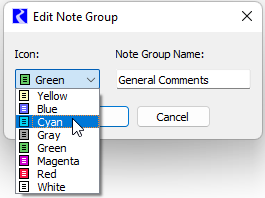
To edit an existing Note Group, use the following steps.
1. In the Note Groups panel at the top of the Note Manager, click on the desired Note Group to select it.
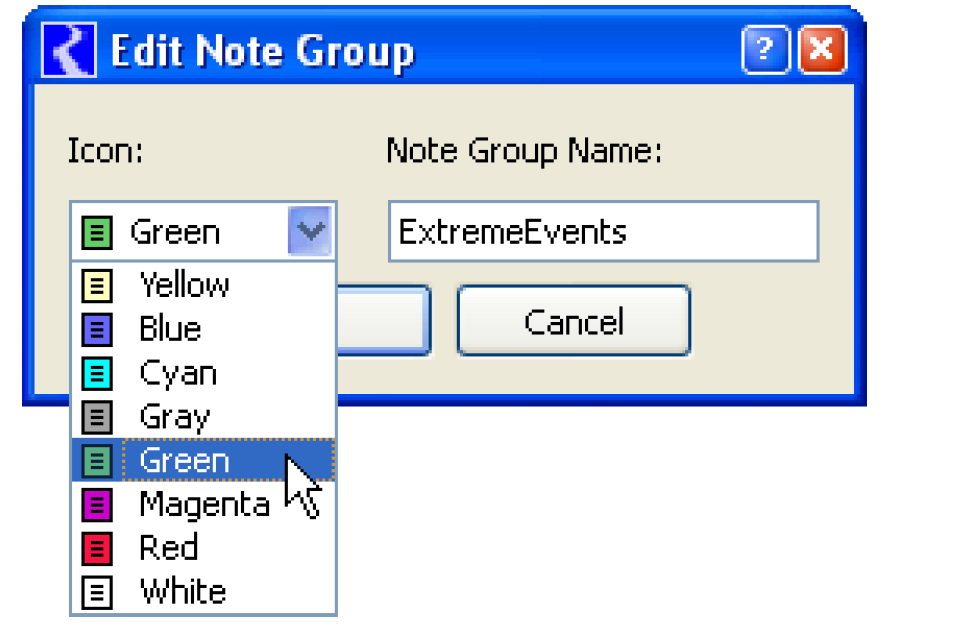
2. Select the Edit Selected Group button. This will open the Edit Note Group window.
3. To change the color of the icon associated with the Note Group, select a new icon color from the Icon menu.
4. To change the name of the Note Group, enter the new name in the Note Group Name field.
5. Select OK to apply the changes. The changes will be immediately applied for all notes in the Note Group.
Note Groups can be deleted, by selecting the desired groups and then selecting the Delete Selected button. This will delete the group and all notes and note instances in that group.
Creating and Editing Notes
Creating and editing a note can be done either from the Note Manager or directly from a slot dialog, the Slot Viewer or SCT.
Creating a Note from the Note Manager
To create a note from the Note Manager, use the following steps.
Note: Before creating a note, you must create the Note Group to which the note will belong. See Creating and Editing Note Groups.
1. Open the Note Manager using one of the following.
– From the Utilities menu on the main workspace, select Note Management.
– In a series slot dialog, Series Slot Viewer or SCT, right-click on a series slot value; then in the shortcut menu, select Add Note, then Note Manager.
2. In the Notes panel in the middle of the Note Manager, select the Create Note button.

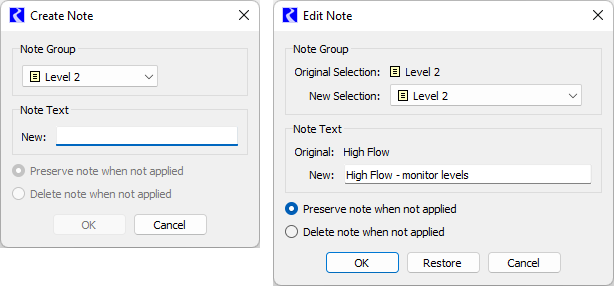
3. In the Note Group menu, select the Note Group to which the new note will belong. This will define the color of the icon that is displayed for the note.
4. In the Note Text field, enter the text for the note.
5. Select OK to apply the changes.
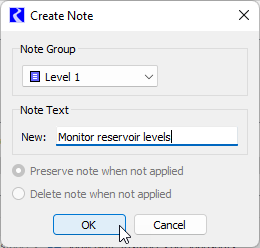
Note: When creating a new note, the “Preserve note when not applied” option is selected by default and cannot be changed. This is because by definition the new note has not yet been applied for any note instances, so it must preserved so that it is not immediately deleted. This setting can be changed later by editing the note; see Editing a Note from the Note Manager.
After creating the note, it can then be applied for one or more note instances; see Adding a Note Instance from the Note Manager.
Editing a Note from the Note Manager
To edit an existing note, use the following steps.
1. Open the Note Manager using one of the following.
– From the Utilities menu on the main workspace, select Note Management.
– In a series slot dialog, Series Slot Viewer or SCT, right-click on a series slot value; then in the shortcut menu, select Add Note, then Note Manager.
– In a series slot dialog, Series Slot Viewer or SCT, right-click on a series slot value that has a note; then in the shortcut menu, select the note and then Edit Note.
2. In the Note Manager, in the Note Groups panel at the top, select the Note Group for the desired note if it is not already selected.
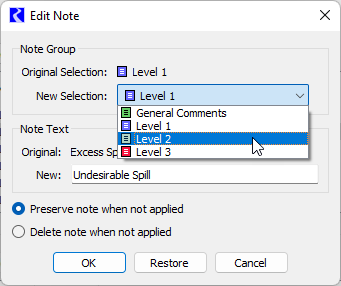
3. In the Notes panel in the middle, select the desired note; then select the Edit Selected Note button. This will open the Edit Note window.
4. In the Note Group menu at the top, change the group membership if desired.
5. In the Note Text field, enter the new text for the note.
6. Select the desired option for Preserve/Delete note when not applied. When the Delete option is selected, the note will be deleted from the Note Manager if it is no longer applied for any note instances. This can be useful to prevent old notes from accumulating in the model. The Preserve option will cause the note to persist even when it is not applied for any note instances. This allows a preconfigured note to be available to apply at a later time.
7. Select OK to apply the changes.
Any existing note instances for the edited note will be immediately updated to reflect the changes, including the Note Group membership (and associated icon color) and the note text.
If you select the Delete Selected Notes button, it will delete the note and all note instances for that note. This action is not reversible.
Adding a Note Instance from the Note Manager
To add one or more note instances (apply a note to a specific slot at a specific timestep) from the Note Manager, use the following steps.
Note: Before adding a note instance from the Note Manager, you must create the note that will be applied; see Creating a Note from the Note Manager.
1. Open the Note Manager using one of the following.
– From the Utilities menu on the main workspace, select Note Management.
– In a series slot dialog, Series Slot Viewer or SCT, right-click on a series slot value; then in the shortcut menu, select Add Note, then Note Manager.
2. Select one of the following Add Note Entry options
– Select the Add Note Entry button at the top of the Note Instances panel.
– If the Note Manager was opened from a slot dialog, Series Slot Viewer or SCT, select the Add Entry Using Context button at the bottom of the Note Instances panel. This option is only available if the Note Manager was opened from the shortcut menu on a slot timestep.
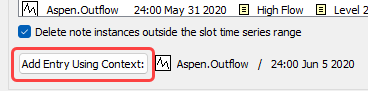
When either of these options is selected, the Apply Notes to Slots window will open. When the Add Note Entry Using Context button was selected, the slot list in the middle panel and the timestep in the bottom panel will already be populated based on the context shown at the bottom of the Note Manager, which comes from the slot and timestep from which the Note Manager was opened.

3. At the top of the Apply Note to Slots window, use the Group and Note menu to select the desired group and note.
4. In the middle panel, use the Add Slots button to select the desired slots.
5. In the lower panel specify the timesteps at which to apply the note. Enter the first timestep in the top field of the Timesteps panel. If the note is to be applied on multiple, consecutive timesteps, then select the checkbox for Apply Over Timestep Range, and then enter either the Last Timestep or the Timestep Count. Entering either one of these will update the other.
6. Select OK or Apply to apply the note.
In order to apply a note to multiple, non-consecutive timesteps, you will need to make multiple note entries using the steps described above.
Deleting Note Instances from the Note Manger
To delete note instances from the Note Manager, use the following steps.
1. Open the Note Manager using one of the following.
– From the Utilities menu on the main workspace, select Note Management.
– In a series slot dialog, Series Slot Viewer or SCT, right-click on a series slot value; then in the shortcut menu, select Add Note, then Note Manager.
2. In the Note Groups panel at the top, select the Note Groups with the note instances you want to delete. Use Ctrl + click for a multiple selection. You can use the Select/Deselect All checkbox to quickly select all Note Groups.
3. In the Notes panel in the middle, select the notes with the note instances you want to delete. Use Ctrl + click for a multiple selection. You can use the Select/Deselect All checkbox to quickly select all notes in the selected Note Groups.
4. To delete the selected notes and all of the associated note instances, select the Delete Selected Notes button.
5. To delete specific note instances, but not the note, select the desired note instances in the Note Instances panel at the bottom. Use Ctrl + click for multiple selection. Then select the Delete Selected Instances button.
Tip: By selecting the checkbox for Delete note instances outside the slot time series range, any note instances on timesteps that no longer exist on the slot will be automatically deleted whenever the slot time series range changes. This option can be used to prevent out-of-date notes from accumulating in the Note Manager as the model moves ahead in time.
Adding Notes and Note Instances from a Slot
Use the following steps to add a note and/or a note instance directly from a slot, without opening the Note Manager.
Note: The options described here for slot dialogs are also available in the SCT with similar steps. See Display and edit series slot notes in System Control Table (SCT).
1. Open the desired series slots in the Slot Viewer or individual slot dialogs.
2. In the Slot Viewer or slot dialog, select the desired timesteps. Use Ctrl + click for a multiple selection. If the slots are displayed in the Slot Viewer, the multiple selection can include multiple slots.
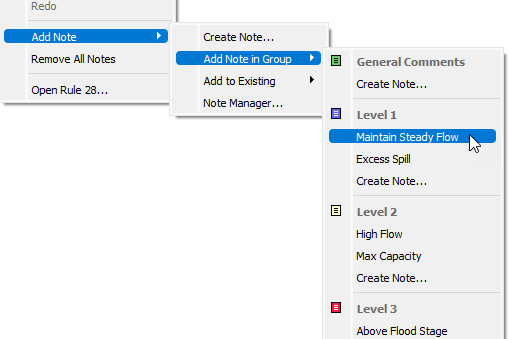
3. Right-click on one of the selected timesteps, and move the cursor over Add Note in the shortcut menu. Four options will appear.
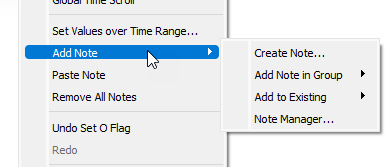
• Create Note—opens the Create Note dialog; you can type the desired note text, and select the Note Group to which you want to assign the note. Note Groups are configured in the Note Manager. See Creating and Editing Note Groups for details. If no Note Groups have been configured, a Default Note Group will be available. When the Create Note dialog is opened from a slot, the option to Delete note when not applied will be selected by default. If you want the note to remain in the Note Manager even if it is no longer applied for any note instances, so that it can be selected for later use, select the option for Preserve note when not applied. When you select OK, the note is applied on the selected timesteps, and the new note gets added to the Note Manager. 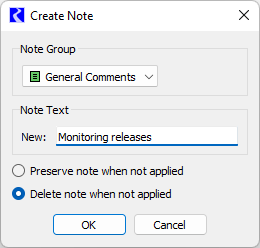
• Add Note in Group—allows you to select from notes already configured in the Note Manager (see Note Manager for details), organized by Note Group. You can also choose to create a new note within the specified group. When you select a note, it is immediately applied on the selected timesteps, and the applied note instances are added to the Note Manager.
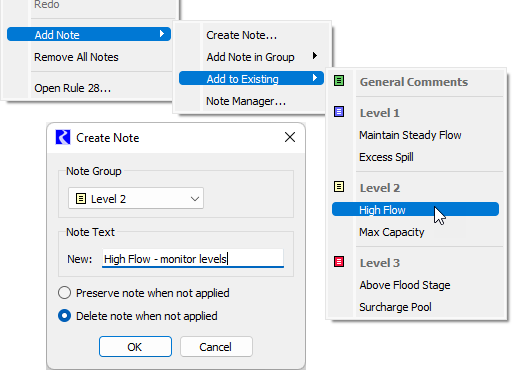
• Add to Existing—allows you to select from notes already configured in the Note Manager (see Note Manager for details), but instead of applying the selected note directly, it opens the Create Note dialog to allow you to add to or modify the selected note. When the Create Note dialog is opened from the SCT, the option to Delete note when not applied will be selected by default. If you want the note to remain in the Note Manager even if it is no longer applied for any note instances, so that it can be selected for later use, select the option for Preserve note when not applied. When you select OK, the note is added on the selected timesteps, and the note gets added to the Note Manager as a new note.
• Note Manager—opens the Note Manager window. From there you can add or edit notes and apply them to specified slots. See Note Manager for details.
Editing Notes from a Slot
Use the following steps to edit notes directly from a slot, without opening the Note Manager.
Note: The options described here for slot dialogs are also available in the SCT with similar steps. See Display and edit series slot notes in System Control Table (SCT).
1. Open the desired series slot in the Slot Viewer or individual slot dialog.
2. In the Slot Viewer or slot dialog, select the desired timesteps. Use Ctrl + click for a multiple selection. If the slots are displayed in the Slot Viewer, the multiple selection can include multiple slots.
3. Right-click on one of the selected timesteps. When one or more note instances exist on a particular Slot/Timestep, the right-click shortcut menu on the cell includes a menu for each note. Move the cursor over the desired note in the shortcut menu; then select one of the following.
• Edit Note—This opens the Note Manger, allowing you to edit the note. See Editing a Note from the Note Manager. Any edits made to a note with this approach will modify all note instances for which the note is applied, not only the selected note instances.
• Replace with New Note—This opens the Create Note dialog to allow you to add to or modify the selected note. When the Create Note dialog is opened from the SCT, the option to Delete note when not applied will be selected by default. If you want the note to remain in the Note Manager even if it is no longer applied for any note instances, so that it can be selected for later use, select the option for Preserve note when not applied. When you select OK, the modified note replaces the note on the selected timesteps, and the note gets added to the Note Manager as a new note. This option will affect only the note instances on the selected timesteps.
• Remove Note—immediately removes the note from the slot on the selected timesteps (deletes the note instance). No confirmation message is displayed.
Copying Notes to Other Timesteps
Use the following steps to copy a note and paste it to other slots and/or timesteps within the Slot Viewer or individual slot dialogs.
Note: The options described here for slot dialogs are also available in the SCT with similar steps. See Display and edit series slot notes in System Control Table (SCT).
1. Open the desired series slot in the Slot Viewer or individual slot dialog.
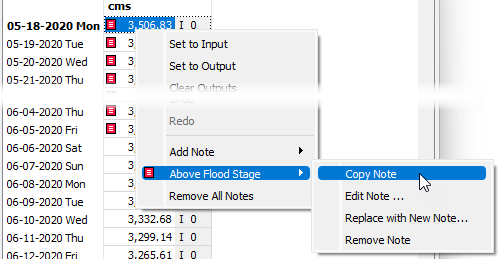
2. In the Slot Viewer or slot dialog, right-click on the timestep with the desired note.When one or more note instances exist on a particular Slot/Timestep, the right-click shortcut menu on the cell includes a menu for each note. Move the cursor over the desired note in the shortcut menu; then select Copy Note.
Figure 6.54
3. In the desired destination slots, select the desired timesteps. Use Ctrl + click for a multiple selection.
4. Right-click on one of the selected timeteps, and from the shortcut menu, select the Paste Note option for the selected note. The note instances will be added to the selected timesteps.
Collected Notes on Expression Slots
Collected notes are a special type of note associated with series expression slots (i.e. Series Slot with Expression). When the expression slot is evaluated, notes from the series slots referenced in its expression (“source” slots) are copied to corresponding timesteps in the expression slot. The source slots for providing notes are an accumulated list of the source slots referenced across the expression slot’s evaluations at all timesteps. The notes from the source slots are collected and copied once at the end of the expression slot’s evaluation. The collected notes are removed and re-collected each time the expression slot evaluates. In the context of a run, they are removed at the beginning of the run and collected at the end of the run, so if the run is paused or aborts in the middle, the collected notes will be absent.
The collection of notes for series with expressions is optional and is controlled on a model-wide basis by a parameter selection in the RPL Parameters dialog. This dialog is available from the RiverWare workspace under the Policy menu.

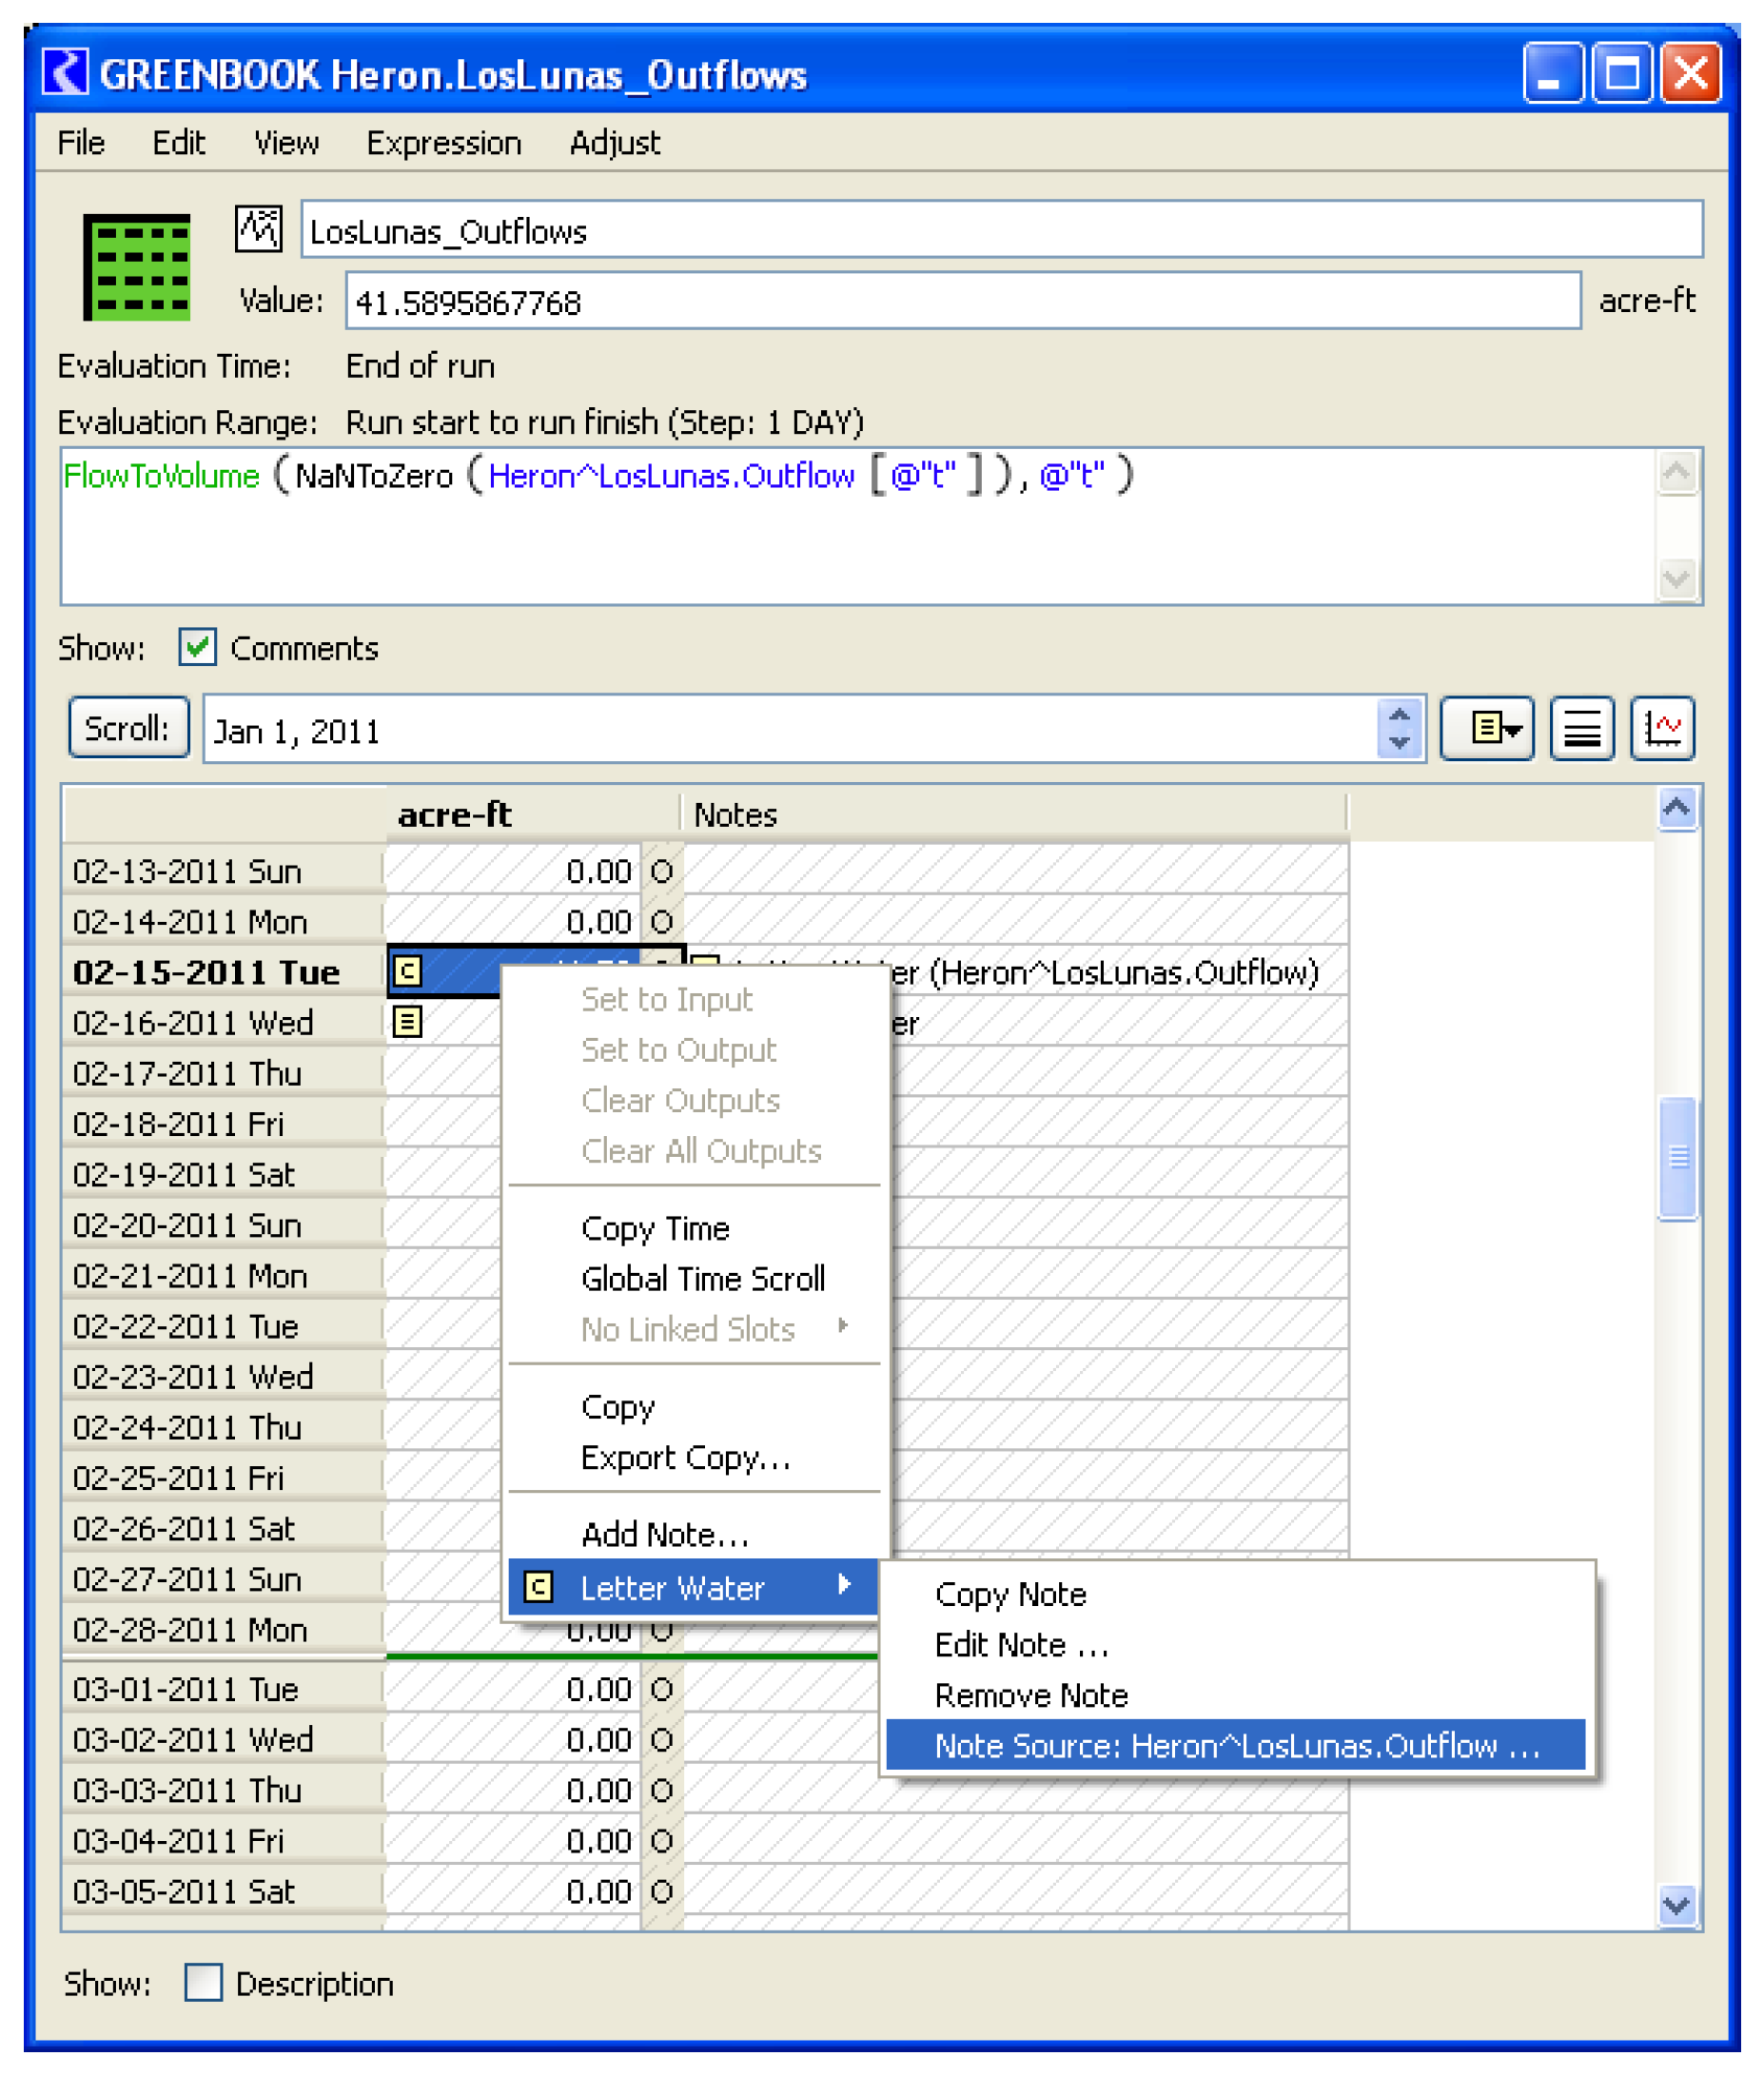
In the places where notes for series can be displayed (Series Slot, SCT and Notes Group Manager dialogs), collected notes are differentiated by having a C in their icon; see Figure 6.55. The text of a collected note, where displayed in the notes column or in a tool tip when mousing over a note icon, will show the text of the note followed by the source slot name in parentheses.
Note: If a note is propagated through a number of expression slots, the slot where the note originated is maintained as the source slot for the note, even though one expression slot may be picking it up from another expression slot that referred to the source slot.
The context menu (right-click) on a cell for a collected note in the series slot and SCT dialogs will have an additional menu entry showing the source slot of the collected note. Select the item to open the source slot’s dialog. If a source slot is deleted from the model, the collected notes that refer to that source slot will also be deleted.
Figure 6.55
Accounting Multi Slot Notes
Accounting multi slots, such as storage account inflow or outflow, have a subslot for each supply linked to the multi slot. You can add a note to the multi slot or the supply/subslot.
Note: It is good practice to add the note to one of the linked supplies.
When you add a note to a multi slot that has one or more subslots or supplies, a confirmation asks you which you would like to use.
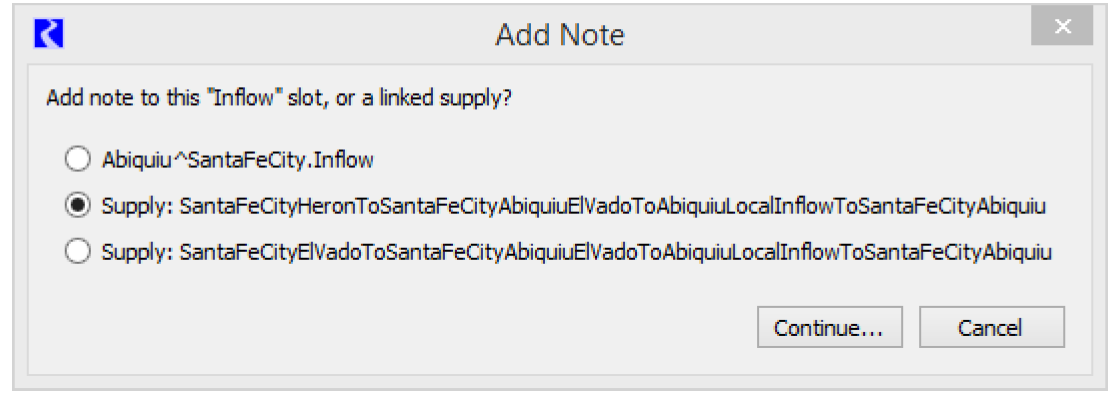
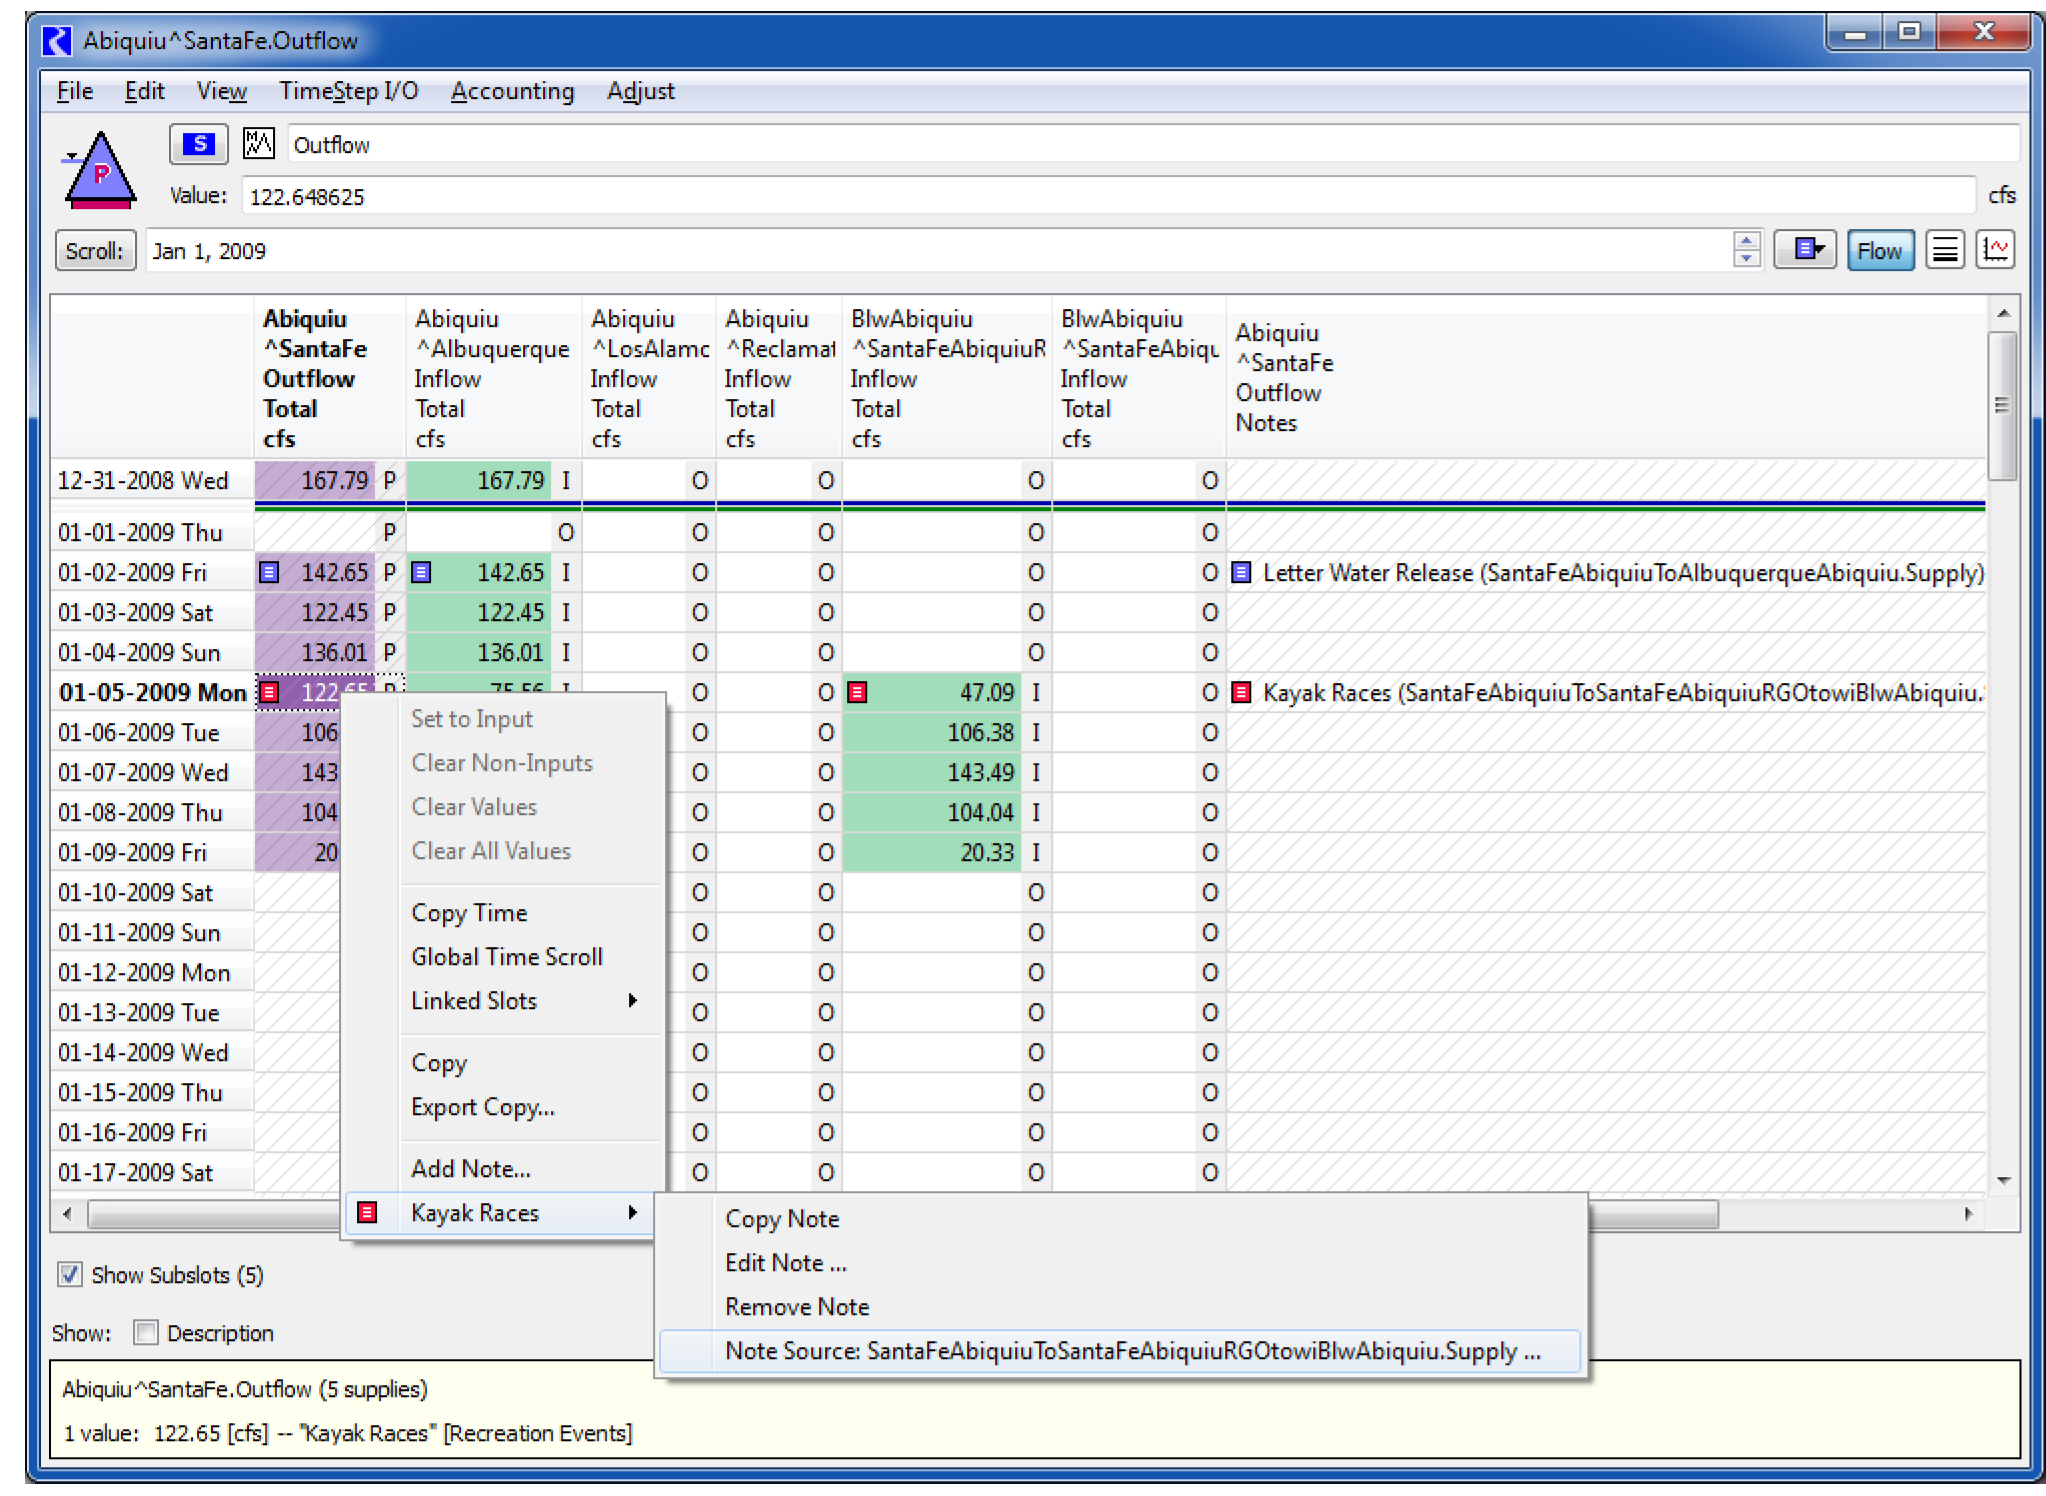
When a note is added to a linked supply, the note is automatically propagated to the multi slots on either end of the supply. Notes propagated in this way are assigned a source slot corresponding to the supply. The display of the propagated note is similar to collected notes (see Collected Notes on Expression Slots), where the source slot name is displayed in parentheses after the note text in the notes column, and the right-click context menu contains an item for the source slot that, when selected, will open the source supply’s slot dialog. When a note on the supply is deleted, or the supply itself is deleted, propagated notes will be removed from the corresponding accounting multi slots.
Importing and Exporting Notes Using Text Files
Notes can be imported or exported to a text (xml) file. The export/import functionality allows notes made in a copy of a model to be transferred back into the original.
Selecting the Import or Export Selected buttons brings up a file selector to specify an import or export file for Note Groups. These operation are also available from menu items in the File menu at the top of the dialog. Exporting one or more selected Note Groups will write information to the file for the group, its notes, and the slot associations for those notes. On import from a file, a Note Group is created if it does not already exist, notes in the group are created if they do not already exist, and slot associations for the notes are created if they do not already exist. A feedback dialog will indicate if note associations with slots cannot be made (i.e. if the slot is not in the new model).
Exporting and Importing Notes Using DMIs
Notes can be output from RiverWare slots to data files or imported to slots from data files using control file-executable DMIs (see Control File-Executable DMI in Data Management Interface (DMI)). The control file keyword used to specify notes is as follows:
slot_anno = true
The default value for slot_anno (i.e. slot annotations) is false, meaning no Notes will be written.
See Optional keyword=value Pairs in Data Management Interface (DMI) for more information.
A line in RiverWare time series format (for DMI import or from DMI export) containing a note will be formatted as:
<value> anno {Storm Events} {4.3 Inches}
where <value> will be a numeric value, “anno” is a keyword, Storm Events defines the Note Group to which the note belongs and 4.3 Inches is the note itself. The “<“and “>” will not exist in actual output. The “{” and “}” do exist, delimiting the Note Group name from the note text itself.
Note: In the data file, only one note instance will be supported at each timestep for a series slot. If a slot has more than one note instance on a single timestep, only one of those note instances will be preserved in the DMI operation.
Revised: 01/05/2024