
Distributed Concurrent Runs
When performing concurrent MRM runs consisting of many runs, the following are some problems that users encounter:
• The memory required may exceed the resources available and/or
• The time required to make the runs is excessive.
This section describes a utility that solves these two issues by distributing many runs across many RiverWare instances on the same machine.
Note: All runs are made on the same computer that has multiple cores or multiple logical processors. In the following sections, each separate MRM instance is referred to as a simulation processor.
In this approach, there is a controller processor and simulation processors. The controller processor does the following:
1. Creates the configurations
2. Controls execution (Start and Stop) of each simulation.
3. Tracks the progress.
4. When all the runs are finished, combines the output RDF file from each simulation into one output RDF file.
Figure 3.8
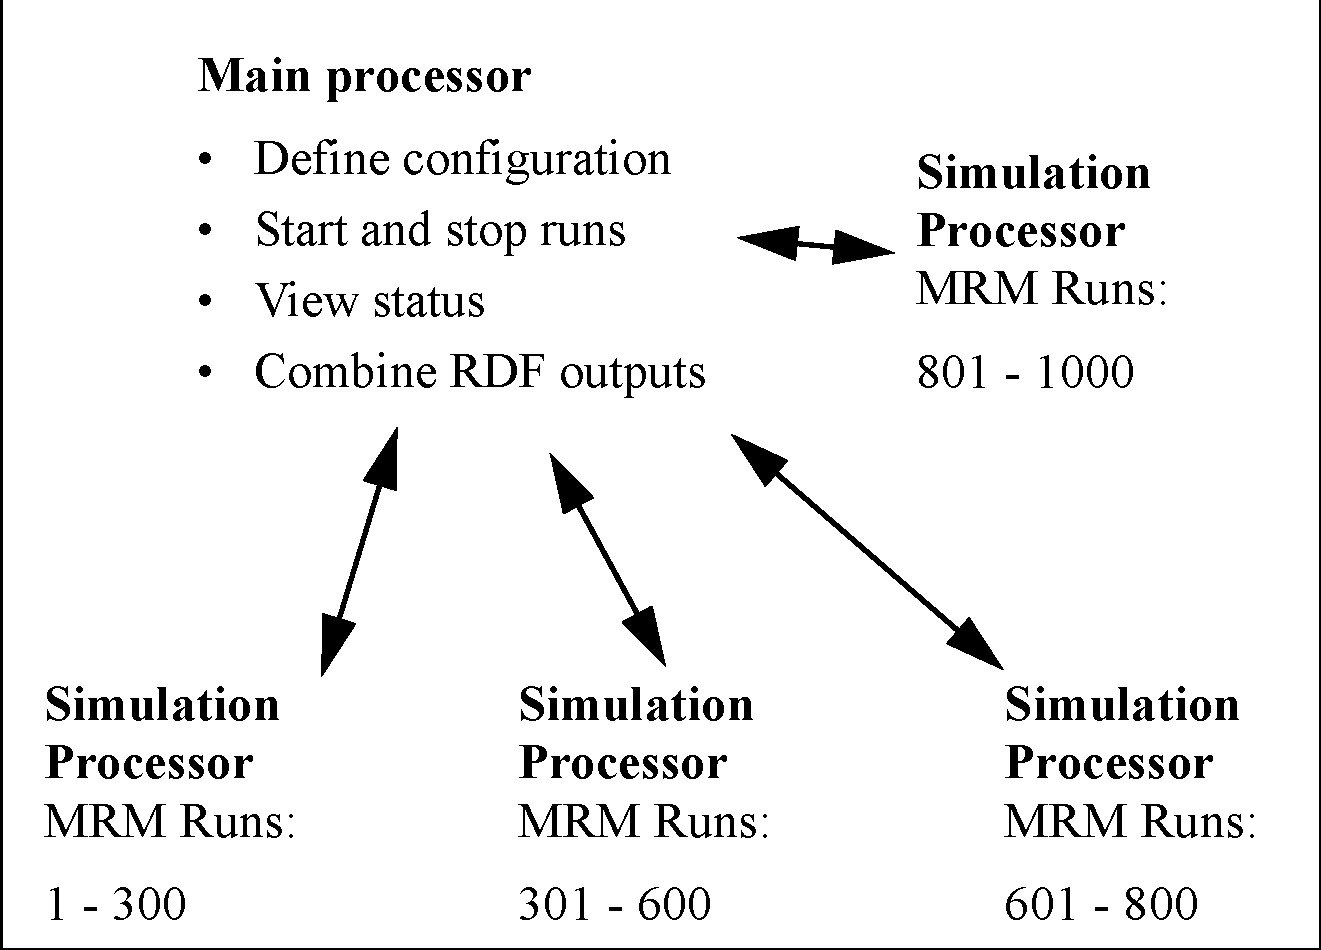
Each simulation processor then executes the MRM runs that the controller gives it to execute. Each processor runs one or more MRM runs that consist of a portion of the total number of concurrent runs. This is shown graphically in the screenshot. In this example, there are 1000 runs that are distributed unequally to four processors.
Note: If you are running RiverWare using a floating license, you can only run as many RiverWare instances as your license allows. For example, a three-seat floating license can only run 3 RiverWare instances. Therefore, you can distribute an MRM run to only three RiverWare instances. If you wish to distribute to more instances, check out a roaming license. Node-locked and roaming licenses can run unlimited RiverWare instances. The license guides can be found at the following URL:
This feature was initially designed for a very specific application of concurrent MRM. As such, the following are the limitations and constraints:
• The same version of RiverWare must be used for each run.
• In the MRM configuration, the Inputs must be Traces, Index Sequential with the Pairs mode selected (see Index Sequential Pairs Mode for details), or Select Years.
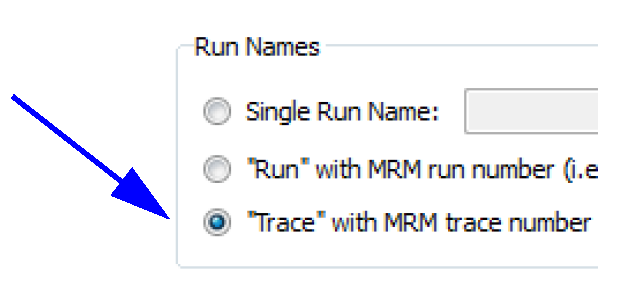
• Input DMIs can include Control File-Executable or Excel Database DMIs with the Header approach. If using Excel, you must use the Trace configuration option for the Run Names. The Run option is not supported.
Figure 3.9
• Only a single ruleset may be used.
The following sections present an overview of the user interface, how to make a run, and how the utility works to distribute the runs.
User Interface Overview
The interface for distributing MRM runs across multiple simulations consists of two components, the MRM configuration within RiverWare and the Distributed MRM Controller dialog which is external to RiverWare.
MRM Configuration
When an Input mode that supports distributed MRM is selected (Traces, Index Sequential with pairs mode selected, or Select Years), the Input tab has a Distributed Runs checkbox that becomes enabled. When checked, the Distributed Runs tab is added to the dialog.
▼
As discussed in the sections that follow, the Distributed Runs tab allow you to configure:
• The working directory.
• Whether the configuration should be saved to a file.
• The number of RiverWare instances across which to distribute the traces.
• How to assign the distributed RiverWare instances to processors.
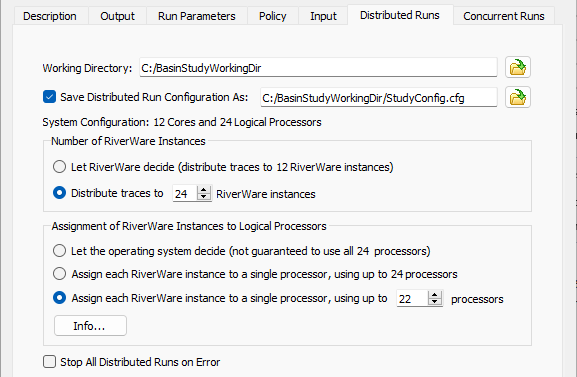
Working Directory
A distributed concurrent run creates several working files - batch script files, control files, intermediate RDF files and log files among them. The working directory specifies where the working files will be created. Importantly, it should be a directory which the controller processor and all simulation processors have access to.
Save Configuration As
When a distributed concurrent run is started, RiverWare writes a configuration file and invokes the Distributed MRM Controller. You can save the configuration to a named file. Then it is possible to invoke the Distributed MRM Controller directly, bypassing RiverWare. See Creating or Changing a Configuration for details.
Number of RiverWare Instances
The Number of RiverWare instances section defines the simulation processors or the number of RiverWare instances across which the traces will be distributed.
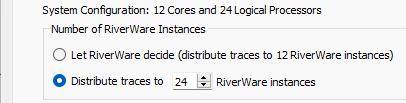
The System Configuration line provides the number of cores and the number of logical processors on the machine. You can distribute your runs as follows:
• Let RiverWare decide. RiverWare will set the number of RiverWare instances equal to the number of cores. The model can be moved to different computers and the configuration will update based on the number of cores on that computer.
• Distribute Traces to <N> RiverWare instances. Specify a set number of RiverWare instances so the runs complete in a reasonable amount of time given the computer's resources. Factors to consider when setting the number of RiverWare instances is the number of traces, the number of logical processors available, the amount of RAM, and whether you plan to have other applications running at the same time as the MRM. If you specify more RiverWare instances than the number of processors, each individual run will take longer to complete, but you still may experience reduced overall time for the MRM due to the increased parallelization.
The choice is ultimately hardware and model dependent. To make the best choice you will need to have detailed knowledge of your model’s memory usage and hardware. Tools like SysInternals may help to identify the maximum working set when running the model. Experimentation may be necessary to determine the most efficient settings.
Assignment of RiverWare Instances to Logical Processors
There are three options for how the distributed RiverWare instances are assigned to individual processors
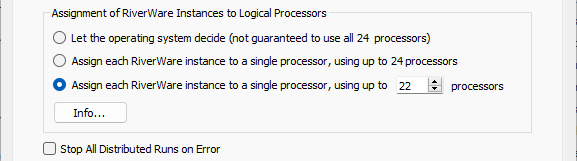
• Let the operating system decide. This is the default option. RiverWare starts the number of instances specified, but assignment to processors is managed by the operating system. For some combinations of hardware and operating systems, this option may not utilize all available processors. In some cases, only half of the available processors are utilized. Thus it may not take full advantage of the potential parallelization. To determine if all processors are being utilized, you can view the CPU usage in the Task Manager or Process Explorer (part of the SysInternals suite) while running the distributed MRM. On some machines, in order to guarantee that all processors are utilized, you must use one of the other two options.
• Assign each RiverWare instance to a single processor, using all available processors. For this option, MRM directly assigns each RiverWare instance to processors 0 to N, where N is the smaller of the number of RiverWare instances and the number of logical processors on the computer. If the number of RiverWare instances exceeds the number of processors, assignment will loop back through the processors beginning again with 0. RiverWare automatically determines how may processors are available. If the model is used on a different computer, the configuration for this option will update based on the number of processors on that computer.
Warning: Allowing MRM to utilize all processors can slow other processes on the computer, including user interface response; therefore, if you plan to use other applications while running MRM, it is recommended to use the third option in order to leave some processors free for other applications.
• Assign each RiverWare instance to a single processor, using up to <N> processors. For this option, specify directly how many processors to utilize. MRM directly assigns each RiverWare instance to processors 0 to N, where N is the smallest of the number of processors specified, the number of RiverWare instances, and the number of processors on the computer. If the number of RiverWare instances exceeds the number of processors, assignment will loop back through the processors beginning again with 0. Allowing RiverWare to utilize all processors can slow other processes on the computer, including user interface response. If you plan to use other applications while the MRM is running, it is recommended that you specify fewer than the full number of processors available on the computer, leaving some processors free for other applications.
Note: If you are using MRM with Optimization and you are using an LP Method that is multi-threaded, such as the Barrier Method, you should only utilize the first option to let the operating system decide how to distribute to processors. Otherwise each optimization will utilize only a single processor and thus, will not gain the benefit from multi-threading.
Stop All Distributed Runs on Error
Finally, in this section is a control to Stop all Distributed Runs on Error. When checked, if one distributed run aborts, the remaining distributed runs will also be stopped. This prevents having to wait for all runs to finish when one has failed and the results are not valid. See also Concurrent Runs for more information on a control to allow a set number of individual runs/traces to abort before aborting all runs. Setting the run limit to 1 has the same affect as checking the box for distributed runs, either will stop all simulations when one simulation fails. Note, the run limit takes precedence, as it will stop all simulations even if the box is not checked. The one area where the Stop all Distributed Runs on Error check box is relevant is when a multiple run aborts outside of a simulation (for example, when writing the RDF output).
Distributed MRM Controller and Status
As mentioned above, the distributed MRM includes a user interface, the Distributed MRM Controller, which displays the status of the simulations. This dialog is not within RiverWare but is a separate executable in the installation directory. It is also opened automatically when you make a distributed MRM run from the RiverWare MRM Run Control. More specifically, the Distributed MRM Controller allows you to:
• Start and stop the simulations individually or collectively.
• View RiverWare’s diagnostic output for the simulations.
• View the multiple and single run status.
• See an estimated time remaining.
• See the status of the post-processing (combining the RDF files).
In Figure 3.10, from left to right, are the Process Status, Multiple Run Status, and Single Run Status panels.
Figure 3.10
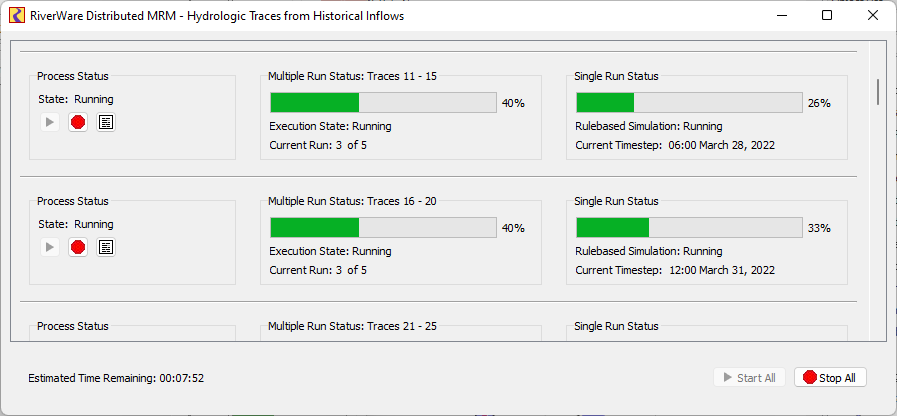
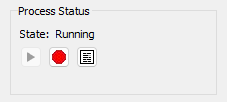
The Process Status panel includes the Start, Stop, and View Diagnostics buttons. The buttons allow you to start, stop, and view diagnostics for the individual run/process.
The Multiple Run Status and Single Run Status panels (which are very similar to RiverWare’s run status dialog) display the progress of each MRM run and each individual run:

The bottom of the dialog shows the estimated time remaining based on available data after the first run has completed.
How to Make a Distributed Run
There are two options, creating/changing the configuration (within RiverWare) or rerunning a configuration (can be external to RiverWare). These are described in the next two sections:
Creating or Changing a Configuration
If you are creating a new configuration or changing an existing configuration, the changes must be made from within RiverWare. This will allow RiverWare to create the necessary configuration files that will be passed to the simulation controllers. When you select Start, RiverWare will create the necessary configuration files and start the Distributed MRM Controller. The Distributed MRM Controller controls the execution of the MRM runs.
Use the following steps to make the runs in this case:
1. Open RiverWare.
2. Fully define the configuration or make any changes to an existing configuration in the MRM Run Control Configuration dialog. See User Interface Overview for the options.
3. Apply the changes.
4. SAVE THE MODEL. The distributed runs open and run the model that is saved on the file system. Therefore, you should save the model now, so that the configuration is preserved. Any changes to the model (including external files such as the RDF control file) will invalidate the saved configuration file.
5. Select Start on the Multiple Run Control Dialog. RiverWare will start the Distributed MRM Controller.
6. From the Distributed MRM Controller, select Start to start the distributed runs. See Distributed MRM Controller and Status for details.
7. The individual runs start and the status is shown including an estimate of the time remaining.
8. When all runs are complete, the output RDF files are combined into one final RDF file.
Rerunning a Configuration
If you are repeating a previously saved configuration, then you can execute the Distributed MRM Controller directly and not open RiverWare. In that case, you start at Step 6. The Distributed MRM Controller will first open a simple dialog allowing you to select the configuration file and will then open its user interface. See Save Configuration As for details.
How It Works
Figure 3.11 illustrates the distributed architecture. In the distributed architecture there is a controller processor and one or more simulation processors.
The distributed architecture includes two processes - the Distributed MRM Controller (RwRemoteMgr.exe) and instances of RiverWare (RiverWare.exe).
Figure 3.11
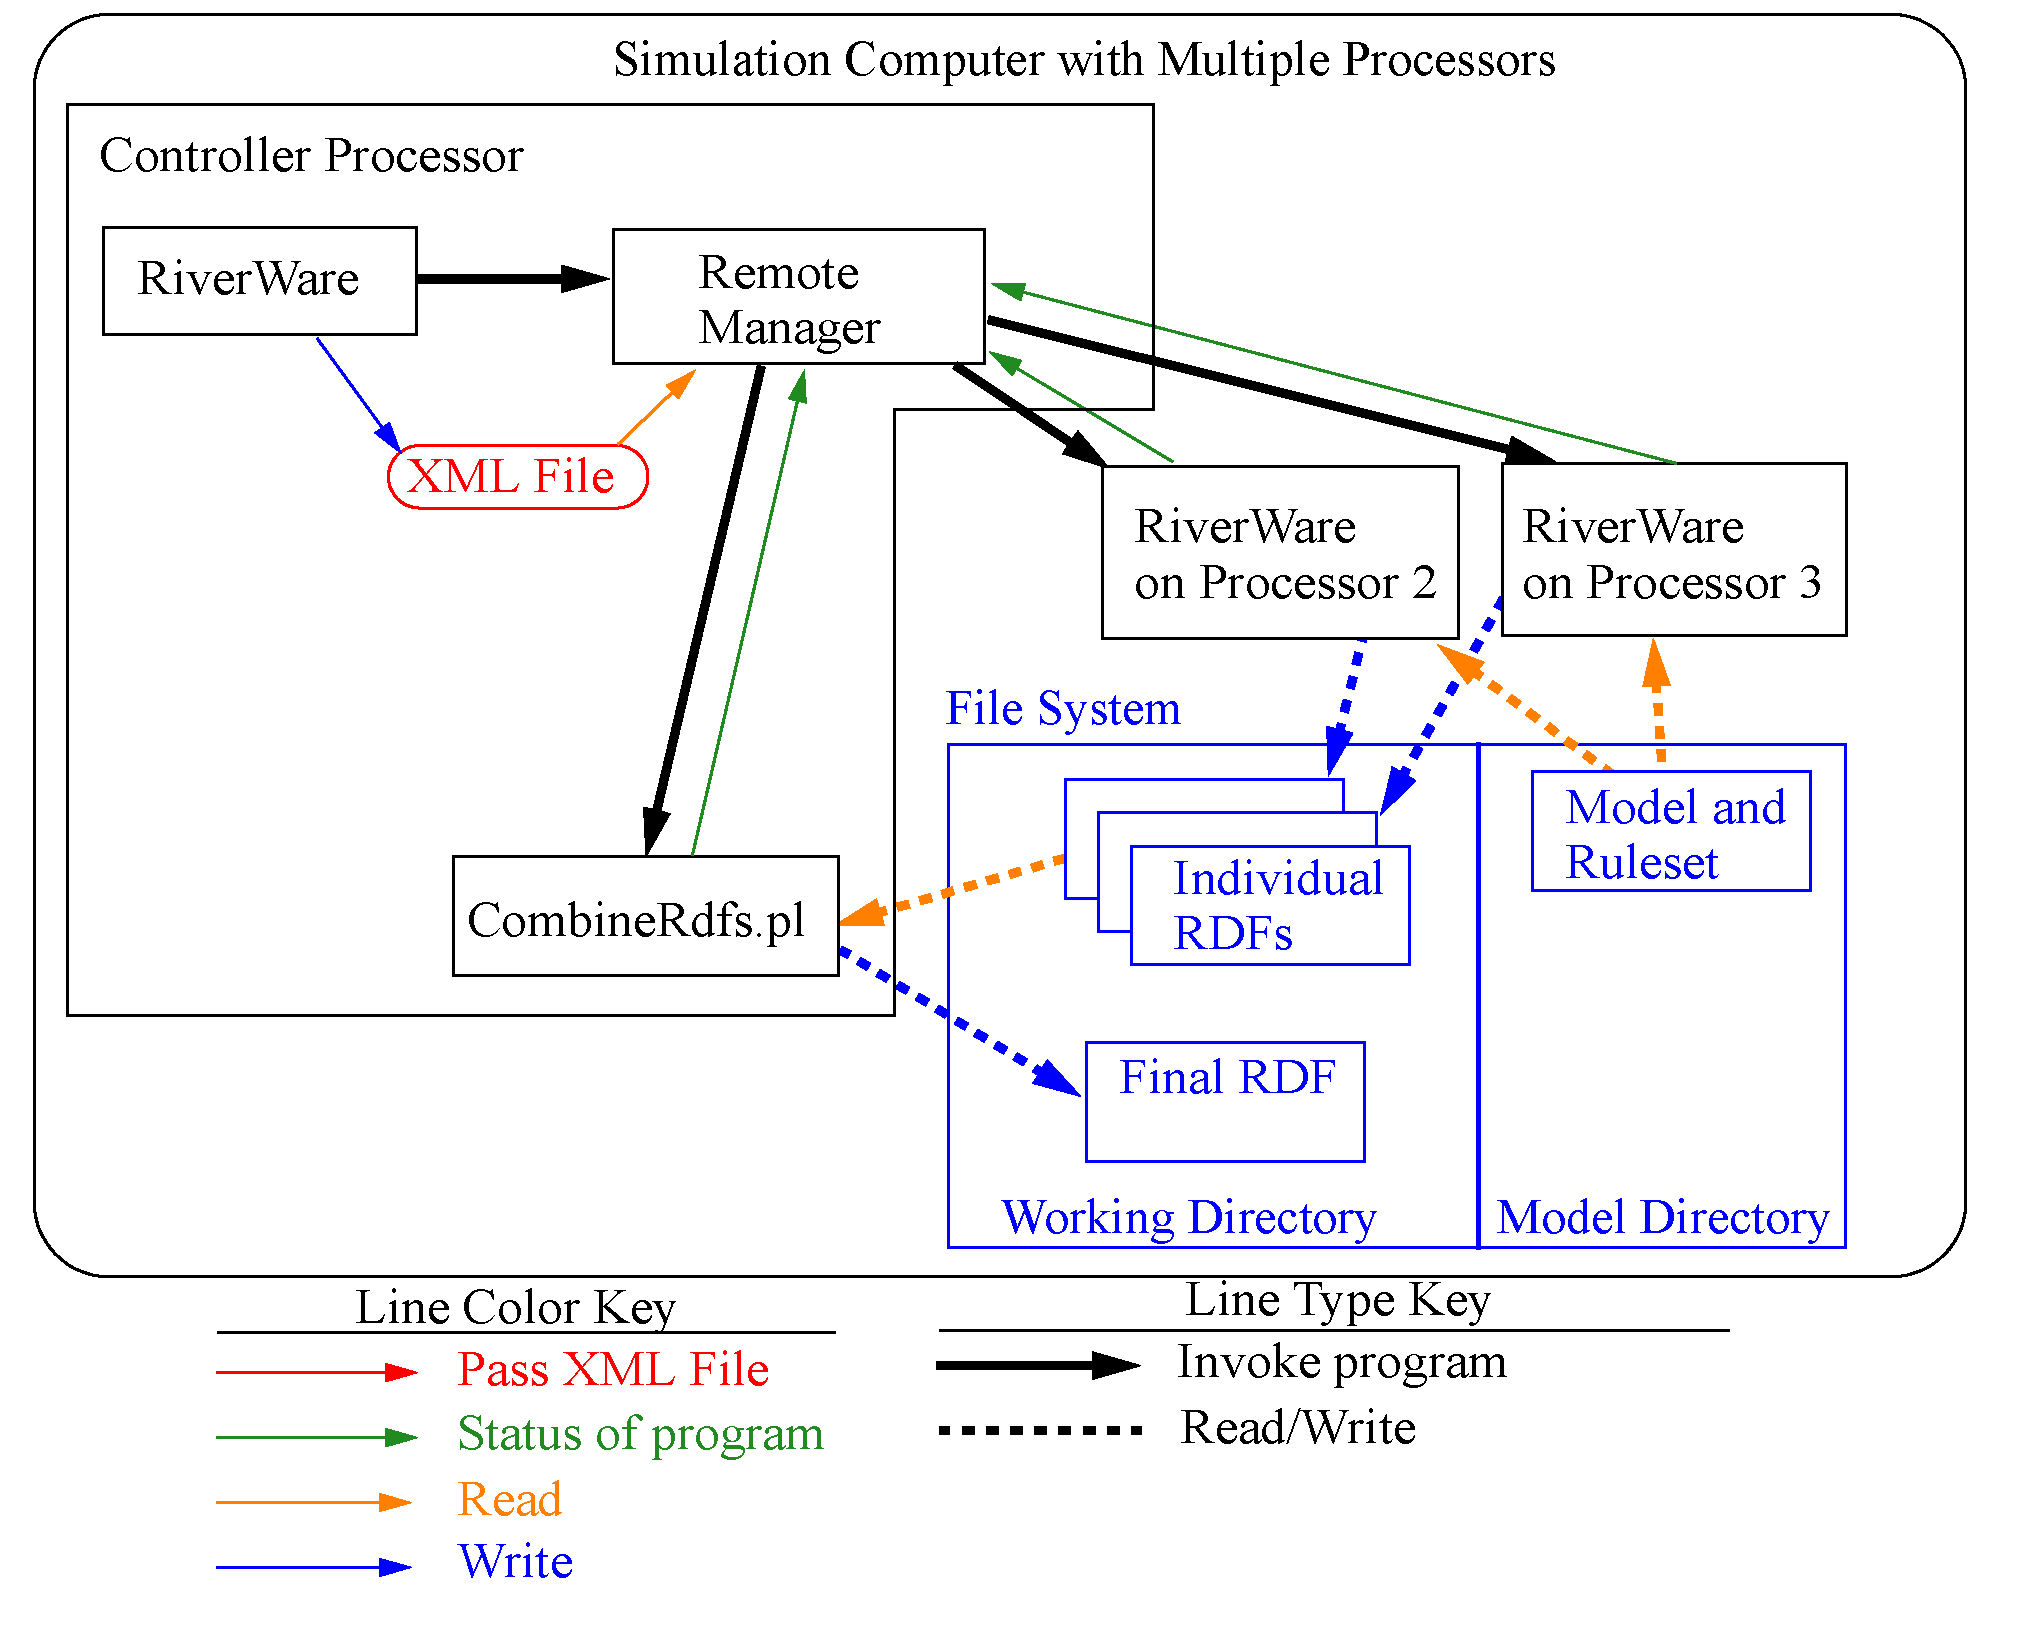
Distributed MRM Controller
The Distributed MRM Controller parses an XML configuration file that defines the simulations and:
• Creates an XML configuration for each of the simulations.
• Configures its user interface (a dialog which shows the status of the simulations).
• For each simulation, connects to the simulation processor, writes the XML configuration, and reads RiverWare’s output (which it uses to update its status dialog).
• When all simulations have finished, combines the partial RDF files to create the final RDF files.
XML Configurations
Previous sections have referred to XML configurations. These are the files that RiverWare creates to control/define the distributed MRM runs.
Note: This section is a technical reference providing more information on how this utility works. The XML files are generated by the utility and the user does not need to edit these files to make a distributed MRM run.
The top-level XML configuration <distrib> identifies a distributed concurrent run and is hereafter referred to as the distributed configuration. An XML document defining a distributed concurrent run would have the following top-level elements:
<document>
<distrib>
...
</distrbv>
</document>
The XML document defining a distributed concurrent run is created by RiverWare when a user starts the run. DistribMrmCtlr parses the distributed configuration and creates a configuration for each of the simulations. Some elements are from the MRM configuration, others are provided by RiverWare. Some elements are common to all simulations, others are unique to each simulation.
Example 3.1 Sample XML File
Key elements in this example are preceded by brief descriptions.
<distrib>
The RiverWare executable which started the distributed concurrent run. The assumption is that all simulations use the same executable.
<app>C:\Program Files\CADSWES\RiverWare 9.0\riverware.exe</app>
The model loaded when the user starts the distributed concurrent run.
<model>R:\\CRSS\\model\\CRSS.mdl</model>
The global function sets loaded when the user starts the distributed concurrent run.
<gfslist>
<gfs>R:\\CRSS\\model\\CRSS.gfs</gfs>
</gfslist>
The config attribute is the MRM configuration selected when the user starts the distributed concurrent run. The mrm elements are from the MRM configuration and identify for each simulation the traces to simulate.
<mrmlist config=”Powell Mead 2007 ROD Operations”>
<mrm firstTrace=”1” numTrace=”200”/>
<mrm firstTrace=”201” numTrace=”200”/>
</mrmlist>
The rdflist element is a list of the final RDF files, while the slotlist element is a list of the slots which are written to the RDF files. Slots can be written to multiple RDF files; they’re associated with the RDF files by the idxlist attribute, whose value is a comma-separated list of RDF file indices. RiverWare initializes the RDF DMI and mines its data structures to generate rdflist and slotlist.
<rdflist num=”2”>
<rdf name=”R:\\CRSS\\results\\Res.rdf” idx=”0”/>
<rdf name=”R:\\CRSS\\results\\Salt.rdf” idx=”1”/>
</rdflist>
<slotlist>
<slot name=”Powell.Outflow” idxlist=”0,1”/>
<slot name=”Powell.Storage” idxlist=”0”/>
</slotlist>
The envlist element specifies RiverWare’s runtime environment; RIVERWARE_HOME is from the version of RiverWare which starts the distributed concurrent run, all others are from the MRM configuration.
<envlist>
<env>RIVERWARE_HOME_516=C:\\Program Files\\CADSWES\\RiverWare 5.1.6 Patch</env>
<env>CRSS_DIR=R:\\CRSS</env>
</envlist>
The tempdir element is from the MRM configuration and is the intermediate directory where the individual simulations write the partial RDF files.
<tempdir>R:\\CRSS\\temp</tempdir>
</distrib>
Revised: 01/11/2023