
Model Comparison Tool
When developing a model, it is often desirable to compare a model to some previous version of the model to identify differences. In addition, comparison tools are essential when multiple people are developing a model or there are multiple versions of a model that are to be merged together.
Model Comparison Use Case
The need for a model comparison tool can be illustrated by the following use case.
1. Bob acquires a copy of the current “official” version of the model file, modifies it, and saves a new model file. The modification process could be lengthy and involve many different sorts of changes, e.g., adding objects and slots, running DMIs, executing runs, interactively changing data, etc.
2. Bob provides the new model file to Susie, who would like to understand the ways in which the new model differs from the original one. A comparison tool helps Susie locate and understand the differences.
3. Having reviewed Bob’s changes, Susie might then incorporate some or all of these modifications into a new model and then save this new model as the new official version.
Note: If only some of Bob’s changes are to be incorporated into the official model, or if the official model has changed since Bob originally obtained a copy of it, then Susie cannot simply replace the current official model with the model provided by Bob. Instead Susie should compare Bob’s model with the original or updated “official” model to see what has changed and then make those same changes to the original model.
The Model Comparison Tool compares many entities of two models. It looks at the properties of the entities and their values. It then shows the differences and allows you to see which items have changed.
Following are the limitations of the Model Comparison Tool:
• A subset of model entities are currently compared by this tool. The compared items are shown in the model selection dialog and in Table 3.2. In general, objects, accounts, slots, slot values, DMIs, scripts, MRM configurations, and RPL Sets saved within the model are compared.
• This tool doesn’t support automatic merging but allows you to copy from the selected property values panel and replace in the open model.
Accessing the Model Comparison Tool
From the RiverWare workspace, select Utilities, then Model Comparison Tool.
Selecting Models to Compare
The tool opens and shows a dialog where you specify the two models to compare; options are described below.
Model A and Model B Selections
The two models are referred to as Model A and Model B. For both models, choose one of the following:
• Currently Open Model. Choose the currently opened model, including any changes made since last saving the model.
• Read Model From File. Choose a model on the file system. Use the ellipsis button to open a file chooser to select the model.
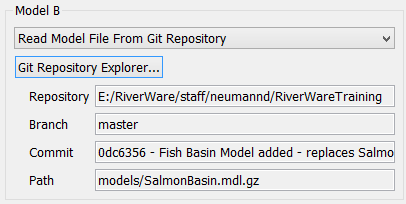
• Read Model File From Git Repository. Choose a model that is part of a Git repository. Then choose the model by repository, branch, commit, and file. The following section describes the Git repository selection.
Use the swap button to switch the selection for model A with the selection for Model B.

Reading From a Git Repository
When the Read Model File From Git Repository option is selected, the controls start out blank:
Select the Git Repository Explorer button to open the explorer.
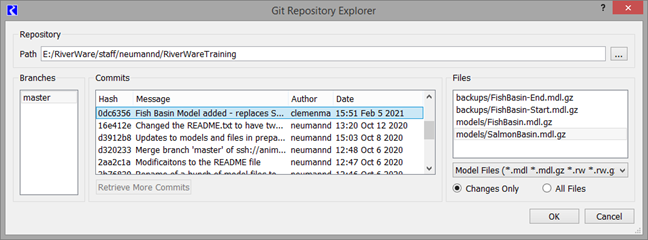
In this dialog box, you navigate through the various components of a Git repository with the goal of selecting a file to compare. The four basic steps are: 1) select the folder containing the Git repository, 2) select the branch, 3) select the commit, and 4) select the file.The following sections describe each piece.
Repository
It will show the repository for the current model (if there is one) and a history of recently used repositories. Select the button to the right of the Path field to select the folder of the repository. Any folder within the Git repository can be selected. Once selected, the Path field will be populated with the root directory of the repository (i.e. the directory that contains the .git subdirectory).
Branches
The Branches list is populated with the names of all locally available branches in the repository. If the desired branch is not visible, then the branch may need to be pulled from the remote Git repository using standard Git tools outside of RiverWare.
Commits
Selecting a branch in the list populates the Commits list with the latest 50 commits in that branch ordered from newest to oldest. Each entry displays the commit hash, message, author, and date, though only the first 7 characters of the hash and the first line of the message are displayed in the list. The entire hash and message can be viewed in a tool tip or in a separate dialog by right clicking on a commit and selecting the View Full Commit Message option.
Only the newest 50 commits are loaded. More can be loaded with the Retrieve More Commits button.
File Selection
Selecting a commit populates the Files list with the files in the commit according to the file display options:
• Changes Only: Only files that were changed as part of the selected commit are displayed. This is the default option.
• All Files: All files present in the repository at the time of the selected commit are displayed.
A drop down menu provides the ability to filter by file type. There are three options:
• Model Files (*.mdl *.mdl.gz *.rw *.rw.gz),
• gzip files (*.gz), and
• All Files (*)
To complete the selection, choose a file and select OK.
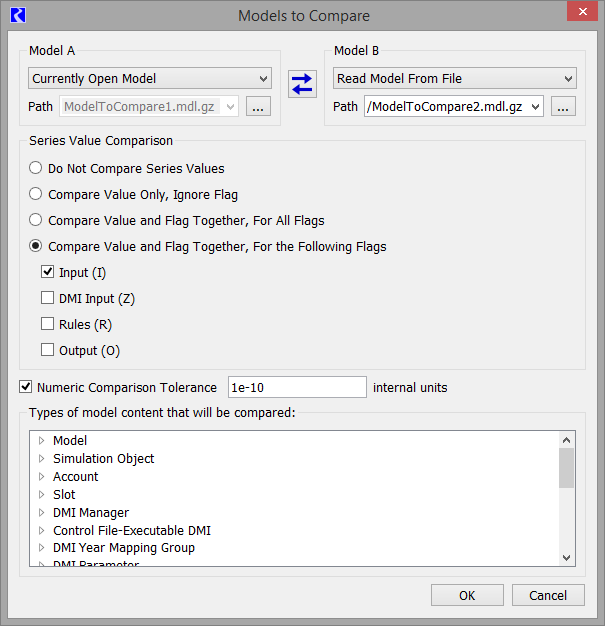
The information is now shown in the Models to Compare dialog box:
Series Value Comparison Options
In the Series Value Comparison region, specify how series data values should be compared. The following choices are available:
• Do Not Compare Series Values: No series values are compared. The series slot Values are not shown in the results.
• Compare Value Only, Ignore Flag: Compare series values, regardless of the flag. For example, if slot 1 has 100.0 (I) in Model A, but 100 (R) in Model B, no difference will be reported.
• Compare Value and Flag Together, For All Flags: Compare series values and flags. For example, if slot 1 has 100.0 (I) in Model A, but 100 (R) in Model B, a difference will be reported.
• Compare Value and Flag Together, For the Following Flags: Compare series values and flags but only for the specified flags. For example, if slot 1 has 100.0 (I) in Model A, but 100 (R) in Model B, no difference will be reported unless the I or R flag check boxes are selected. Choose which flags to compare: Input (I), DMI Input (Z), Rule (R), or Output (O).
Numeric Comparison Tolerance
If desired, specify an absolute tolerance for numeric comparisons in the Numeric Comparison Tolerance field. The value 1e-10 is used by default to avoid flagging as different those values with very small differences that occur due to machine precision.
Entities and Properties Compared
The bottom portion of the dialog shows which entities and properties in the model file will be compared. A full list of items is described in the Reference on the Entities and Properties Compared below. In general, objects, accounts, slots, slot values, scripts, MRM configurations, and RPL Sets embedded within the model are compared.
Note: This is a subset of entities/properties in the model file. For example the path of the two models is compared, but the run timestep is currently not compared. The list of content will be expanded in future releases.
All RPL sets saved or embedded in the model file are automatically compared including:
• Expression Slot Set
• Global Function Set (when saved in the model as described Save Location in RiverWare Policy Language (RPL))
• Initialization Rules
• Iterative MRM Ruleset
• Object Level Accounting Method Set
• Optimization Goal Set (when saved in the model as described Save Location in RiverWare Policy Language (RPL))
• Rulebased Simulation (RBS) Ruleset (when saved in the model as described Save Location in RiverWare Policy Language (RPL))
Those saved as separate files are not compared with this tool, but can be compared using the RPL Set Comparison tool, which has identical functionality. Access the RPL Set Comparison Tool from the workspace’s Policy and then RPL Set Comparison Tool menu. For more information, see Comparing RPL Sets in RiverWare Policy Language (RPL).
Making a Comparison
When finished configuring the dialog, select OK. The tool then performs the comparison and the main Model Comparison Tool is then shown.
The comparison happens when the selection dialog is confirmed or the Refresh button is selected. Afterwards, the tool displays the results of that comparison, which might no longer apply if you have since changed the workspace or deleted the file.
Note: When comparing models from a Git repository (see Reading From a Git Repository), RiverWare obtains a version of the model from the repository and saves it to a temporary folder. The comparison is then performed on the temporary model file using the process described in How the Model Comparison Tool Works. The comparison shows the path to the temporary file.
Reference on the Entities and Properties Compared
Table 3.2 provides a description of each entity compared, and for each of the entities, the properties that are considered. The asterisk (*) in the Properties indicates the copy property is supported for this property. See Copy Property for more information.
Note: Not all entities of a given type will have all of the properties, e.g., not all slots have expressions.
Entity | Properties (an * indicates the Copy Property operation is supported) |
|---|---|
Model | • Path - The location of the model on the file system are compared as text. • Version - The RiverWare version from the last save. • Run Start - The run start timesteps are compared • Run Finish - The run finish timesteps are compared • Run Timestep Size - The timestep sizes (1 Hour, 1 Day, etc) are compared |
Simulation Object | • Description - The text description as shown on the Open Object dialog’s Description tab are compared as text. • Methods - The user-selectable methods, shown on the object’s Methods tab are compared as text. Note: The tool compares all categories and methods, whether they are visible or not (perhaps because they are specific to a certain controller or dependent on other methods/categories). They are listed alphabetically by category. |
Account | • Water Type - For each account, the Water Type is compared. • Water Owner - For each account, the Water Owner is compared. • Priority Date - For each account, the Priority Date is compared. |
Slot | • Name - compared as text • Description - For each slot, the description is compared as text. • Value(s) * - The values of slots are compared using the tolerance described below. The slot values are shown in the appropriate format based on the type of slot. For tables, periodic and scalar slots, the values are compared using the full precision in standard values on the slots. For series slots, the comparison uses the setting shown in the Series Value Comparison, described above. Note: Slot values are shown using the Unit Type rule defined in the active Unit Scheme. Slot level exceptions are not supported. • Expressions * - For expression slots, the RPL expression is compared. • Linked Slots - For series slots, any linked slots are compared. • Slot References - for Mass Balance Summary Slots, the slots referenced in the Water Balance and Slots Sums are compared as a list. • Row labels - For table and periodic slots, the list of row labels is compared |
Slot Set | Information on Slots Sets can be found in Slot Sets. The following is compared: • Name - Compared as text. • Dynamic - The set’s dynamic setting is compared. This indicates whether the slot set is dynamic (yes) or static (no). • Slots - The list of slots in the slot set are compared as text. |
DMI Manager | DMIs are compared in a hierarchical structure. The DMI Manager is the top level item and contains: • Locked Status - Is the DMI locked? Yes/No compared as text. • Show Progress - Will the DMI Progress dialog be displayed? Yes/No compared as text. • Show Status - Will the DMI Status dialog be displayed? Yes/No compared as text. |
Control File-Executable DMI | These items correlate directly to the Control File-Executable DMI dialog. All content is compared as text and toggles are shown as Yes or No. • Name - the DMI name is compared as text • Input or Output - the DMI input/output type is compared as text. • Confirm Warnings - Does the DMI confirm warnings, compared as Yes/No. • Record Invocations - Yes or No, compared as text • Control File - The control file is compared • Executable - The executable and path are compared as text. • Allow Spaces in File Paths - Yes or No • Limit Output Range to Run Range - Yes or No • Line Ending - - Native, windows, or unix • Active User Parameters - Only the active user parameters are compared as text. |
Trace Directory DMI | These items correlate directly to the Trace Directory DMI dialog. All content is compared as text and toggles are shown as Yes or No. • Name - the DMI name is compared as text • Input or Output - the DMI input/output type is compared as text. • Confirm Warnings - Does the DMI confirm warnings, compared as Yes/No. • Record Invocations - Yes or No, compared as text • Allow Spaces in File Paths - Yes or No • Limit Output Range to Run Range - Yes or No • Line Ending - Native, windows, or unix • Top Level Directory - The file path is compared as text. • Control File - The control file (sometimes called a control file template) is compared. • Single Trace Number - The trace number used for a single run. |
Database DMI > Dataset > > Slot Selection | The properties for a Database DMI show a hierarchical structure displaying the following item: • Name - the DMI name is compared as text • Input or Output • Confirm Warning - Yes or No • Record Invocations - Yes or No • User Parameters - Compared as text Then, there is a sub item for each referenced Dataset • Name - The name of the referenced dataset. • Type - Either DSS, HDB, or Excel • Enabled - Yes or No Then, there is another sub item for each referenced Slot selection: • Selection Label - The label shown for this slot selection • Enabled - On or off • Begin Timestep • End Timestep • Slot List - The expanded list of slots for this slot selection |
Database Group | • Name - The group name is compared as text. • Comment - Comments are compared as text • Members - The names of DMIs contained in the group are compared as text. |
DMI Year Mapping Group | • Name - The group name is compared as text. • Comment - Comments are compared as text • Members - The names of DMIs contained in the group are compared as text. • Map Years - The list of map years is compared. |
DMI Parameter | • Name - The parameter name is compared as text. • Minimum Value - The minimum value is compared. • Maximum Value - The maximum value is compared. • List Items - The list of possible values is compare as text. |
DSS Dataset | These items correlate directly to the DSS Dataset dialog. All content is compared as text and toggles are shown as Yes or No. • Name • Name Map • Missing Value Preference • Missing Value Replacement • Unit Preference • Unit List • Read Table Behavior • DSS File • DSS Path • Data Type List |
Excel Dataset | These items correlate directly to the Excel Dataset dialog. All content is compared as text and toggles are shown as Yes or No. • Name • Name Map • Missing Value Preference • Missing Value Replacement • Unit Preference • Unit List • Connection Process • Workbook • Slot Mapping • Header Specification • Header Orientation • Ranges on Same Worksheet • Worksheet • Apply Header Offset • Header Offset • Apply Range Offset • Range Offset • Run Name Type • Single Run Name • Use Begin Timestep • Use Units |
HDB Dataset | These items correlate directly to the HDB Dataset dialog. All content is compared as text and toggles are shown as Yes or No. • Name • Name Map • Missing Value Preference • Missing Value Replacement • Unit Preference • Unit List • Group Slots • Database Name • Table Type • Mapping ID • Model ID • Model Run ID • Runtime Model Run ID • Ensemble ID • Runtime Ensemble ID • Ensemble Agency ID • Ensemble Trace ID • Use Water Year Table • Use Overwrite Flag • Read Validation Character |
Name Map | • Name - The name is compared • Display Order - The ordering of the name maps are compared. |
Script Manager | The Script Manager shows item shows a hierarchical list of Scripts, Scripts and Script Groups. The following general Script Manager items are compared: • Default Tab • Open on Model Load • Execute Group on Model Load • Group to Execute on Model Load |
Script Group | Each Script Group is shown with the following: • Name • Scripts |
Script | Each script has a hierarchical list showing all of the script actions and the following: • Name • Description |
Script Action | Each Script Action compares the following properties as text: • Enabled • Show in Dashboard • Display Text • Additional properties specific to the action type Note: There are many types of script actions, and each type has a different set of properties. Because these properties are numerous and varied, they are not enumerated in this table or in the Models to Compare dialog. |
MRM Configurations | These items correlate directly to the MRM Configuration dialog. All content is compared as text and toggles are shown as Yes or No. The properties for MRM Configurations show a hierarchical structure displaying the following items for each MRM Configuration: • Name • Description • Keyword / Value Descriptors • Mode • Policy Setup • Input DMIs Setup • Input DMIs Type • Rulesets - This is a list of rules shown on the Policy tab. • Input Ensembles - These are the input ensembles shown on the Ensembles tab, when configured • Output Ensembles - These are the output ensembles shown on the Ensembles tab, when configured |
MRM Output Info | For each MRM configuration, these sub items correlate directly to the Output tab of the MRM configuration dialog. All content is compared as text and toggles are shown as Yes or No. • Per Trace Output DMI • RDF: Control File • RDF: Data File • RDF: Timesteps Mode • RDF: Allow Spaces in File Paths • Excel: Generate Excel Workbooks from RDF • Excel: Delete RDF Files • Excel: Slot Name Format • Excel: Workbook Configuration • Generate Comma-Separated Values Files - Yes or no toggle, See next section. • Generate NetCDF Files - Yes or no toggle, See section below |
MRM Comma-Separated File | For each Comma-Separated Values output shown in the list, these sub items correlate directly to the Comma-Separated Values File Configuration within the MRM configuration. All content is compared as text and toggles are shown as Yes or No. • Name • File • Timestep Format • Use Object Name • Use Object Type • Use Slot Name • Use Slot Name With Unit • Use Unit • Use Timestep Size • Use Year • Use Month • Use Model Name • Use Ruleset File Name • Use Input DMI Name • Use MRM Config Name • Use MRM Descriptors • Slots - This is the list of slots to ouput to the CSV file |
MRM NetCDF File | For each NetCDF Files output shown in the list output list, these sub items correlate directly to the Net CDF File Configuration within the MRM configuration. All content is compared as text and toggles are shown as Yes or No. • Name • File • Use Ruleset File Name • Use Input DMI Name • Use MRM Config Name • Use MRM Descriptors • Use Model Name • Use Object Name • Use Object Type • Use Slot Name • Use Unit • Use Timestep Size |
MRM Run Parameters | For each MRM Configuration, these sub items correlate directly to the Run Parameter tab within the MRM configuration dialog box. All content is compared as text and toggles are shown as Yes or No.For more information, see Concurrent Runs in Solution Approaches. • Initial Date • Finish Date • Timesteps • Use Accounting Controller • Save Model File • Save After • Save In Folder • Save With Name Prefix |
MRM Input Info | For each MRM Configuration, these sub items correlate directly to the Input tab within the MRM configuration dialog box. All content is compared as text and toggles are shown as Yes or No. • Has Initialization DMI • Initialization DMI • Input DMIs • Has Ensemble Input • Index Sequential: Number of Runs • Index Sequential: Initial Offset • Index Sequential: Interval • Index Sequential: Interval Units • Index Sequential: Control File • First Trace • Number of Traces • Index Sequential / DMI Mode • Distributed Runs Enabled |
MRM Distributed Runs | For each MRM Configuration, these sub items correlate directly to the Distributed Runs tab within the MRM configuration dialog box. • Working Directory - the path is compared as text • Save Run Configuration - yes or no • Saved Run Configuration Path - the path is compared as text • Distribution Approach - This corresponds to the radio button. The two options are shown in the model comparison tool as: Use all available cores or Specify number of multiple runs. • Number of Runs - The computed or specified number of runs is compared. • Stop All Runs on Error - yes or no • Environment Variables - Any specified environment variables are compared as a list. |
MRM Iterative Runs | For each MRM Configuration, these sub items correlate directly to the Iterative Runs tab within the MRM configuration dialog box. All content is compared as text and toggles are shown as Yes or No. • Pre-Run Rules • Post-Run Rules • Execute Pre-Run Rules • Continue After Abort • Max. Iterations |
RPL Set (for all sets that are saved within the model file) | • Name - The set names are compared as text. • Agenda Order - The agenda order (1,2,3... or ... 3,2,1) are compared as text. • Description - The set description is compared as text. • Precision - The set precision is compared as a numeric value. • Is Global? - Is this set a global functions set. • External Documentation - The external documentation toggle is compared as text. |
Utility Group (as part of a RPL set saved within the model) | • Name * - The group names are compared as text. • Description - The group description is compared as text. • Notes - The group notes are compared as text. • Is Enabled - The enabled/disabled setting is compared. • Names Color - The colors used for the group name is compared as a color value. • External Documentation - The external documentation toggle is compared as text. |
Policy Group (as part of a RPL set saved within the model) | • Name * - The group names are compared as text. • Description - The group description is compared as text. • Notes - The group notes are compared as text. • Is Enabled - The enabled/disabled setting is compared. • Names Color - The colors used for the group name is compared as a color value. • External Documentation - The external documentation toggle is compared as text. |
Report Group (as part of a RPL set saved within the model) | • Name * - The group names are compared as text. • Description - The group description is compared as text. • Notes - The group notes are compared as text. • Is Enabled - The enabled/disabled setting is compared. • Names Color - The colors used for the group name is compared as a color value. • External Documentation - The external documentation toggle is compared as text. |
Rule, Goal Method (as part of a RPL set saved within the model) | • Name * - The rule names are compared as text. • Priority - The rule priority values are compared. • Description - The rule description is compared as text. • Notes - The notes are compared as text. • Is Enabled - The enabled/disabled setting is compared as true or false. • Execution Constraint * - The execution constraints are compared as RPL items. • Pre-Execution DMI Name - The pre-execution DMI names are compared as text. • Post-Execution DMI Name - The post-execution DMI names are compared as text. • External Documentation - The external documentation toggle is compared as text. • Stop on NaN - The Stop on NaN settings are compared as true or false. • Names Color - The colors used for the rule name is compared as a color value. • Statements * - The RPL statements are compared as RPL items. |
Function (as part of a RPL set saved within the model) | • Name * - The function names are compared as text. • Description - The function description is compared as text. • Notes - The group notes are compared as text. • Is Enabled - The enabled/disabled setting is compared. • Arguments - The functions’ set of arguments are compared as text. • Return Type - The functions’ return type (NUMERIC, BOOLEAN, etc) are compared as text. • Diagnostic Units - The Display Function Diagnostics Scale/Units is compared as text. • Pre-Execution Diagnostics - The pre-execution diagnostic toggle is compared as true or false. • Post-Execution Diagnostics - The post-execution diagnostic toggle is compared as true or false. • Is Time Varying - The toggle for Time Varying is compared. • External Documentation - The external documentation toggle is compared as text. • Post-Execution Checks * - The functions’ Post-Execution Checks are compared as RPL expressions. • Names Color - The colors used for the function name is compared as a color value. • Body * - The RPL expressions are compared as RPL items. |
Report Item (as part of a RPL set embedded in the model) | • Name * - The item names are compared as text. • Item Type - The type of the item (rule, function, object, slot, etc) are compared • Item Parent - The items parent (i.e for a slot, which object is it on) are compared. • Names Color - The colors used for the item name is compared as a color value. • External Documentation - The external documentation toggle is compared as text. |
Tour of the Model Comparison Tool
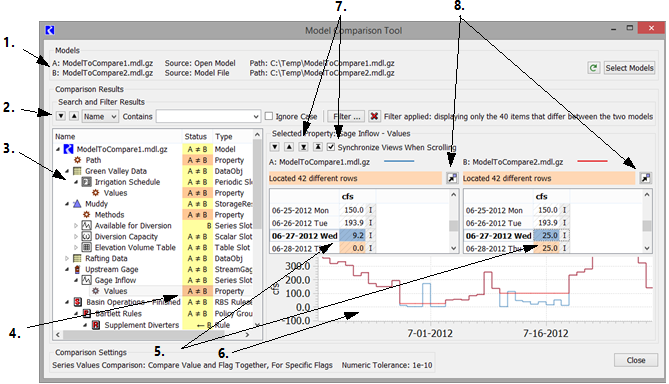
The Model Comparison Tool contains the following areas, as shown in Figure 3.3 and explained by the numbered items:
1. The Models panel shows the names, sources and paths of the selected models.
2. The Search and Filter Results panel allows for searching and filtering of the results.
3. The hierarchical view of results area shows the comparison results.
4. The color coding and Status shows individual differences between the two models.
5. The Selected Property panel shows the property (if any) for the currently selected item in the comparison results view. This shows the differences are highlighted in orange with the selected cells in blue.
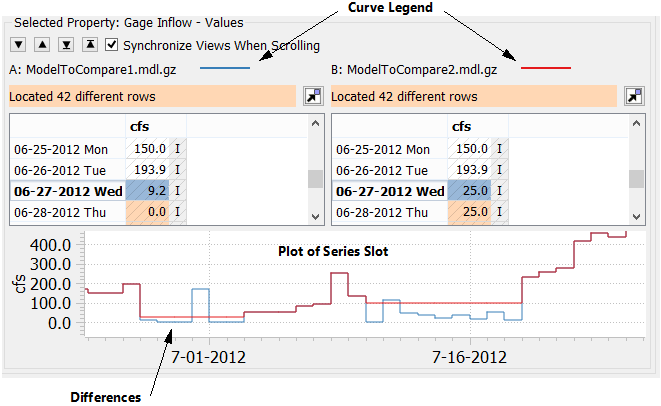
6. When a series slot’s values are selected, a plot is also shown. Data from Model A is shown with a blue line, while model B data is shown in red. A legend above the data reinforces the color usage.
7. When a slot value, text item, or RPL item is selected, navigation controls are shown to go to the next/previous difference and to scroll the two panels together.
8. The Copy Property operation allows you to copy the property’s value and replace it in the opened model. It is only enabled when this operation is supported.
Figure 3.3 Screenshot of the Model Comparison Tool showing the main areas of the tool.
The following sections describe these areas and how to use the tool.
Models Panel
The Models panel shows information about the models that were compared, including, for each model, the name (usually the file name), the source (i.e., whether it was the currently opened model or read from a file), and the full file system path. Use the Select Models button to choose different models and initiate another comparison. This opens the Models to Compare dialog; see Selecting Models to Compare.
Recompute the differences between the two models by clicking on the green circular arrow.  This is useful if you make changes to Model A or B.
This is useful if you make changes to Model A or B. Note: When the models are selected, the Model Comparison Tool compares the specified models. See How the Model Comparison Tool Works for details. If you make changes to one of the chosen models, it is not immediately reflected in the comparison tool. Use the Recompute Differences button  to update the status in the tool.
to update the status in the tool. Comparison Results Panel
The Comparison Results panel shows a hierarchical view of the results of the comparison. The hierarchy is based on the structures of the two model. For example, objects contain slots as children entities. Aggregate objects have object elements as their children. Objects and slots are listed in alphabetical order within the hierarchy level.
Use the tree controls (arrows) to expand or collapse sections or items. The expanded/collapsed state is preserved as much as possible when re-computing differences between models or applying filters. Right-click context menus also include
or applying filters. Right-click context menus also include – Expand All Sub-Items fully expands the selected item and all of the items beneath it, similar to the default view after a comparison is performed.
– Collapse All Sub-Items collapses all of the selected item’s children, providing a more summarized view of differences.
Double-clicking an object or slot item will open the appropriate dialog to view the version of that entity. Note, double-clicking to open only works if one of the models compared is the open model.
Columns include the Name, Status and Type. The Model, Objects, and Slots show their particular icon. The Status column shows the results of the comparison. Table 3.3 lists the possible status values and their meanings.
Status | Meaning |
|---|---|
A = B | The item is identical in Models A and B. |
A ≠ B | The item is different in Models A and B. |
A | The item exists in model A but not in Model B. |
B | The item exists in Model B but not in Model A. |
A --> | The item exists here in Model A and elsewhere in Model B and/or the item has been renamed. |
<-- B | The item exists here is Model B and elsewhere in Model A and/or the item has been renamed. |
The Type column lists the type of that row: either a Model, Simulation Object (type of object), Type of Slot, Account, DMI item, RPL item or property. The comparison tool ultimately compares Properties of the items, not the items themselves. In the Status column, the color indicates the following meaning. This is also shown in Figure 3.4:
Figure 3.4 Legend for Status column colors
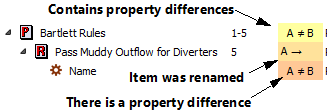
• Yellow indicates that the item contains properties and that within the item there are differences in properties.
• A light orange shading indicates the item’s Name property has changed; that is, the item has been renamed. When an item has been renamed (not copied/pasted or moved), the item will show up twice in the list, once with the name used in model A (the status shows “A ->”) and once with the name used in model B (the status shows “<- B”).
• The darker orange color indicates that the value of the property is different.
Green text indicates the property’s value has been replaced in the opened model with the value from the other model. See Copy Property for more information.
Search and Filter Tools
You can search, in either direction, for specific content in any of the three columns (Name, Status, or Type). Use the drop-down menu to specify in which column to search. Type a string into the search field.
Table 3.4 describes the search and filter buttons in the Comparison Results panel.
Button | Text | Meaning |
|---|---|---|
 | Next Match | Select the next item that matches the search criteria. |
 | Previous Match | Select the previous item that matches the search criteria |
 | Search | Choose where you wish to search,. Select either one of the tree columns, Name, Status, or Type or choose to search in the values of the items, that is, the raw data. |
 | Search Content | Type in the search criteria. Use the arrow menu to select previously entered items. |
 | Ignore Case | Check the box to ignore case when searching. When unchecked, case is considered. |
 | Filter... | Open a dialog where filters can be applied. This opens the Model Comparison Tool Display Filters dialog; see Filter Settings |
 | Cancel | Remove all filters. |
 | Filter Status | Text is shown noting that there are filters applied and the number of items shown. |
 | Quick Filter context menu | Use the context menu to quickly filter items out of the results tree. See Quick Filters |
Filter Settings
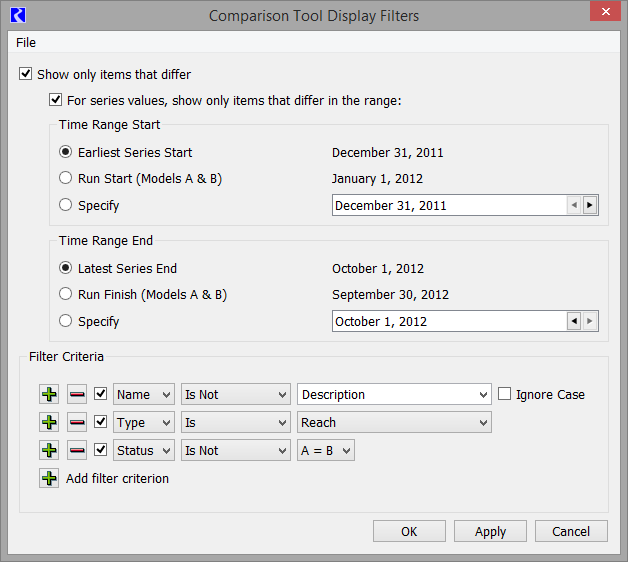
When displaying results for a large model, there can be many differences. Use the Filter button to set up filters to only see desired items; a sample is shown in Figure 3.5.
Figure 3.5 Model Comparison Tool Display Filters
The following types of filters can be applied:
• Show only items that differ - When selected, only items that differ are shown. Other items that match are not shown in the comparison results panel. De-select this option to show every item that was compared.
For series values, show only items that differ in the range: For the model comparison tool, you can further filter to show series slot differences using this option. When selected, there are several options for specifying the start and end dates of the range to apply.
For the Time Range Start, the options are:
– Earliest Series Start: the earliest series slot start date, considering all series slots in both model A and B.
– Run Start: the start date of the single run controller of model A or models A and B, if they match.
– Specify: enter any date using the resolution of either A or B’s timestep size, whichever is smaller.
For the Time Range End, the options are:
– Latest Series End: the latest series slot end date, considering all series slots in both model A and B.
– Run Finish: the finish date of the single run controller of model A or models A and B if they match.
– Specify: enter any date using the resolution of either A or B’s timestep size, whichever is smaller.
When a time range has been specified and the filter is applied to the comparison results, Series Slot Values properties are shown in the results tree if they differ between the two models at one or more dates in the time range. The tabular display of values is scrolled to the start date of the filter range and the plot is zoomed on the time axis to show the filter range.
• Filter Criteria - additional filters can be configured. Add filter criteria using the  button and remove using the
  button.
button and remove using the button. Note: Results are the intersection of all the filter criteria. In other words, the results shown will match the filters specified in row 1 AND row 2 AND row 3, and so on.
For each filter criterion, options include the following.
– Name: Filter on the Name column to only show results that match one of the following criteria:
• Is: Does the name exactly match the specified filter text?
• Is Not: Does the name exactly not match the specified filter text?
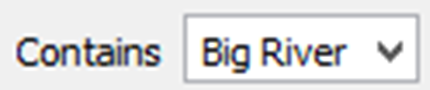
• Contains: Does the name contain the specified filter text?
• Does Not Contain: Does the name not contain the specified filter text?
For each Name filter row, choose to Ignore Case if desired.
– Type: Filter on the Type column. The drop-down menu shows the types that are available in the results.
• Is: Does the type exactly match the specified option?
• Is Not: Does the type not match the specified option?
• Is: Does the status exactly match the specified option?
• Is Not: Does the status not match the specified option?
– Values: Filter on the value of the property, i.e. the data compared.
• Is: Does the value exactly match the specified filter text?
• Is Not: Does the value exactly not match the specified filter text?
• Contains: Does the value contain the specified filter text?
• Does Not Contain: Does the value not contain the specified filter text?
There are some known limitations with the value search/filter behavior:
• Commas need to be included in the search/filter text for the thousands separator. For example, enter “1,000” to find a value of 1000.
• Series timestep search/filter text must be of the form “00:00 January 1, 2021” even though the dates are displayed in the form “1-1-2021 Fri 00:00” in the comparison tool.
• Scalar date values must be searched by their integer representation as seen in the Slot Viewer - For example, “12:00 November 6, 2020” has an integer value of “6,969,326,400” (note that the commas would be required here).
When a filter is applied, the status in the Search and Filters status is updated. To disable all filter, select the red X in the Model Comparison Tool.
Custom Filter Sets
One model comparison filter set and one RPL set comparison filter set can be saved in the model file as a “custom set”. This is useful when the same filter criteria are used frequently with a given model. These custom filter sets are accessed from the File menu:
• Load Custom Filter Set: updates the Comparison Tool Display Filters dialog with the filter set previously saved with the currently loaded model.
• Save Current Filters as Custom Filter Set: applies the current settings in the filters dialog as the new custom filter set in the currently loaded model.
Tip: There is one custom filter set for the Model Comparison Tool and one for the RPL Set Comparison tool.
You can also export/import filter sets as described in Export/Import Filter Sets.
Clearing Filters
Use the File and then Clear Filter Set menu to reset all filters in the Comparison Tool Display Filters dialog back to default values.
Export/Import Filter Sets
Filter sets can also be exported to and imported from separate files. This is useful when different sets of criteria are applicable in different circumstances or when a single set of criteria is useful across multiple models. Filter sets are exported and saved as an XML file.
Use the File and then Export Filter Set menu and then specify an XML file name/path to use. The current filters in the Comparison Tool Display Filters dialog are saved to the file.
Use the File and then Import Filter Set menu to import a previously exported set.
Note: Neither option has any impact on the custom filter sets saved in the model file.
Tip: Exported Filter Sets are specific to either the Model Comparison Tool or the RPL Set Comparison tool and are not interchangeable.
Quick Filters
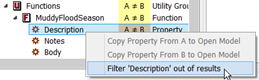
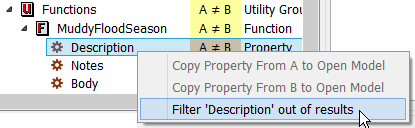
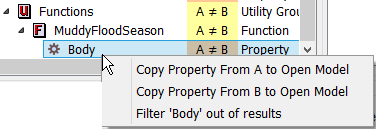
Quickly filter an item out of the results tree using the right-click context menu on the results tree. For example, in Figure 3.6, you don’t want to see any descriptions in the results, so right-click and choose Filter ‘Description’ out of results’.
Figure 3.6 Screen shot of right-click context menu to filter item from results
This action creates a filter in one of the available filters in the Comparison Tool Display Filters:

For objects, you can quickly filter out objects of that name, all objects, or objects of that type (Reservoir, Reach, and so on)
Use the filter dialog, described in Filter Settings, to remove or edit the filter.
Selected Property
The Selected Property panel shows the values for the selected property where applicable. If a yellow row (Model, Object, Slot, etc.) is selected, a note is shown that “No Property Selected”. Only property values are shown in these views. When a Property row is selected, the panel shows the values for that property. Depending on which property is selected, its value will be displayed as text, a table of slot value, possibly including a plot, or as a RPL expression. For example, in Figure 3.7, there are differences in the Methods on Muddy reservoir. Selecting the Methods row shows the differences in the Selected Properties area.
Figure 3.7 Model Comparison Tool results with Selected Property highlighted

Right-click the property values and choose Copy to copy the data to the system buffer. This works for both text differences and slot values. You can paste these to an email, document, or spreadsheet.
Navigation Controls
To view individual differences displayed in the property panel more easily, the following buttons are shown in Figure 3.8 and the corresponding operations are described below:
Figure 3.8 Screenshot of Model Comparison Tool navigation controls. The numbers correspond to the items in the list.

1. Scroll to the next difference: The property value displays are initially scrolled to the first difference. This operation scrolls down until the next difference is in view.
2. Scroll to the previous difference: This operation scrolls up until the previous difference is in view.
3. Scroll to the next group of contiguous differences: For slot data, this operation scrolls down until the next group or block of contiguous differences is in view.
4. Scroll to the previous group of contiguous differences: for slot data, this operation scrolls up until the next group or block of contiguous differences is in view.
Note: When using these four next and previous operations, the navigation is relative to the selected difference; it is not relative to the selected cell, timestep, RPL item or other selection.
5. Synchronize Views When Scrolling: When this box is checked, scrolling one property value display (horizontally or vertically) will also scroll the other value display by the same amount. If the displayed values are vastly different widths or heights, then there is a limit to the degree to which the views can be synchronized. For example, time series with much different time ranges may not scroll exactly together.
Plots
When Values for a series slot are selected, a plot is shown within the Selected Properties panel. The plot shows the entire set of data with two lines, one for each model. Model A data is shown in blue, while Model B data is shown in red. A legend is shown above the data. Figure 3.9 illustrates.
Right-click the plot area for options to Auto-Scale, Zoom, Move, Copy Plot Image, Export Image, or Print. Draw a rectangle on the plot to zoom in.
Figure 3.9 Model Comparison Results with a plot of numerical differences shown.
Copy Property
Once you’ve compared models and identified differences, sometimes you might want to “merge” the two models together. The Model Comparison Tool supports merging by allowing you to select a property item and then chose to copy the value and paste it into the value in the opened model. The operation is essentially:
Copy the value of the selected property (in Model A or B) and replace the value of that property in the open model
This operation is enabled only when the following conditions are met:
• A supported property is selected in the results tree. Currently certain items are supported including RPL statements, RPL function bodies, slot names, and slot values. Supported items are listed in the Table 3.2 with an asterisk next to the item.
• The parent item exists in both models.
• The property’s comparison status is A≠ B.
With a property selected, there are two ways to initiate the Copy Property operation:
• Use the Copy Property button 
• Right-click context menu on the property
When you initiate the action, the value in value shown in the comparison tool is copied and then pasted into the same property in the open model. The dialog is typically opened. The value in the model comparison’s window is not changed. It always shows the result of the last comparison. But the property text is now shown in green and the header shows an exclamation point with a tool tip noting that the property was modified in the opened model. Figure 3.10 shows a sample of the dialog box after a Copy Property operation has occurred.
Figure 3.10 Screenshot showing the selected property after a replacement has occurred. Note the green text indicating the property has been replace.

Warning: The comparison tools and the copy property operation uses codes, called Universally Unique Identifiers (UUIDs), to track the items in the model. These were introduced in RiverWare 7.5. If you compare two models that diverged before this release, then the items do not have the same codes and the comparison and copy properties operation may not work.
How the Model Comparison Tool Works
In RiverWare, only one model can be loaded at a time. To be able to compare two models, RiverWare must create in-memory representations of the two sets of data and values to be compared. If Model A is the opened model, then RiverWare needs to read Model B and then create representations of values that can be compared. To do so, RiverWare synchronously executes the following batch RiverWare process.
1. Loads the model file.
2. Creates a representation of the model.
3. Writes that representation to a file.
4. The original RiverWare instance then reads the file into memory.
5. It repeats the same steps for the other model, if necessary.
6. With both sets of information in memory, RiverWare can then compare the properties and values and present the results in the tool.
Note: Because of this process, comparing large models can take a long time to load the model, write a representation of the data, and then read that data back into RiverWare.
Revised: 06/04/2022