
Comparing RPL Sets
When developing RPL sets, it is often desirable and/or necessary to compare two RPL sets and see what is different between the sets. Following are some examples of when you might want to compare two RPL sets:
• You have multiple copies of similar RPL sets that represent different policy alternatives. You need to determine what is different to make sure they represent the correct policy alternative.
• Your co-worker has made changes to the RPL set and you want to know what changes have been made. Perhaps then you will incorporate the changes into a master version.
• You need to identify all of the changes that have been made to the set since some previous version.
The RPL Set Comparison Tool compares two RPL sets and shows you the differences between the sets. This allows you to see where items are different, what the specific differences are, and allows you to easily access the RPL set dialogs so that you can change one or both sets. This tool support merging by allowing you to copy a property’s values from one set and replace the same value in another set. Further, it provides quick access to the RPL dialogs and the ability to copy and paste from the utility to the RPL editors.
A more general tool for comparing model files is described in Model Comparison Tool in User Interface. It also compares RPL sets that are embedded in the model file.
Accessing the Comparison Tool
From the RiverWare workspace, use the menu: Policy, then RPL Set Comparison Tool
Or from any RPL set editor dialog select Set, then Compare Set
Selecting RPL Sets to Compare
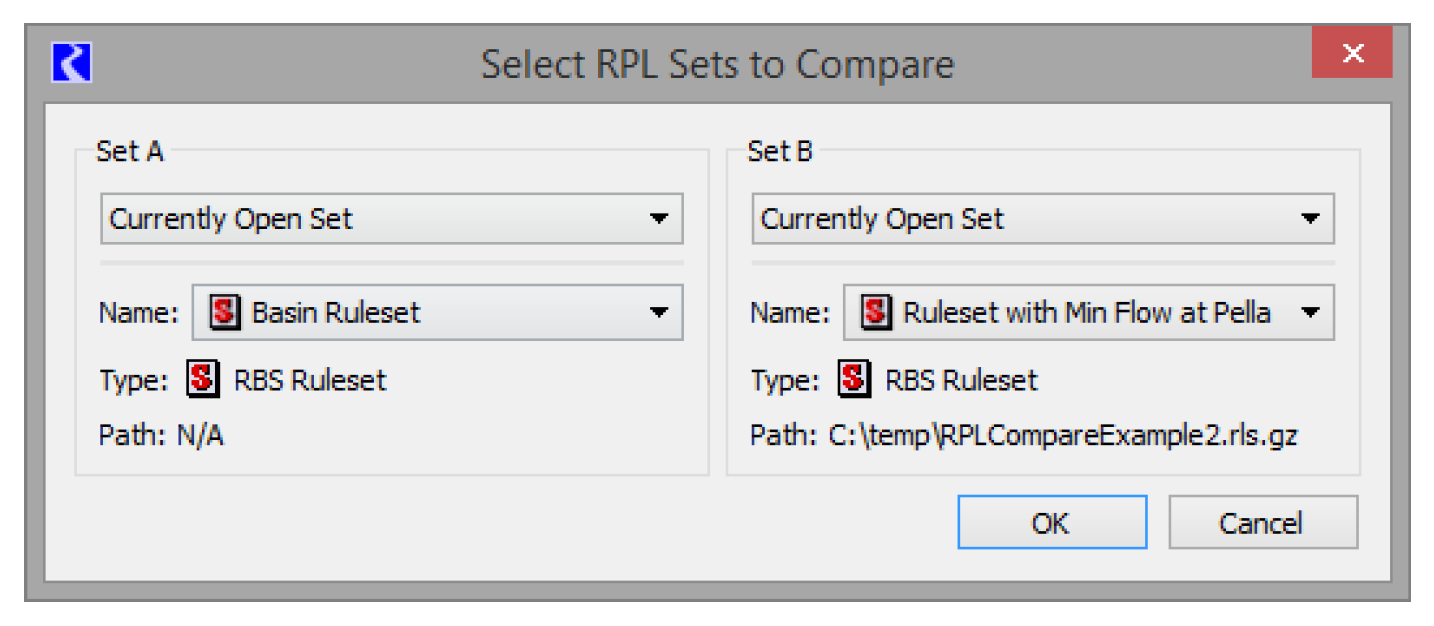
The tool opens and shows a dialog where you specify the two sets to compare. The two sets are referred to as Set A and Set B. For each set, choose one of the following:
• Currently Open Set: Choose any of the sets that are open in the current model.
• Read Set from File: Choose a RPL set on the file system. Choose the type and file path. Use the ... button to open a file chooser.
• Read Set File from Git Repository: Choose a RPL set from a Git repository on the file system. Select the files using the Git Repository Explorer. Then select the set type. See Reading From a Git Repository in User Interface for more information on this operation.
• Read Set from Model: Choose a RPL set that is embedded in another model file on the file system. First select the model file. Then select the name of the set.
• Read Set from Model in Git Repository: Choose a RPL set that is embedded in a model file that is part of a Git repository on the file system. Select the files using the Git Repository Explorer. Then select the Set type. See Reading From a Git Repository in User Interface for more information on this operation.
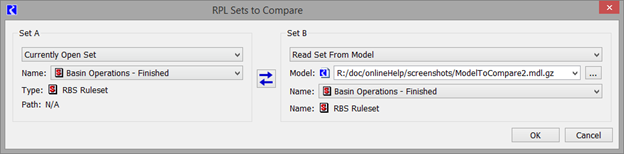
Use the swap button to switch the selection for model A with the selection for Model B.

When finished, select OK. The main RPL Set Comparison Tool opens.
Tour of the RPL Set Comparison Tool
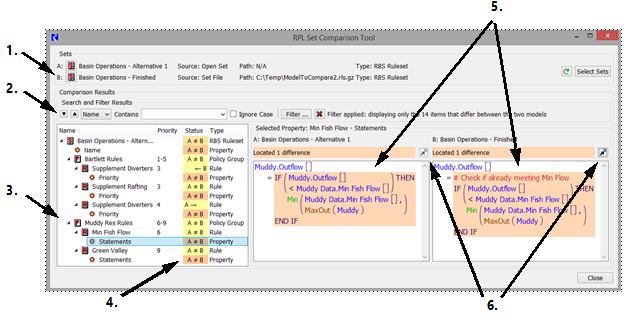
The RPL Set Comparison Tool contains the following areas, as shown in Figure 2.9 and explained by the numbered items:
1. The Sets panel shows the names, locations and type of the selected sets.
2. The Search and Filter Results panel allows for searching and filtering of the results.
3. The Comparison Results area shows a hierarchical view of the sets and the comparison results. This shows where there are differences between the two sets
4. The color coding and Status shows individual differences between the two models.
5. The Selected Property panel shows the values for the selected row for both Set A and Set B. This shows the differences for the selected item highlighted in orange.
6. The Copy Property operation allows you to copy the property’s value from one set and replace it in the open set. Note, only replacing in open sets is supported. The appropriate buttons are enabled when this operation is supported.
Figure 2.9 Annotated Screenshot of the RPL Set Comparison Tool
The following sections describe these areas and how to use the tool.
Sets Panel
The Sets panel shows the sets that are being compared. It shows the set Name, Source, Path, and Type. Use the Select Sets button to choose alternative sets. See Selecting RPL Sets to Compare for details on the dialog that is displayed.
Recompute the differences between the two sets by clicking on the green circular arrow.  This is useful if you make changes to Set A or B.
This is useful if you make changes to Set A or B. Search and Filter Tools
You can search, in either direction, for specific content in any of the three columns (Name, Status, or Type). Use the drop-down menu to specify in which column to search. Type a string into the search field.
Table 2.4 describes the buttons in the Comparison Results panel.
Button | Text | Meaning |
|---|---|---|
 | Next Match | Select the next item that matches the search criteria. |
 | Previous Match | Select the previous item that matches the search criteria |
 | Search Column | Choose in which column you wish to search. |
 | Search Content | Type in the search criteria. Use the arrow menu to select previously entered items. |
 | Ignore Case | Check the box to ignore case when searching. When unchecked, case is considered. |
 | Filter... | Open a dialog where filters can be applied. This opens the Comparison Tool Display Filters dialog; see Filter Settings |
 | Cancel | Remove all filters. |
 | Filter Status | Text is shown noting that there are filters applied and the number of items shown. |
Filter Settings
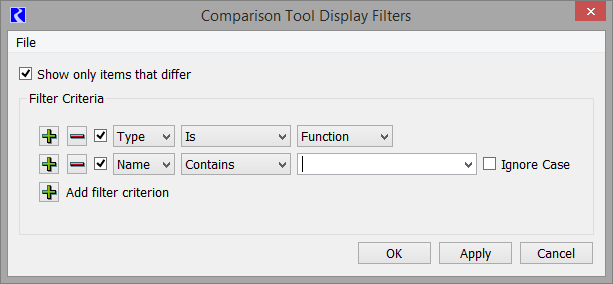
When displaying results for a large set, there can be many differences. Use the Filter button to set up filters to only see desired items. As shown in Figure 2.10, the following types of filters can be applied:
• Show only items that differ (selected by default)
• Additional filters that can be configured. Add filter criteria using the  button and remove using the
  button. For each filter criterion, options include
button and remove using the button. For each filter criterion, options include– Name: Filter on the Name column to only show results containing the specified text. Choose to Ignore Case if desired.
– Type: Filter on the Type column. The drop-down menu shows the Types that are available in the results.
– Value: Filter on the values in the property panel.
When a filter is applied, the status in the Search and Filters status is updated. To remove a filter, select the red X in the RPL Set Comparison Tool.
Figure 2.10 Comparison Tool Display Filters
Custom Filter Sets
One RPL set comparison filter set can be saved in the model file as a “custom set”. This is useful when the same filter criteria are used frequently with a given model. These custom filter sets are accessed from the File menu:
• Load Custom Filter Set: updates the Comparison Tool Display Filters dialog with the filter set previously saved with the currently loaded model.
• Save Current Filters as Custom Filter Set: applies the current settings in the filters dialog as the new custom filter set in the currently loaded model.
Tip: There is one custom filter set for the Model Comparison Tool and one for the RPL Set Comparison tool.
You can also export/import filter sets as described in Export/Import Filter Sets.
Clearing Filters
Use the File and then Clear Filter Set menu to reset all filters in the Comparison Tool Display Filters dialog back to default values.
Export/Import Filter Sets
Filter sets can also be exported to and imported from separate files. This is useful when different sets of criteria are applicable in different circumstances or when a single set of criteria is useful across multiple models. Filter sets are exported and saved as an XML file.
Use the File and then Export Filter Set menu and then specify an XML file name/path to use. The current filters in the Comparison Tool Display Filters dialog are saved to the file.
Use the File and then Import Filter Set menu to import a previously exported set.
Note: Neither option has any impact on the custom filter sets saved in the model file.
Tip: Exported Filter Sets are specific to either the Model Comparison Tool or the RPL Set Comparison tool and are not interchangeable.
Quick Filters
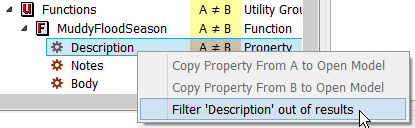
Quickly filter an item out of the results tree using the right-click context menu on the results tree. For example, in Figure 2.11, you don’t want to see any descriptions in the results, so right-click and choose Filter ‘Description’ out of results’.
Figure 2.11 Screen shot of right-click context menu to filter item from results
This action creates a filter in one of the available filters in the Comparison Tool Display Filters:

For objects, you can quickly filter out objects of that name, all objects, or objects of that type (Reservoir, Reach, and so on)
Use the filter dialog, described in Filter Settings, to remove or edit the filter.
Comparison Results Panel
The Comparison Results panel shows a hierarchical view of the results of the comparison. The hierarchy is based on the structures of the two set. Columns include the Name, Priority/Index, Status and Type. The Set, Groups, and Rules/Goals/Methods show their particular icon. The Status column shows the results of the comparison. Table 2.5 lists the possible status and their meanings.
Status | Meaning |
|---|---|
A = B | The item is identical in Sets A and B. |
A ≠ B | The item is different in Sets A and B. |
A | The item exists in set A but not in Set B. |
B | The item exists in Set B but not in Set A. |
A -> | The item exists here in Set A and elsewhere in Set B and/or the item has been renamed. |
<- B | The item exists here is Set B and elsewhere in Set A and/or the item has been renamed. |
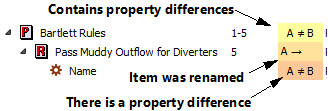
The Type column lists the type of that row, either a Set, Group, Rule, or Property. The comparison tool ultimately compares Properties of the items, not the items themselves. In the Status column, the color indicates the following meaning, This is also shown in Figure 2.12:
• Yellow indicates that the item contains properties and that within the item there are differences in properties.
• A light orange shading indicates the item’s Name property has changed; that is, the item has been renamed. When an item has been renamed (not copied/pasted or moved), the item will show up twice in the list, once with the name used in set A (the status shows “A ->”) and once with the name used in B (the status shows “<- B”).
• The darker orange color indicates that the value of the property is different.
Figure 2.12 Color legend for the Status column
Double-click a row in the Comparison Results to open the RPL dialogs for that item.
Note: If the set was loaded from a RPL set file or another model file, the dialogs cannot be opened. If both sets are opened in the model file, then double-clicking a row will open two dialogs, one for each set.
Note: The RPL Set Comparison Tool compares internal copies of the specified sets. If you make changes to one of the chosen sets, it is not immediately reflected in the comparison tool. Use the Recompute Differences button  to update the status in the tool.
to update the status in the tool. Selected Property
The Selected Property panel shows the values for the selected row. If a yellow row (Rule, Set, Group, etc) is selected, a note is shown that “No Property Selected”. Only properties are shown in these views. When an orange Property row is selected, the panel shows the values for that property. The information shown is based on the property type and can include text, colors, true/false, and RPL expressions. When a statement, function body, or execution constraint is selected, the RPL expression is shown for both sets A and B. For example, in Figure 2.13, a statement is selected and the RPL statements are shown. You can see that Set A has a Max function while Set B has a Min function. The total number of differences found is listed above each Selected Property panel. Multiple differences are highlighted whenever possible.
Figure 2.13

Following are known limitations related to the highlighting of differences:
• When two statements or expression differ only by comment, the tool highlights the entire statement/expression, not just the comment. Ideally the tool would highlight the individual differences in the comment text.
• The tool does not highlight differences in symbol declarations (E.g. NUMERIC num), either in the type or name, but the entire expression is highlighted
• Adding, deleting, or moving a statement within a block (or an item in a list expression) will usually lead the tool to overestimate the number of changes (i.e., every statement after the first difference will be considered different). This is not the case for insertions and deletions within textual properties.
Copy Property
Once you’ve compared sets and identified differences, sometimes you might want to “merge” the two sets together. The RPL Set Comparison Tool supports merging by allowing you to select a property and then chose to replace the value from one set into the value in the opened set. The operation is essentially:
Copy the value of the selected property (in A or B) and replace the same property in the open Set (B or A)
Refreshing the comparison tool afterwards will lead to the relevant properties having the comparison status of A = B.
This operation is enabled only when the following conditions are met:
• The set that is “receiving” the value (whose properties would be modified by the operation) is the currently open set (specified by choosing the Currently Open Set option when selecting sets for comparison).
• A supported property is selected in the results tree view. Currently certain items are supported including RPL statements and RPL function bodies. See Selecting Models to Compare in User Interface for supported items.
• The property’s comparison status is A≠ B.
With a property selected, there are two ways to initiate the Copy Property operation:
• Use the Copy Property buttons

• Right-click context menu on the property

The value in the opened set is replaced and the dialog is typically opened. The value in the comparison’s window does not changed. It always shows the result of the last comparison. But the property text is now shown in green and the header shows a note that the property was modified in the opened model. Figure 2.14 shows a sample of the dialog box after a replacement has occurred.
Figure 2.14 Screenshot showing the selected property after a replacement has occurred. Note the green text and warning icon indicating the property has been replace.

Warning: The comparison tool and the copy property operation uses codes, called Universally Unique Identifiers (UUIDs), to track the items in the set. These were introduced starting in RiverWare 7.5. If you compare two models that diverged before this release, then the items in the two models do not have the same UUIDs and the comparison and copy properties operation may not work.
Example of Using the RPL Set Comparison Tool
Following is one use case example where the RPL Set Comparison Tool is very useful.
We have been developing a model and ruleset of our basin and need to add some proposed policy changes to the set. I am busy with other things, so I asked my co-worker to help implement the policy in the ruleset. She did this and sent me the new ruleset on her way out the door for vacation. She left the note that “I added the new rule and had to update a couple other things” but didn’t describe what she changed. I also have been working on the model and now it is time to see what she did and merge it into my work. I use the following procedure.
7. I open my model and load my ruleset. In this case, my ruleset is embedded in the model file; it is called Basin Ruleset.
8. I open (but don’t load) my co-worker’s modified ruleset. This is called Ruleset with Min Flow at Pella.
9. I use the menu: Policy, then RPL Set Comparison Tool
10. I then choose my embedded ruleset, Basin Ruleset, as Set A and my coworker’s modified ruleset as Set B. I then select OK.
11. The RPL Set Comparison Tool opens and shows that there are differences between the two sets. I can use the Next and Previous buttons to step through the differences. Figure 2.15 shows the results.
Figure 2.15 Annotated screenshot of difference tree for sample RPL comparison
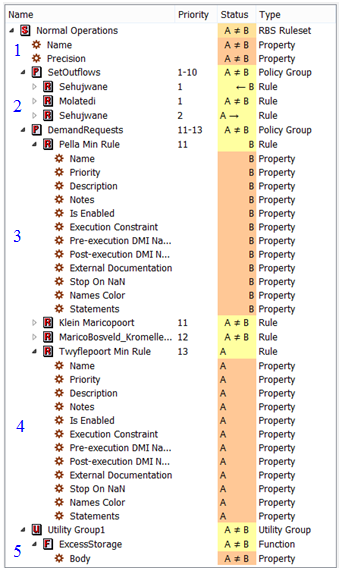
12. It looks like there are five main areas of differences. We’ll go through these differences in Table 2.6. I select each row to see the property difference in the right hand panel.
Difference | Description |
|---|---|
1 | The ruleset name and precision are different. |
 | |
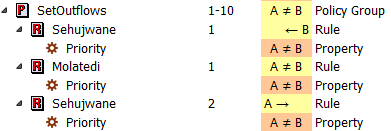
2 | Rule 1 and 2 have changed priority.In Set B, Sehujwane is priority 1. In Set A, Sehujwane is priority 2. Since it is strictly the priority order that has changed, there are no property differences, so the right panel doesn’t show any differences. |
 | |
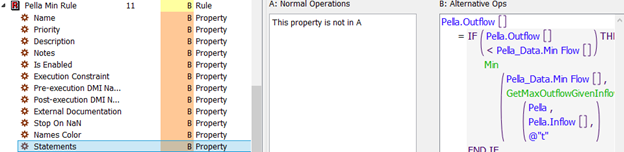
3 | Rule 11 is in Set B but not in Set A. The right panel shows the logic in Set B and lists that the property is not in Set A. |
 | |
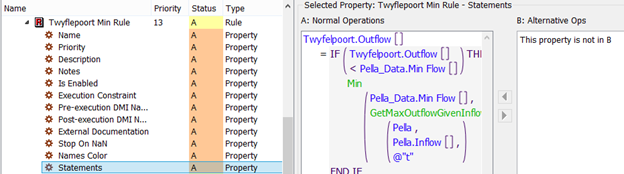
4 | Rule 10 is in Set A but not in Set B. |
 | |
5 | The ExcessStorage function has differences. It looks like my co-worker added 100 m3 tolerance for the comparison. It would be nice if she had documented why she did this. |
 | |
13. Now I need to combine or merge her differences into my ruleset. First I’ll select the SetOutflows row to open the policy group for both sets.
14. The priority order of the first two rules is correct in my set, so I’ll leave it as is, with no changes.
15. I need to get the new rule that my coworker developed. Since the desired rule is in Set B, I open that set and right-click the Pella Min Rule and Copy. Then append it to that same group in Set A. I’ll rearrange to make it rule 4.
16. The RPL Set Comparison tool hasn’t changed even though I am editing the set. The comparison tool uses copies of both sets. I must select the Recompute button  to get the changes.
to get the changes. 17. Now I’ll update the function that was changed. I click the ExcessStorage function Body row. I then click the Copy Property from B to Open Set button , to copy the value from Set B to Set A. The RPL Set Comparison tool doesn’t change, but the two dialogs open, showing the 100m3 update in Set A.
, to copy the value from Set B to Set A. The RPL Set Comparison tool doesn’t change, but the two dialogs open, showing the 100m3 update in Set A.In this way, I’ve looked at the differences and decided which ones I want to apply to my set. Although I had to do some manual and some Copy Property merging of the two sets, the RPL Set Comparison Tool really helped me to identify where there are differences and then present those differences in an organized fashion.
Revised: 06/04/2022