
RiverWare Run Range Event
The RiverWare Run Range Event allows you to configure a study in which scenarios have different run ranges—for example, different start or end dates. This event allows you to configure a series of run ranges, which are used to generate scenarios.
Example 4.5 Example Run Range event
For the sample study there are 12 run ranges with a monthly timestep, beginning with each month from 1980-01 through 1980-12. The run duration is 24 months, with the exception that the policy requires the run ranges to extend through at least May of the end year. There are 12 run ranges, as shown in Table 4.1.
Each run range is a unique input to the study and is used to generate scenarios. If the study has two RiverWare Policy events, four RiverWare DMI events with a Supply category, and two RiverWare DMI events with a Demand category, then the study has 12 x 2 x 4 x 2 = 192 scenarios.
Start Date | End Date | # Timesteps | |
|---|---|---|---|
1 | 1980-01 | 1982-05 | 28 |
2 | 1980-02 | 1982-05 | 27 |
3 | 1980-03 | 1982-05 | 26 |
4 | 1980-04 | 1982-05 | 25 |
5 | 1980-05 | 1982-05 | 24 |
6 | 1980-06 | 1982-06 | 24 |
7 | 1980-07 | 1982-07 | 24 |
8 | 1980-08 | 1982-08 | 24 |
9 | 1980-09 | 1982-09 | 24 |
10 | 1980-10 | 1982-10 | 24 |
11 | 1980-11 | 1982-11 | 24 |
12 | 1980-12 | 1982-12 | 24 |
Run Range Configuration Dialog Box
This dialog box opens when you open a Run Range event on the RiverSMART workspace.
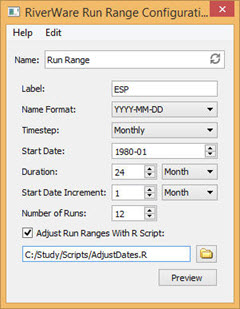
Name
Enter a user-defined name for the event.
Label
Enter an optional label to be prepended to the run range name, in format label-YYYY-MM-DD or labelYYYYMMDD, depending on the Name Format entry. If a study includes multiple run range events with overlapping dates, the label can help to distinguish the events.
Name Format
This entry specifies how the run range start date is formatted to form the run range name, which in turn, forms scenario names. Select the format to use. Although the menu options show full YYYY-MM-DD precision, only the precision necessary for the simulation timestep is used: YYYY, YYYY‑MM, or YYYY-MM-DD.
Timestep
Select the simulation timestep: Yearly, Monthly, or Daily. This must match the model simulation timestep.
Start Date
Enter the start date of the first run range in the series. Only the precision necessary for the simulation timestep is used: YYYY, YYYY-MM or YYYY-MM-DD.
Duration
Enter the duration of each run range in the series. For a yearly timestep, the duration is specified in years; for a monthly timestep, the duration is in years or months; for a daily timestep, the duration is in years, months, or days.
Start Date Increment
Enter the offset added to the start date of each run range to determine the start date of the next run range in the series. For a yearly timestep, the increment is specified in years; for a monthly timestep, the increment is in years or months; for a daily timestep, the increment is in years, months, or days.
Note: For daily timesteps or start date increments specified in years or months, the results may have unintended offsets. For example, if the start date is 1980-01-31 and the start date increment is 1 month, the start dates of the first few run ranges in the series, assuming a non-leap year, would be 1980-01-31, 1980-02-28, and 1980-03-28, not the last day of each month, as may be intended.
Number of Runs
Enter the number of run ranges in the series.
R Language Script
Select the check box to use an R script to adjust the run ranges for policy-specific requirements; see Run Range R Script for details. Specify the R script file by entering the path in the text box or selecting it through the File Chooser.
Run Range R Script
Note: For the Run Range event to use an R script, the R Project for Statistical Computing must be installed on your computer; see Install R and Component Packages for details.
In Example 4.5, the policy requires run ranges to extend through at least May of the end year, which means the run ranges beginning in January through April have durations greater than 24 months. This type of policy-specific behavior cannot be captured in the Run Range event configuration; however, you can provide an R script file to adjust the run ranges as necessary.
The R language script file must define the function.
adjustDates <- function(inputFile, outputFile)
{
}
The inputFile and outputFile parameters are the full paths to the function input and output files. The workflow is as follows.
1. The event generates the run ranges from its configuration. The run ranges conform to the duration and start date increment.
2. The event writes the run ranges to a CSV file; see CSV File Format for details.
3. The event invokes Rscript.exe to execute the adjustDates() function.
– The outputFile parameter is the full path to a file the function will write.
Rscript.exe must be installed and in the user search path; see Install R and Component Packages for details.
If RiverSMART diagnostics are enabled, the input and output file paths are displayed in diagnostic messages, which may be helpful for debugging the R script.
4. The adjustDates() function parses the input file, adjusts the run ranges as necessary, and writes the output file, which is a CSV file with an identical format to the input file.
– If the function determines no adjustments are necessary, it should not write an output file, indicating no change.
– If the function finishes successfully, including no change, it should exit with a zero status; otherwise it should exit with a non-zero status.
5. If the adjustDates() function finishes successfully, and if it writes the output file, the event parses the file and validates the adjusted run ranges included in the file. If the adjusted run ranges are valid, the event replaces the run ranges it generated with the adjusted run ranges.
adjustDates() Function
This function can print informational and error messages that are displayed in the RiverSMART Diagnostic window. Informational messages are displayed only if RiverSMART diagnostics are enabled. There are many ways to do this in the R language; one way is to define the functions, which can be called in the same manner as the R language sprintf() function is called.
info <- function(...) cat(sprintf(...), sep='', file=stdout());
error <- function(...) cat(sprintf(...), sep='', file=stderr())
The exit status indicates whether the function finished successfully.
# Successful:
quit(, 0, )
# Error:
quit(, 1, )
An error exit status should be accompanied by error messages.
CSV File Format
The input and output CSV files for the adjustDates() function include the following fields:
• Run number (1 .. N)
• Run name
• Timestep (year, month, or day)
• Start year
• Start month
• Start day
• End year
• End month
• End day
• Number of timesteps
The CSV files include full precision (yyyy,mm,dd), even if not required by the timestep. For the example, the first few lines of the input file for the adjustDates() function are as follows:
run_number,run_name,timestep,start_year,start_month,start_day,end_year,end_month,end_day,num_timesteps
1,1980-01,month,1980,01,31,1982,01,31,24
2,1980-02,month,1980,02,29,1982,02,28,24
3,1980-03,month,1980,03,31,1982,03,31,24
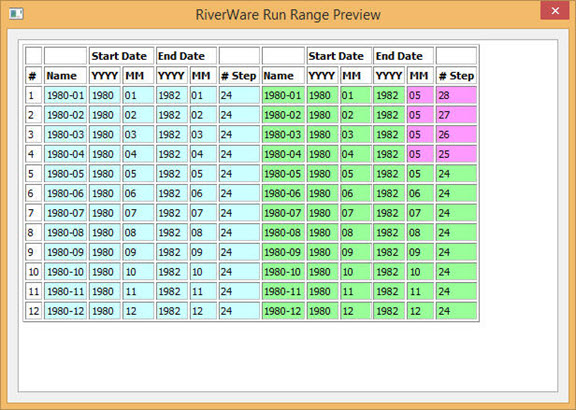
Run Range Preview
The Run Range Preview executes the R script workflow (see Run Range R Script) and displays the results in the RiverWare Run Range Preview dialog box. This allows you to easily view the run ranges generated by the Run Range event and the adjustments made by the R script. Without this capability, you would need to generate the scenarios and compare two CSV files in the event Working\ folder.
Figure 4.1shows the run ranges from Example 4.5 extended through May of the end year.
• Blue cells are the initially generated run ranges.
• Green cells are the adjusted run ranges
• Magenta cells highlight the differences.
Figure 4.1 Run Range Preview
DMI Event Integration
In some applications of the Run Range event, run ranges are associated with DMIs. For example, the run range 1980‑01 may have different initial conditions than the run range 1980‑02. In this case, you need to organize your data to include the run range names.
For example, you can organize the data in trace folders, as follows.
C:\Study\InitCond\1980-01
C:\Study\InitCond\1980-02
...
Alternatively, you can organize the data in an Excel workbook with sheets named “1980‑01”, “1980‑02”, and so on.
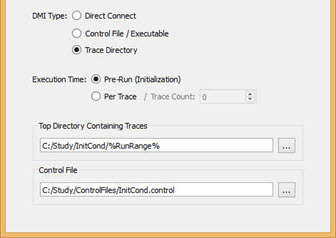
To facilitate DMI event configuration, you can use the %RunRange% variable, which is replaced with the name of the run range. The following DMI event configuration fields support the %RunRange% variable:
• Direct Connect DMI: workbook and sheet
• Control File / Executable DMI: executable and arguments
• Trace Directory DMI: top folder and control file
Example 4.6 Example DMI Event configuration using the %RunRange% variable
The following figure shows a Trace Directory DMI event using the %RunRange% variable. The scenarios using run range 1980‑01 will import the initial conditions in C:\Study\InitCond\1980-01; the scenarios using run range 1980‑02 will import the initial conditions in C:\Study\InitCond\1980-02, and so on.
Revised: 08/02/2021