
Flood Control
The Flood Control methods calculate a flood control release for the current simulation day. The flood control methods use forecast data (storage, inflows, empty space at 0 through Forecast Period timesteps after the current simulation timestep). They propose release schedules for each reservoir for each timestep in the forecast period to account for routing effects. They return the values for the first timestep of the proposed schedule (for the current simulation timestep).
Model Setup
There are two flood control methods, Operating Level Balancing and Phase Balancing. See Operating Level Balancing in Objects and Methods for details on Phase Balancing. Because most of the Southwest Division uses the Operating Level Balancing method, it is the only one discussed in this document.
To use the Operating Level Balancing method, the user must select methods on each reservoir and control point. Also a computational subbasin must be created that contains the desired objects (typically all of the objects in the model). The user must also select a number of methods on this computational subbasin. Following is an overview of the methods that should be considered on each object type.
Reservoir Methods
On each reservoir, select the following:
• Operating Level Balancing method in the Flood Control Release category; see Operating Level Balancing in Objects and Methods.
• Conservation and Flood Pools in the Operating Levels category; see Conservation and Flood Pools in Objects and Methods.
The multi-object method selector can be used to make this selection on all reservoir objects at once. The flood control method does not perform calculations on the object, but provides the following slots that will be added that require user input:
• Allowable Rising Release Change
• Allowable Falling Release Change
• Maximum Release Variation
• Balance Period
• Forecast Period
• Top of Flood Pool
• Top of Conservation Pool
• Bottom of Conservation Pool
• Operating Level Table
The value entered in the Balance Period and Forecast Period slot must be the same on all reservoir objects used in flood control. The user can set these values on all objects at once through the computational subbasin. See Computational Subbasin Methods for details.
Optionally, you can select a method in the Conditional Operating Level category to add an alternative operating level table, which will be used when hydrologic conditions indicate. See Conditional Operating Levels in Objects and Methods for details.
Control Point Methods
On each control point, select the Operating Level Balancing method in the Flood Control category; see Operating Level Balancing in Objects and Methods for details. The multi-object method selector can be used to make this selection on all reservoir objects at once.
Once Operating Level Balancing method has been selected, several other method categories become active. These include, but are not limited to the following:
The user must decide if any of these categories apply to the control point in question (a selection is not necessary if these calculation do not apply). Several slots may be added as a result of these method selections.
If the control point is a key control point, select a method in the Key Control Point Balancing category. If a method is selected, the control point will be displayed as a key control point on the workspace with a key icon in the center of the object. Control point objects designated as key control points will be included in the reservoir balancing calculations performed during the computation of flood control releases.
Required Input Data
Configure the Upstream Reservoirs and Routing Coefficients slots on each control point. The Upstream Reservoirs slot is a list of all upstream reservoirs whose releases are routed through the control point in question. The Routing Coefficients slot will have a column for each reservoir listed in the Upstream Reservoirs slot. In each column, enter the direct routing coefficients from the reservoir in the column header to the control point object. These coefficients will be used to route releases in the algorithm that computes the flood control releases. The actual routing of the final releases is done incrementally via the reach objects. Therefore, in order to have consistent routing between the flood control algorithm and the reach objects, these direct routing coefficients should be computed from the incremental routing coefficients used on the reach objects (or vise versa) using a sufficient number of significant figures.
Note: Flow-based routing coefficients are allowed. See Alternative Routing Coefficients Methods for details on these methods.
Key Control Point Balancing
If the control point is a key control point, select the Operating Level Balancing method in the Key Control Point Balancing category (the Control Point icon will then display a key symbol). Several slots are added when this method is selected. Enter a list, in the Key Control Point Reservoirs slot, of the upstream reservoirs that are balanced by the control point. This list should either be the same as, or a subset of, the list of reservoirs in the Upstream Reservoirs slot. Input a value for Balance Period. This value must be the same value on all key control points and reservoir objects. The computational subbasin can be used to set the value on all objects simultaneously. Also, input values for the Balance Tolerance and Balance Iterations slots. See Operating Level Balancing in Objects and Methods for details on the effects these slots have on the balance calculations.
Computational Subbasin Methods
Create a Computational Subbasin for flood control using the Subbasin Manager dialog and specify the objects included in the subbasin. The subbasin consists of all the objects, linked to form a continuous network, that are considered in the simultaneous flood control release calculations.
Configure Subbasin for Flood Control
Once the computational object has been created it can be configured for flood control. The computational subbasin object can be opened in the following ways:
• Double-click the subbasin in the Subbasin Manager dialog.
• Select Workspace, then Open Computational Subbasin from the main RiverWare menu.
The open subbasin dialog has two tabs: Slots and Methods. The slots view will be empty until a method has been selected. In the Methods view, select the Operating Level Balancing method in the Flood Control category. Several new slots and method categories will be added as a result of this selection. Input values in the following slots:
• Forecast Period
• Balance Period
• Top of Conservation Pool
• Highest Operating Level
• Lowest Operating Level
• Top of Flood Pool.
The remaining slots with the word “Tolerance” in the name will default to the tolerance values used in SUPER. See Operating Level Balancing in Objects and Methods for details on these slots.
Also, when the Operating Level Balancing method is selected, a number of categories become available. All of these dependent method categories on the computational subbasin default to the method selection that corresponds to SUPER behavior. See Balance Level Determination in Objects and Methods for details on these methods.
Propagate Values
The values entered in the Forecast Period, Balance Period, Top of Flood Pool and Top of Conservation Pool slots must be the same on all objects that have these slots. The user can enter these values on the computational subbasin and then propagate the values to all other objects using the Subbasin, then Propagate Values feature in the open subbasin dialog.
Verifying and Enabling Subbasin
Once the subbasin has been configured, it can be verified and enabled. Subbasin verification is performed by selecting Subbasin, then Verify Subbasin in the open subbasin object. This is an internal check to ensure that the subbasin is continuous and that all the required data has been input. Once the subbasin is ready for use in a model run, it can be enabled by selecting Subbasin, then Enable Subbasin in the open subbasin object. When a subbasin is enabled, the verification checks are performed at the beginning of the run and the subbasin can be used by the Flood Control function. If the subbasin is not being used in a model run and will not pass verification, it can simply be disabled and will not hinder the model run.
RPL Implementation
Once the surcharge release forecasts have been computed and routed downstream, and the empty space forecasts have been computed, the model is ready to solve for the flood control releases. The flood control logic is called from the FloodControl predefined function. This function will perform the flood control calculations for all objects in the specified computational subbasin. After execution, the FloodControl function will return the flood control value and the outflow value, for the current timestep, for each reservoir in the computational subbasin. The flood control rule will set these values on each reservoir object. The resulting reservoir outflow is then routed downstream.
The flood control rule must execute after the regulation discharge calculations and therefore must be higher priority. Add a new policy group above the regulation discharge policy group and add a single rule to this policy group. Figure 3.5 shows a sample rule that executes the FloodControl predefined function and sets the resulting outflow and flood control release (and possibly Target Balance Level) on each reservoir in the Flood Basin subbasin.
Figure 3.5 Sample flood control rule
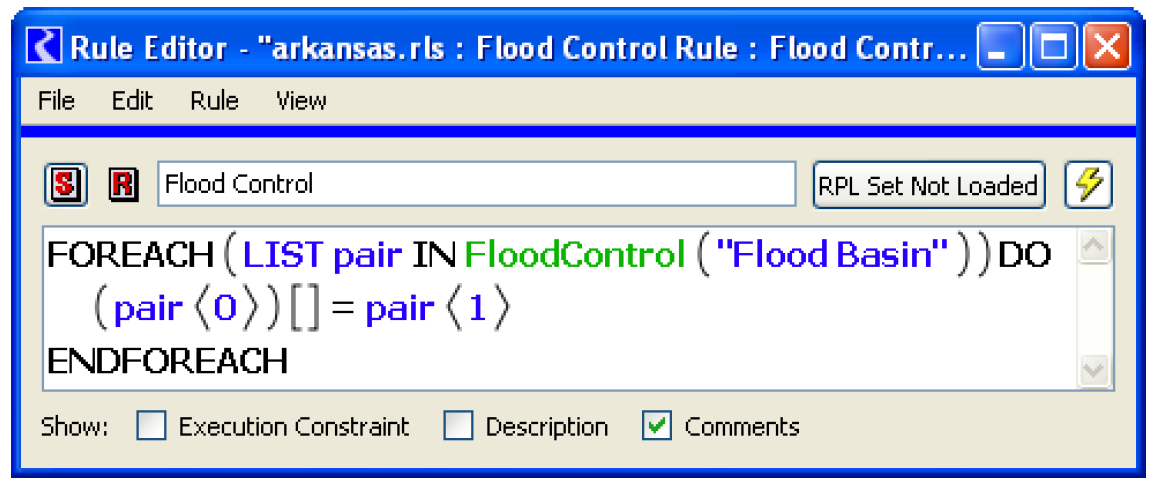
The FloodControl predefined function executes the flood control algorithm. While it computes the flood control releases over the forecast period (using the inflow, surcharge release, flood control minimum release and empty space forecasts computed previously), only the final flood control release for the current timestep is set in the model. Therefore, the FloodControl function returns the flood control release and outflow values for the current timestep only. The FloodControl function returns a LIST that contains three items for each reservoir. Each list contains a slot, the value that should be set on that slot, and the object. So for each reservoir, the following slots are typically set using a FOR statement:
• Outflow = Surcharge Release + Flood Control Release + Flood Control Minimum Release
• Flood Control Release
• Target Balance Level
The sample rule in Figure 3.5 consists of a FOR statement that calls the FloodControl function and sets the resulting values on the proper reservoir slots. The FloodControl function performs the flood control calculations for all objects in the Flood Basin subbasin over the forecast period. In this example, Flood Basin is the name of the computational subbasin created for flood control (this may be named differently in your model). The FloodControl function returns the lists described above and the FOR expression loops through each list and sets the returned slot, at the current timestep, to the corresponding value.
In summary, the flood control rule calls the FloodControl function which computes the flood control releases for every reservoir in the computational subbasin. Then, for each reservoir, at the current timestep, it sets the Flood Control Release slot to the computed value, the Outflow slot to the computed value, and the Target Balance Level to the computed value. After the rule is finished executing, the new outflow values are routed downstream and all objects in the model solve given the outflow values.
See FloodControl in RiverWare Policy Language (RPL) for details on the function itself.
FloodControl Function—Detailed Description of Logic
See Operating Level Balancing in Objects and Methods for a detailed description of the logic for this function.
Revised: 08/02/2021