
Slot Dialogs
The data for a particular slot is shown in either the Slot Viewer or the Open Slot dialog. Both dialogs are introduced in the following section.
Opening a Slot
Use one of the following methods to open a slot:
• In the Object Viewer (or Open Object) Slots or Methods tab, do one of the following:
– Double-click the slot row name.
– Right-click a slot’s row, and use the Open Slot context menu.
– Highlight a slot’s row, and select Slot, then Open Slots from the command menu bar.
– Highlight a slot’s row, and press Ctrl-O.
• From the main workspace, use the Workspace, then Slots, then Open Slot menu.
Sample Slot Dialogs
When you open a slot, the dialog that opens depends on the slot type. Figure 5.1 shows sample slot dialogs for series slots.
Figure 5.1 Screenshots of three sample Series Slot dialogs
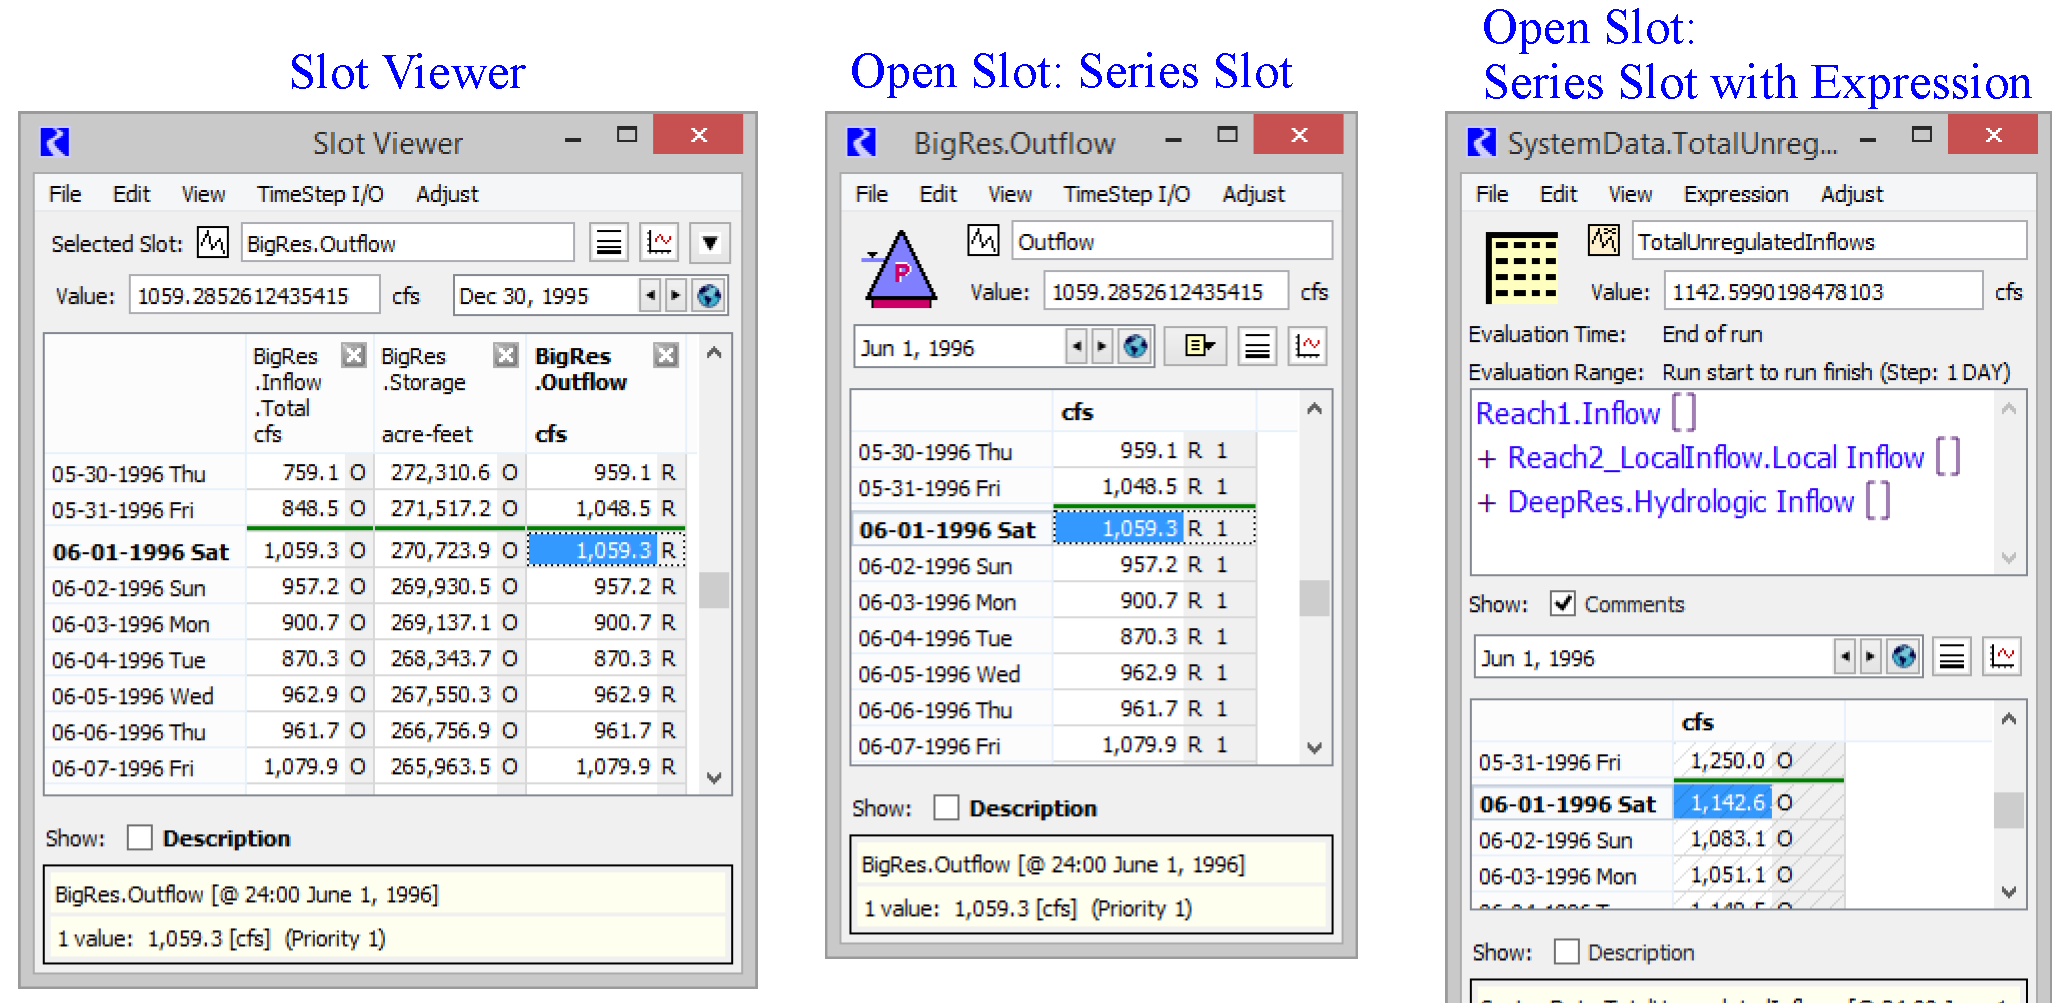
Note: Most series slots will open in the Slot Viewer to show the data. You can drag the column off the viewer to see the slot in its own dialog. See Slot Viewer Functionality for details.
Figure 5.2 shows sample Table, Scalar, and Periodic slots.
Figure 5.2 Screenshot of sample Table, Scalar and Periodic slot dialogs
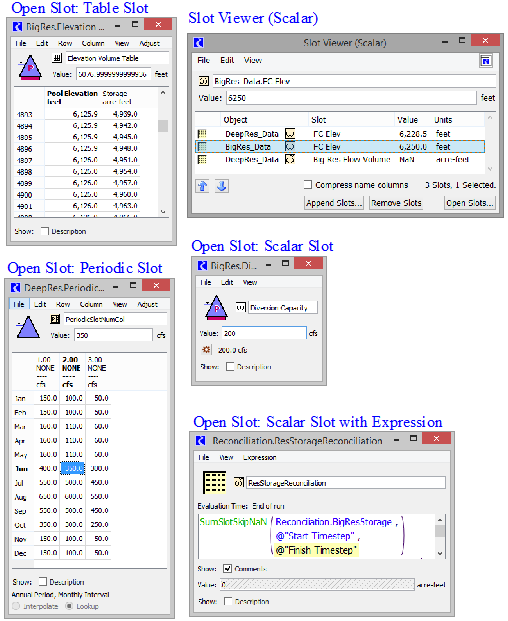
Note: Most scalar slots will open in the Slot Viewer to show the data as a row in the table. You can undock the scalar slot to see the slot in its own dialog. See Scalar Slot Dialog and Slot Viewer (Scalar) for details.
Again, you can see the similarity in the various slot dialogs. As a result, this document will present general slot functionality and then describe slot specific functionality.
Slot Dialog Functionality
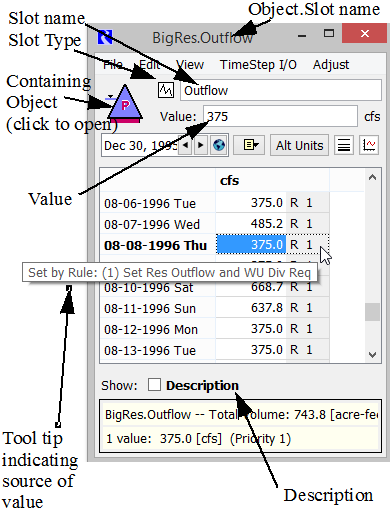
Figure 5.3 shows a sample Open Slot dialog for a series slot. Although other types of slots have different options, most of the slots have similar menus, look, and feel.
Figure 5.3 Annotated screenshot of a slot dialog
Functionality is essentially the same for either the Open Slot or the Slot Viewer; see Slot Viewer Functionality for details.
This section first describes the general Open Slot layout and menu options. Then each individual type of slot is presented later with further information on type specific configuration options.
The open slot contains the following:
• The title of the Open Slot dialog is the Object.Slot name.
• The slot name is repeated in a text field below the menu bar. On custom slots, you can change the name of the slot by editing this text field.
Note: If you are renaming a custom slot whose old name appears in RPL sets, a dialog asks if you want to search RPL sets for the old name and optionally replace occurrences with the new name. Answering Yes will bring up the RPL Search and Replace dialog with the results of a search for the old name in all RPL sets and with the new name filled into the Replace with field. You can examine the occurrences and choose to replace some or all of them with the new name.
• The type of slot is displayed by an icon. See Types of Slots for a list of the icons.
• The containing object’s icon is shown. Selecting this icon will open the object.
• The Value field shows up to 15 digits of precision of the highlighted cell and the units. The user can type a value directly in here or in the cell.
• Tooltips on the cells indicate the rule or DMI that set or triggered a solution; see Tooltips.
Closing a Slot
Use one of the following methods to close an Open Slot dialog:
• Select File, then Close Window.
• Press Ctrl-W when the window is active.
• Select the red X in the upper-right corner of the dialog.
• Double-click the RiverWare icon in the upper-left corner of the dialog.
• From the main workspace, select Workspace, then Slots, then Close All Slots menu item to close all Open Slot dialogs.
• From the Slot Viewer, select the X on the slot’s column.
Slot Descriptions
On all slots, you can specify a text description. The description is accessed from the View, then Add (or Show) Description menu or though the Description checkbox. When this option is selected, a panel is added that provides a text box in which you can type the description. Figure 5.4 shows a sample dialog for a table slot with the Description panel displayed.
Figure 5.4
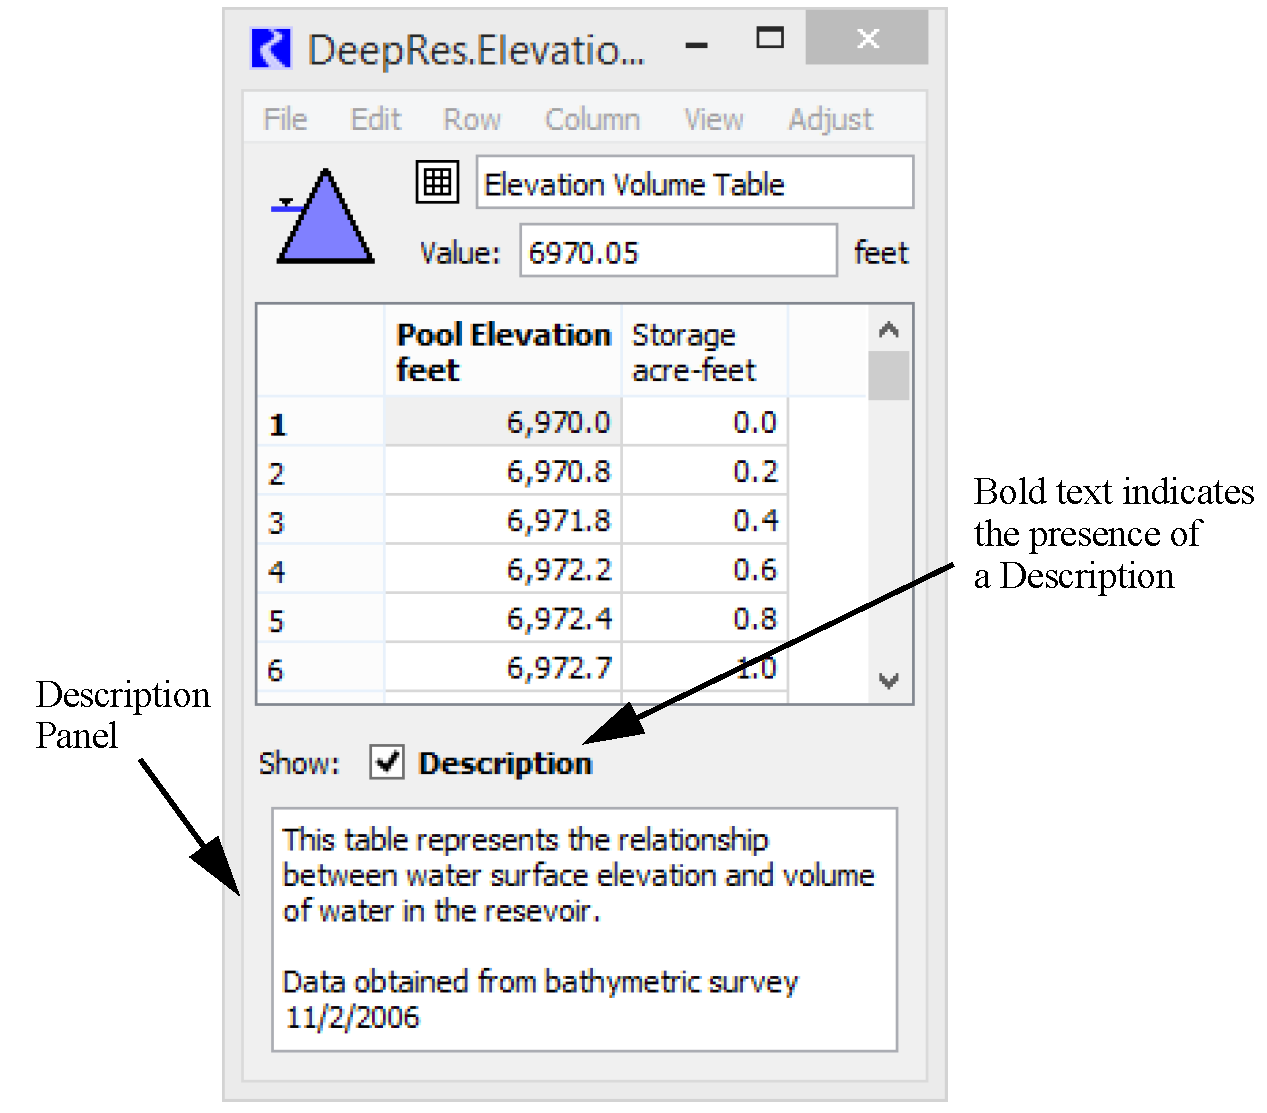
When there is a description, the word Description is bold in the dialog. If there is no description, the word Description is dimmed.
You can also hover over the word Description to get the first 140 characters of the description as a tooltip.
Note: You can configure your preferences on whether or not to show Descriptions using Slot Dialog Display Preferences; see Slot Dialog Display Preferences.
Searching Slot Descriptions
The Search Slot Descriptions utility can be used to find slots that have a description or specific keywords in their description. It is accessed from the RiverWare Workspace using the Workspace, then Slots, then Find Descriptions menu. The Search Slots dialog appears.
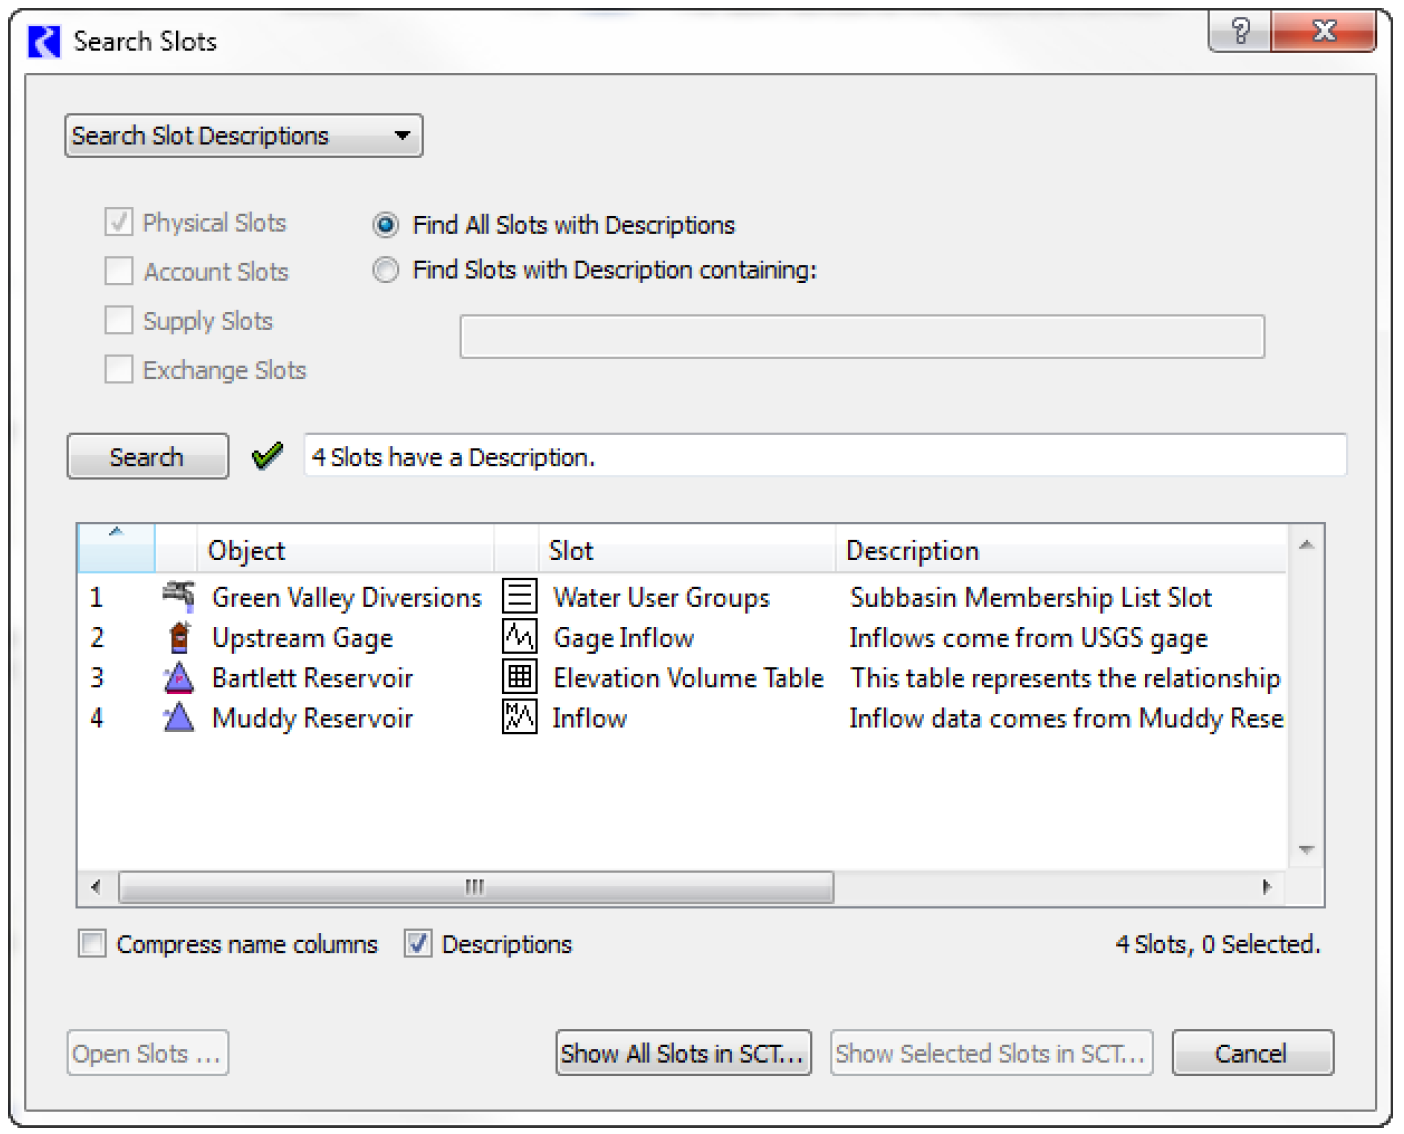
This dialog provides the following options:
• Find All Slots with Descriptions. Find any slot that has a description.
• Find Slots with Descriptions containing. Find slots that have descriptions that contain the specified text. The search is not case sensitive.
You can limit the search to the specified types of slots including physical, account, supply or exchange slots. When any of the search input controls are changed, the Green Check icon turns into a Red “X”, and the search summary description is grayed out. Select the Search button to perform a new search.
This dialog has a Descriptions checkbox below the slot list. Turning on this checkbox replaces several slot attribute columns with a Descriptions column showing up to 150 characters of each Slot's description.
Turning on the Compress name columns checkbox replaces the distinct columns for object name, Account name and Slot name with a single “complete” slot name column.
Several context menu (right-click) operations are available within the slot list:
• Open Slot. Show the open slot dialog for the chosen slot item.
• Open Object. Show the object dialog for the chosen slot item (if applicable).
• Copy Slots. Put the selected slot items into the slot clipboard, e.g. to paste into an output (manager) device slot list.
Buttons along the bottom of the dialog provide these functions:
• Open Slots. Separate open slot dialogs are shown for each of the selected items in the list. If more than four (4) slots are selected, then a query dialog box is shown confirming the operation with a message similar to the following: “Do you want to show 421 Open Slot dialogs?”.
Note: All shown open slot dialogs may be hidden with the Workspace, then Slots, then Close All Slots menu operation.
• Show All Slots in SCT. All slots in the list (regardless of item selection) are shown in a new SCT dialog, and the dialog is closed.
• Show Selected Slots in SCT. Selected slots in the slot list are shown in a new SCT dialog, and the dialog is closed.
• Cancel. The dialog is closed.
The dialog can also be used to find input values on series slots. See Finding Inputs for details.
Creating and Configuring Slots
Custom slots can be created on any type of object (except snapshot data objects). You can create various types of series, tables, periodic tables, statistical tables, scalar and expression slots. See Types of Slots for details. You are not able to create Multi Slots, Table Series Slots or List Slots.
The main menu bar on the Object Viewer (or Open Object) dialog has a Slot menu (or in the context-sensitive menu activated by right-clicking the slot list area) which includes the following commands.
• Add Series Slot
• Add Series Slot with Expression
• Add Text Series Slot
• Add Integer Indexed Series Slots
• Add AggSeries Slot
• Add Integer Indexed AggSeries Slot
• Add Series Slot with Periodic Input
• Add Table Slot
• Add Statistical Table Slot
• Add Periodic Slot, Text Headers
• Add Periodic Slot, Numeric Headers
• Add Scalar Slot
• Add Scalar Slot with Expression
• Add Mass Balance Summary; see Creating a Mass Balance Summary Slot.
• Add Time Aggregation Series Slot
• Add Time Disaggregation Series Slot
After the slot is created, the following steps should be taken:
1. Open the newly created slot by double-clicking it.
2. Rename the slot by typing directly in the Name field.
3. Use the Configure menu option (and the subsequent dialog) to set the unit type, display format, and convergence criteria. See Configure Slot Dialog for details.
4. On series, consider revising the time series range, if necessary, prior to adding data into the series. On table slots, consider setting the number of rows and columns and changing the row or column labels.
5. On non-aggregate objects, slots can be organized into user defined groups. See Slot Groups for details on this utility. In addition, slots and groups can be copied and pasted to other objects. See Copy Slots to Objects for details on this action.
Configure Slot Dialog
The Configure Slot dialog is opened by selecting View, then Configure in the Open Slot dialog. Depending on the type of slot opened, the dialog could appear a slightly different. For example, the portion of the dialog showing the Upper Bounds and Lower Bound is only displayed for Series Slots. See Types of Slots for details about slot type differences.
Note: To configure Convergence or Bounds on multiple slots at one time, use the Configure Existing Slots dialog; see Global Slot Configuration.
Note: To change the Unit Type or Rename many custom slots in one operation, use the Configure Existing Slots dialog; see Global Slot Configuration.
Numeric Display Type
The Numeric Display Type controls how numbers are displayed in the slot. Values are still stored internally with full precision and are used with full precision in all computations. The choices are:
– Rational: Display values as rational numbers, for example 1,234.56. Formatting is based on the active unit scheme, including the selections in the configuration dialog. This is the most common display type.
– Integer: Display values as integers, for example, 2, 10, or 1,203. Formatting is based on the active unit scheme, except that the fractional part is not shown, that is, the precision is 0. Use this when values in this slot are intended to be integers and should be displayed as such. When selected, the display precision is set to 0 and cannot be changed. Some slots associated with objects’ methods have this toggle checked and cannot be changed.
Note: The Integer setting was previously (before RiverWare 8.2) a checkbox with the label Values are integer.
– Year: Display values as years, for example 1952 or 2019. Values are formatted without thousands separators (i.e. a comma), a scale, or a fractional part. Note, this display type applies only to values with unit type NONE. Use this display type when showing calendar years or water years in a slot.
Units
Units (Unit/Scale/Precision/Format) are controlled by the Unit Scheme, which presents a comprehensive view of how numeric values are displayed in RiverWare (see Unit Schemes for details). The units on slots are therefore controlled by the Unit Schemes. But you can configure the units via exceptions in the Unit Scheme Manager or from the slot itself. This section describes the configuration options on the slot. See Creating Exceptions for details on exceptions.
The Configure Slot dialog lists the unit type and the active scheme. On custom slots, you can change the unit type. On simulation slots, the type is fixed. You can then choose one of the options:
• Use Flow settings. Use the Unit type rule, i.e. use the generic setting associated with that unit type.
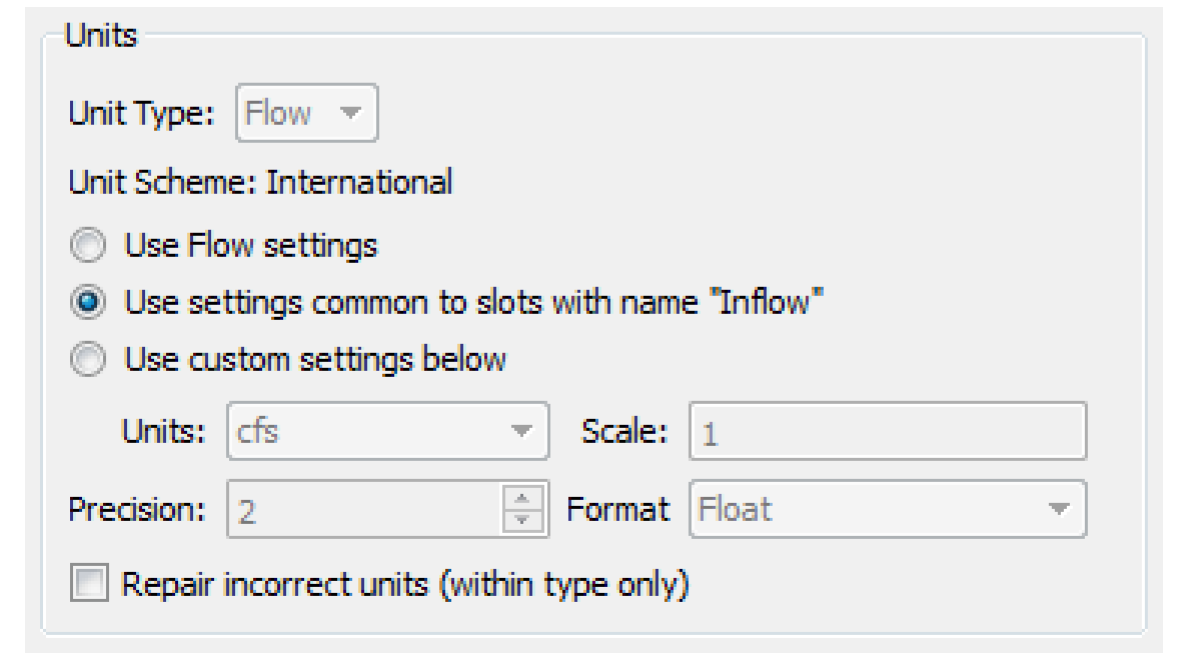
• Use settings common to slots with the name “Inflow”. Use a previously configured unit name exception that defines how slots with the same name should be displayed.
• Use custom settings below. Modify the units for just this slot. When you do this action, you are actually creating a Slot Exception for that slot within the currently active Unit Scheme. After making the change in the slot’s configuration, you can go to the unit scheme and see that exception.
As you change the selection, the unit settings for that toggle are shown in the Unit/Scale/Precision Format areas.
Note: On slots, commas are shown by default as a thousands separator. This is a global setting that is specified from the Workspace, then Show Commas in Numbers menu on the workspace. See Show Commas in Numbers for details. To display years without commas, see the Year Numeric Display Type.
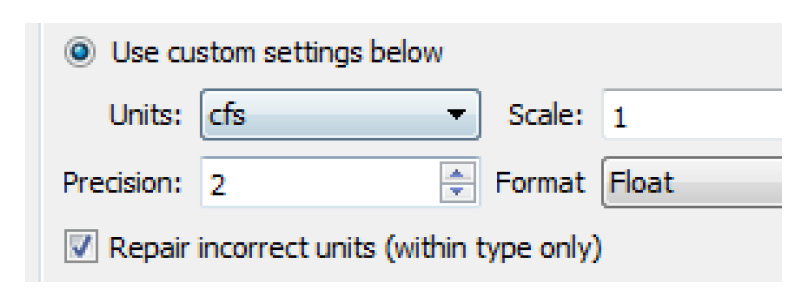
Repair incorrect units
Caution: Take care when using this feature to avoid corrupting data.
Sometimes you enter values into a slot (by typing or importing) but then realize that the slot’s display units were not what you expected. For example, you want to enter 100cfs into a slot so you type it in. But, then notice the slot is showing the flows in cms, when you meant to enter them in cfs. So now the slot has a value of 100cms = 3531.5cfs. How do you fix this without reentering the values?
To change the display units without changing the value displayed, you change the slot’s units from the slot using the View, then Configure menu. Configure that you wish to use custom settings, then change the units. Check the Repair incorrect units (within type only) box. When you apply the change and the confirmation dialog, the units will change, but the displayed values will not. This feature can be used to correct data which were accidentally imported or entered with the wrong display units selected.
Deleting Custom Slots
Note: Non-Custom, Simulation Slots cannot be deleted as they are part of the simulation object.
There are two ways to delete custom slots:
• From the Open Object or Object Viewer Slots tab, select one or more slots and then use the Slot and then Delete Slots menu. A confirmation asks if you really want to delete the slots.
• From the workspace, use the Workspace, and then Slots, and then Delete Custom Slots menu. This opens a slot selector with the “Is Custom” filter on by default. Select the desired slots and select OK. A confirmation asks if you really want to delete the slots. Note, the following slots cannot be deleted in this manner: Agg Series slots that are part of a Mass Balance Summary slot and Snapshot slots.
Revised: 08/02/2021