
Object Account Summary
The Object Account Summary displays summary information for the accounts on a given object. This information is useful to see summary information about all or some of the selected accounts on a given object. For example, see the total accounting storage for a given water type. Or, the see the total volume of water released downstream from all accounts on an object and compare it to the Object’s simulation Outflow to ensure that the two systems are reconciled.
Accessing the Object Account Summary
To open the Object Account Summary, use one of the following options:
• From the Object Viewer (or Open Object), use the Account, then Accounts Summary menu option.
• From the Accounting View of the workspace, right-click on a simulation object and select Accounts Summary from the context menu.
• From Water Accounts Manager, select Accounts, then Object Summary.
• From the Supplies Manager, select Object, then Summary.
• From an Object Account Summary, use the File (or Config) and then Open Additional Object Account Summary
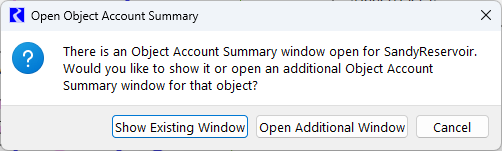
In all but the last case, if there is already an Object Account Summary open for the object, a confirmation is presented to either open the existing windows or open additional windows.
Tour of the Summary Tool
Figure 3.33 highlights the main parts of the Object Account Summary.
Figure 3.33 Annotated screenshot of the Object Account Summary
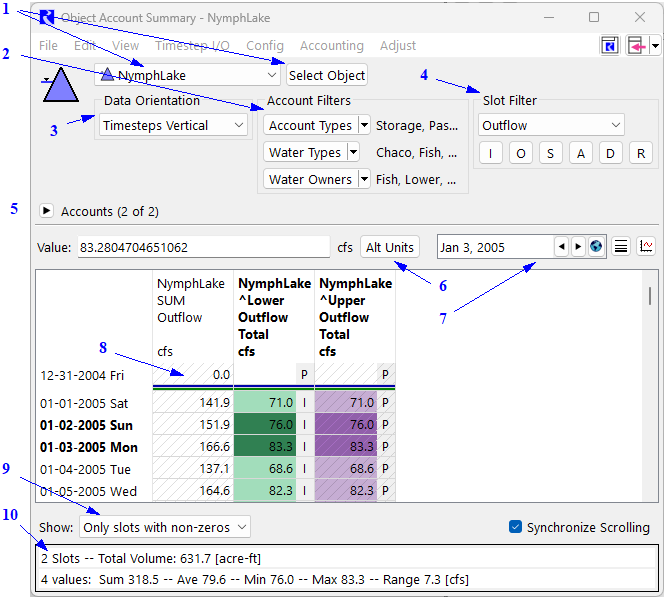
The numbers in the figure are as follows:
1. Select Object: Select the object to show. See Select Objects.
2. Slot Filter: Select the slot entity to show. See Slot Filter.
3. Account Filters: Filter by various Account attributes. See Account Filters.
4. Data Orientation: Rotate the slots and timesteps. See Account Filters.
5. Accounts: Select individual accounts. See Accounts.
6. Alt Units: Flow/Volume toggle.
7. Datetime selector: Scroll to a particular date.
8. Summary Area: View the data. See Summary Area.
9. Show menu: Filter the summary panel to show/hide empty or zero slots. See Slot Filter and the Show Menu.
10. Statistics Information. Get statistics on the selected cells. See Statistics Information.
In general, the top part of the window contains toggles and options that control the information shown. The bottom half of the window shows the summary and the components of that sum. In addition, statistical information is shown at the bottom of the window about the highlighted selection. Following are descriptions and additional information on each part of the window.
Select Objects
Select the object using either the menu or via the selector by selecting the Select Object button.

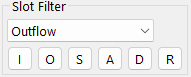
Slot Filter
The slot entity (Outflow, Inflow, Storage, etc.) shown in the summary area is selected using the menu. The most common slot types can be quickly selected using buttons: I = Inflow, O = Outflow, S = Storage, A = Accrual, D = Diversion and R = Return Flow. Use the menu to select other slots on the accounts.
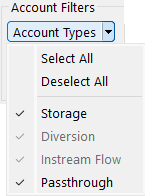
Account Filters
Filter by account type, water type and/or water owners as follows:
– Account Types: Accounts can be filtered by account type; that is, Storage, Diversion, Instream Flow or Passthrough, using the menu option. The options are enabled based on the types of accounts that reside on the object. Each of the filters is controlled by a menu button. Click the button to display a drop-down menu listing the options. Select or deselect the account attributes associated with the accounts as desired. The account filter menus include operations to select or deselect all the items with a single click.
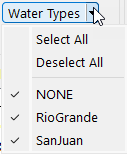
– Water Types: Similar to Account Types, accounts can be filtered by the Water Types defined in the model, including the default NONE water type. Use the menu option to select or deselect the desired Water Types.
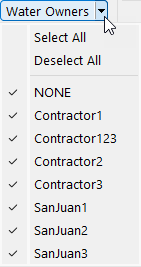
– Water Owners: Similarly, accounts can be filtered by the Water Owners defined in the model, including the default NONE water owner. Use the menu option to select or deselect the desired Water Owners.
Data Orientation
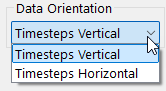
Show the data with either Timesteps Vertical (default) or Timesteps Horizontal. If Timesteps Vertical is selected, the accounts are shown as columns and timesteps are the rows. See Timesteps Vertical. If Timesteps Horizontal is selected, the timesteps are displayed as columns and the accounts are displayed down the rows in the table. See Timesteps Horizontal for more information.
Accounts
The accounts can be ordered and selected for display in the summary area.
Note: When the Account Filters described above are changed, all Accounts in the Accounts list are selected by default.
If the List All Accounts toggle is selected, then all accounts will be shown. Otherwise, only the selected accounts are shown. Each column can be sorted by selecting the column heading. To select multiple accounts, highlight the row and select Set Selection. All accounts can be selected using the Select All Accounts button. The accounts can be re-ordered by two methods:
• Select the column heading to sort the accounts by that column
• Select an account and select the up or down arrow to move the accounts.
Once the order is defined as desired in the Account Selection area, select the Set Order button to apply the changes. This reorders the slots in the summary area. Select the button to show/hide the Accounts area.
button to show/hide the Accounts area.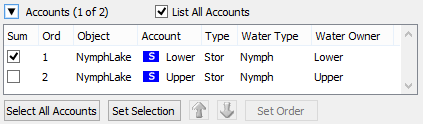
Summary Area
The main area of the window is the summary area that shows each of the selected slots or timesteps and the total sum for the selections. These can be shown with Timesteps Vertical; see Timesteps Vertical or with Timesteps Horizontal; see Timesteps Horizontal for more information.
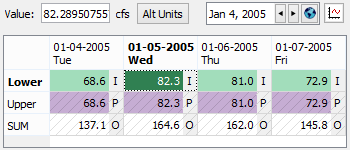
If appropriate, values in the summary area can be switched from Flow to Volume using the Alt Unit button options as shown and described in Viewing Account Series Slot Data.

Also, type in a date in the date box to and select Scroll to move to that timestep. Use the plot button to plot the selected slot. If one or more slots are selected, the plot button will plot the selected slot for the entire time period.
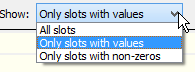
Slot Filter and the Show Menu
The Show menu allows you to specify whether to show All Slots, Only Slots with values (non NaNs) or Only slots with non-zero values.
Statistics Information
The following summary statistics are displayed for the highlighted selection: Sum, Average, Minimum, Maximum, and Range.If the slot entity shown is a Flow slot, then the summary area also shows the sum of the selected cells converted to a volume.

Timesteps Vertical
If you have selected to show the Timesteps Vertical for the data orientation, then the window looks as follows:
Figure 3.34 Screenshot of Slots for Columns in the Account Summary
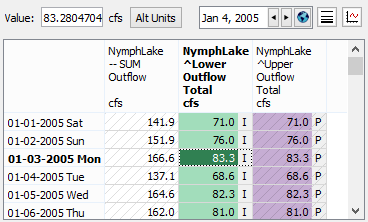
Normal accounting slot editing functionality is supported.
There is also the ability to hide or compress repeated values, a specified value, or NaNs. See Series Display Compression in User Interface for details about Series Display Compression.
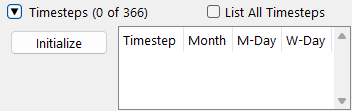
Timesteps Horizontal
As described above, you can select to show timesteps as columns. When the Timesteps Horizontal radio button is selected to show timesteps as the columns, the layout changes to add an area to select the timesteps to show. As there could be many timesteps in a model, at first, the area is empty, as in the following figure.
Figure 3.35 Timestep selection area before clicking the Initialize button
Select the Initialize button to activate the timesteps. This populates the table with the timesteps, as in .
Figure 3.36 Timestep selection area with timestep shown

Select the List All Timesteps toggle to show all of the timesteps in the model. Use the arrows to navigate through the model’s timesteps. Select the desired timesteps by checking the box to the left of the timestep. Select the Set Selection button to apply your choices and update the summary area. The summary area becomes similar to .
to navigate through the model’s timesteps. Select the desired timesteps by checking the box to the left of the timestep. Select the Set Selection button to apply your choices and update the summary area. The summary area becomes similar to .Figure 3.37 Screenshot of Timesteps for Columns in the Account Summary
In this layout, the summary information is shown as the bottom row of the window. Again, highlight specific portions to see the summary statistics and to initiate a plotting operation.
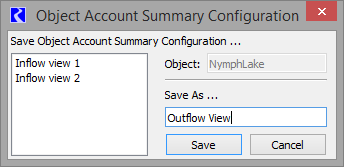
Save Configuration
The configuration can be saved using the Config, then Save As menu. As shown in Figure 3.38, the window lists the saved configurations for this object and allows you to enter a name to save the current configuration.
Figure 3.38 Save Object Account Summary Configuration
This configuration is saved with the model file. To apply the configuration to an Object Account Summary, use the Config menu and select the previously defined configuration name. In Figure 3.39, there are three configurations saved, “Inflow view 1”, “Inflow view 2”, and “Outflow View”.
Figure 3.39 Config menu on the Object Account Summary
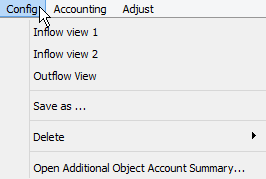
Also, use the Config menu to Delete saved configurations and Open Additional Object Account Summary for this object as shown in Figure 3.39.
Revised: 01/09/2026