
RiverWare Export to RiverWISE
The sharing process begins within RiverWare, where a model developer conducts a run and then exports the model and results to a special file called a WISE file (*.wise). This file contains everything RiverWISE needs to support stakeholder scenario exploration, including the following items.
• RiverWare model. The RiverWare model, including input and output values corresponding to the last run, policies, and workspace background images.
• Input slots. A list of slots whose input values may be modified by stakeholders, with bounds within which those changes should be constrained.
• Result slots. A list of series slots whose values are visible from within RiverWISE.
• Model/run description. Textual description of the model/run, providing a model background and orientation to stakeholders.
In the rest of this section, we describe in detail how to export a WISE file from RiverWare.
Preparing to Export
Before exporting a RiverWISE file, you should be clear about your goals for scenario exploration. For example, you should identify the following information.
• The stakeholders who will receive the WISE file and have an idea of their backgrounds and interests.
• The baseline run you would like to share, including the run range, policy, and input values.
• The series slots that are likely to be of interest to these stakeholders.
• The sort of alternative scenarios that are both permitted by the model and likely to be of interest to the stakeholders.
Note: RiverWISE does not support optimization or MRM runs.
Keep in mind that RiverWISE is a special-purpose tool designed to be accessible to stakeholders with little or no familiarity with RiverWare, and its interface prioritizes simplicity and clarity over the comprehensiveness and generality of RiverWare. The view of a basin provided by RiverWISE is necessarily narrower than that provided by RiverWare, and so it is important to consider which facets of your model are the most relevant to the stakeholders with whom you wish to share your results.
Once you are clear on these issues, the next step is to modify the model and policies as necessary to permit the desired scenario exploration. You may need to change the model to provide stakeholders with the desired input controls and results, as follows.
Input slots
Perhaps you would like stakeholders to be able to scale the input hydrology up or down by 5%. To do this conveniently, they should be able to specify a value in the range [-5%, +5%] and then have this change all of the series slots representing the input hydrology by that percentage. You can set up RiverWISE so the user can change all of the values of a set of slots within a certain range. Alternatively, or for other variables, you might want to create a scalar value that adjusts other values in the model in a certain way. For example, you could add an Input Hydrology Scale Factor scalar slot to your model, and then write initialization rules that use that value to do custom scaling. The Initialization rules should multiply the base hydrology (likely stored on a custom slot) by the scaling factor and set the result on the slot (likely an Inflow slot), at each timestep.
Further, input series slots must actually have values with the “I” or “Z” flag for input. See Input Slots for details about specifying input slots.
Result slots
You might wish to add slots that show a specific metric. For example, if you determine that the targeted stakeholders would like to see a particular quantity that is not currently represented as a series slot in you model (say cumulative flow through a particular stream gage over the course of the run), you will need to add a custom expression series slot that computes the quantity. This slot can then be included in the results available for viewing within RiverWISE.
Once you have modified the policy as necessary and provided the desired inputs, the next step is to execute the run whose results you will be exporting.
Export to RiverWISE Dialog
Once the baseline run is complete and you are ready to export, from the RiverWare main workspace window, initiate the export by selecting the File, then Export to RiverWISE operation. This will open the Export to RiverWISE dialog.
Figure 1.1 shows the Export to RiverWISE dialog.
The remainder of this section describes the parts of this dialog.
Figure 1.1 Screenshot of the Export to RiverWISE dialog box
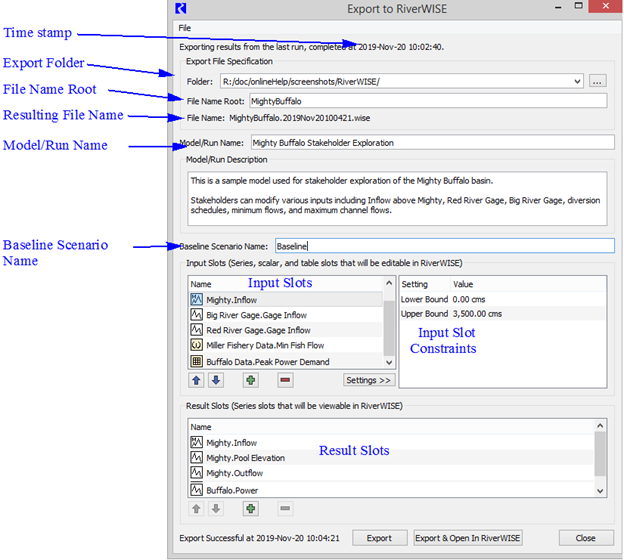
Last Simulation Timestamp
The top of the dialog displays the date and time of the last simulation. The results from that run that will be exported to the WISE file, so it is advisable to confirm that this time corresponds to your expectations.
Caution: If you have changed the model topology, policy, or any slot values since the last simulation, then you must re-execute the simulation before exporting to RiverWISE; otherwise, the export will be internally inconsistent and conclusions drawn within RiverWISE by stakeholders using the exported WISE file are likely to be incorrect/invalid. To be safe, export should occur immediately after the simulation generating the baseline results.
Export File Specification
Next, specify the folder to save in and the user configurable part of the WISE file name. There are two parts you specify: the folder in which to save and the File Name Root. The resulting file is saved to the specified folder with a name that contains the root and the timestamp at which it is saved. Following are descriptions of these parts.
Export folder
The Folder field specifies the folder path to which the WISE file will be written when the export occurs. There are several options for providing this path, as follows:
• Type it into the text box.
• Copy it from elsewhere and paste it into the text box.
• Select the  to the right of the text box, displaying a menu of previously selected paths, and select the desired folder from that menu.
to the right of the text box, displaying a menu of previously selected paths, and select the desired folder from that menu. • Select the More button on the far right, which will open a folder selection dialog.
File name root
The File name root is the user specified portion of the file name. Type the desired name in the field. Often you will include a model name and run descriptor; for example, “MyBasinEIS2018”.
Resulting file name
The resulting file name combines the File Name Root with the date/time at which the export occurs. A sample of this file name is shown, but the actual file name is generated at export.
By convention, WISE files use the *.wise extension; the file name has the following convention:
<File Name Root>.YYYYMMMDDHHMMSS.wise
The file name root and export timestamp together uniquely identify the exported WISE file, and in addition to being incorporated into the file name, are stored within the file. It persists when the WISE file is saved after scenario runs are added and when scenarios are exported; see Save WISE File and Export Scenarios in RiverWISE Stakeholder’s Guide for details.
Model or Run Name
The model or run name is a single-line text field into which you should enter a label which describes the particular model and run results you wish to export. RiverWISE displays the model/run name as the primary identifier associated with a particular WISE file.
This field is initialized based on the current model file (workspace) name, but can be edited. This text can contain white space and it need not be unique (that is, it can be the same for multiple exports). But if it isn't unique, then it is likely to be confusing to stakeholders.
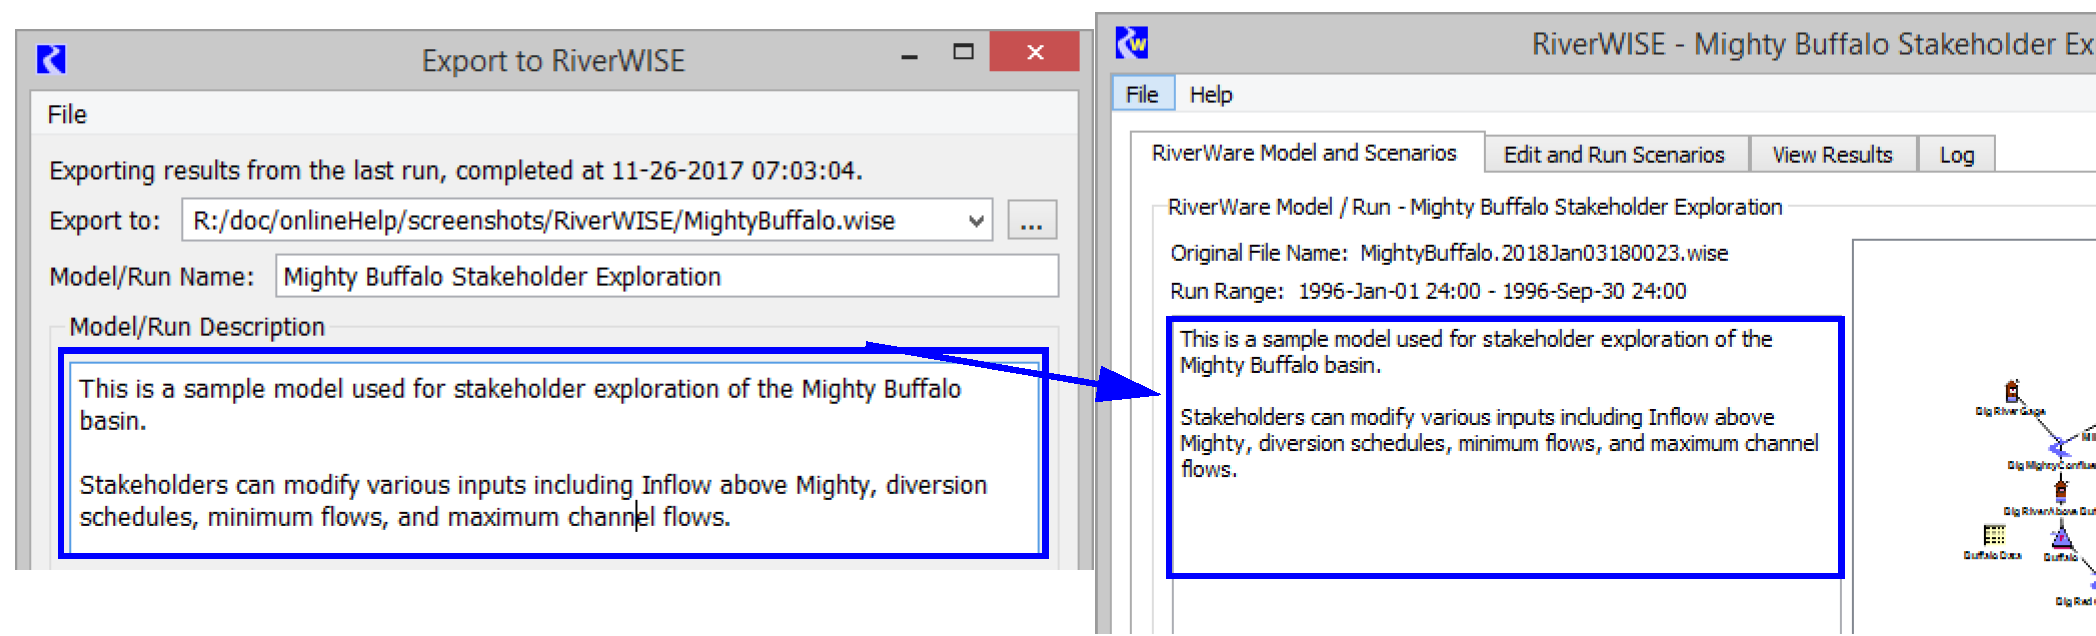
When a stakeholder opens a WISE file in RiverWISE, the Model/Run name is used as shown in Figure 1.2.
Figure 1.2

Model or Run Description
The model or run description multi-line text field may contain a more detailed description of the RiverWare model, the conditions of the particular run that is being exported, and anything else that might be of use to stakeholders using RiverWISE. The first time the Export to RiverWISE dialog is opened, this field is initialized to the Model Info dialog’s Comment.
When a stakeholder opens a WISE file in RiverWISE, it is displayed to the left of the workspace view, as shown in Figure 1.3.
Figure 1.3
Baseline Scenario Name
The baseline scenario name is the label which will be displayed with the scenario represented by the exported values; that is, the last run. The default value for this field is “Baseline.”
Note: Within RiverWISE, stakeholders that have opened the WISE file you have created can create, name, and delete additional scenarios, but they cannot delete or rename the baseline scenario.
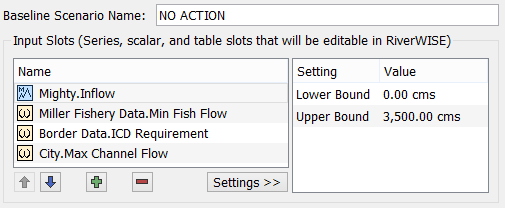
Input Slots
The input slots panel specifies an ordered list of the input slots which stakeholders will be able to modify for non-baseline scenarios.
To add slots to this list, select the Add Slots  button below the panel. This will open a dialog in which you can choose one or more slots to add to the existing list. If a slot that is already in the input slots list is selected when you select the Add Slots button, the new slots will be added after that slot, otherwise they will be appended to the end of the list. Use the Up and Down arrows to rearrange the slots as desired.
button below the panel. This will open a dialog in which you can choose one or more slots to add to the existing list. If a slot that is already in the input slots list is selected when you select the Add Slots button, the new slots will be added after that slot, otherwise they will be appended to the end of the list. Use the Up and Down arrows to rearrange the slots as desired. Only scalar, series, table and periodic slots are permitted in this list.
Note: Statistical Table Slots and Table Series Slots cannot be exported as input slots.
The following sections describe the different options based on the type of slot exported.
Series Slots
Series slots must have one or more values with the Input “I” or “Z” flag. For series slots, you may provide lower and/or upper bounds for the slot by selecting the Settings button and then entering the bounds in the appropriate fields. Default lower and upper bounds are provided based on values in the slot for the baseline.
Note: Series slots must have bounds to be scaled by a percentage or offset by a fraction within RiverWISE. It is recommended that all slots have bounds.
Tip: In RiverWISE, series slot bounds are shown as horizontal lines on plots.
These bounds will be enforced both when you export the WISE file (that is, the baseline scenario cannot violate the bounds provided for an input slot) as well as within RiverWISE when stakeholders are modifying scenarios they have created.
Figure 1.4 Screenshot of the Input Slots panel of the RiverWISE export dialog box
When series slots are added to the input slots list, they are also automatically added to the result slots list, as it is assumed that stakeholders will be interested in viewing these slots.
Tip: The RiverWISE stakeholder will be able to toggle the display units for flows and volumes. Thus, make sure both flow and volume unit schemes are configured as desired.
Scalar Slots
For scalar slots, you may provide lower and/or upper bounds for the slot by selecting the Settings button and then entering the bounds in the appropriate fields.
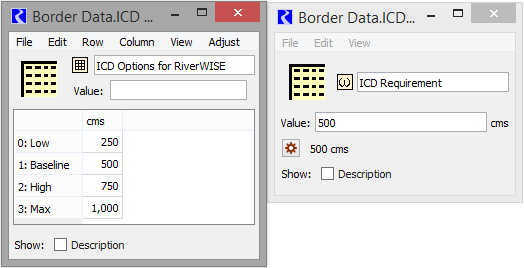
Scalar slots also provide a setting where you can configure the editing options. In the settings panel, use the Edit Option setting. Choose from the options shown in Figure 1.5:
Figure 1.5 Screenshot of Scalar Edit Options
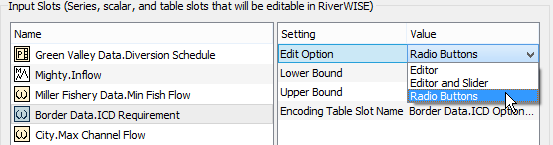
The options are as follows:
• Editor: The stakeholder will type in a new value for the Scalar slot. Provide Lower and Upper Bounds to constrain the entry.
• Editor and Slider: The stakeholder can type in a value or use the slider to specify the scalar value. You must provide Lower and Upper Bounds that become the limits for the sliders.
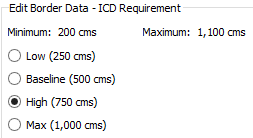
• Radio buttons: The stakeholder will select from a set of scalar value you define. This presents the stakeholder with a more straightforward interface with discreet decisions values. When selected, you must also specify an “Encoding Table Slot Name” that defines the radio button values and labels. One radio button is shown for each row of the table slot with the specified row label as the button label. The associated value is the value in the first column of that row. The screenshot in Figure 1.6 shows an encoding table slot and the exported scalar slot.The resulting radio button display in RiverWISE are shown in Figure 1.7.
Figure 1.6 Screenshot of a sample encoding table and scalar slot.
The following items are required for the table slot:
– The encoding table slot must have at least one column and at least two rows.
– The first column of the encoding table slot must have the expected unit type (that of the scalar slot).
– The current slot value (i.e. the baseline) must be one of the values in the first column.
Figure 1.7 Screenshot of resulting radio buttons in RiverWISE
Periodic and Table Slots
Export periodic and table slots that you would like the stakeholder to change. Within RiverWISE, these data sets are shown next to each other and the stakeholder can edit the values. They cannot be plotted.
Table slots show the defined row and column headers.
Periodic Slot row headers display the date (describing the time interval) associated with that row and the header column includes text or numeric column map values when applicable.
The stakeholder cannot change the number of rows or columns, edit row or column labels, or change the dates of periodic slots.
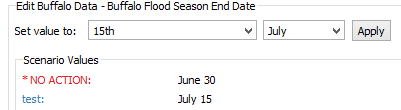
DateTime Values
The input or output slot sets can include slots which have values of unit type DateTime. Within RiverWISE, these values are displayed as they are in RiverWare, for example, “January 1" for a value with unit “MonthAndDay” or "12:00 February 17, 2020" for a value with unit “FullDateTime.”
The edit panel of the “Edit and Run Scenarios” tab presents controls for specifying a DateTime value when any of the values being displayed have the DateTime unit type.
Tip: Within RiverWISE, DateTime units are displayed with slightly different names, intended to be more natural for stakeholder that are not familiar with RiverWare-specific terminology. For example, the RiverWare unit “DateTime” is displayed within RiverWISE as “Date & Time.”
Figure 1.8 A sample of a DateTime scalar value shown in RiverWISE. This scalar allows for edits to the Month and Day.
Within RiverWISE, series data sets that includes DateTime values are edited using the “Edit Tabular Data” approach. Scaling and adding an offset are not available. Similarly it is not possible to simultaneously edit multiple data sets when one of them contains a date/time value.
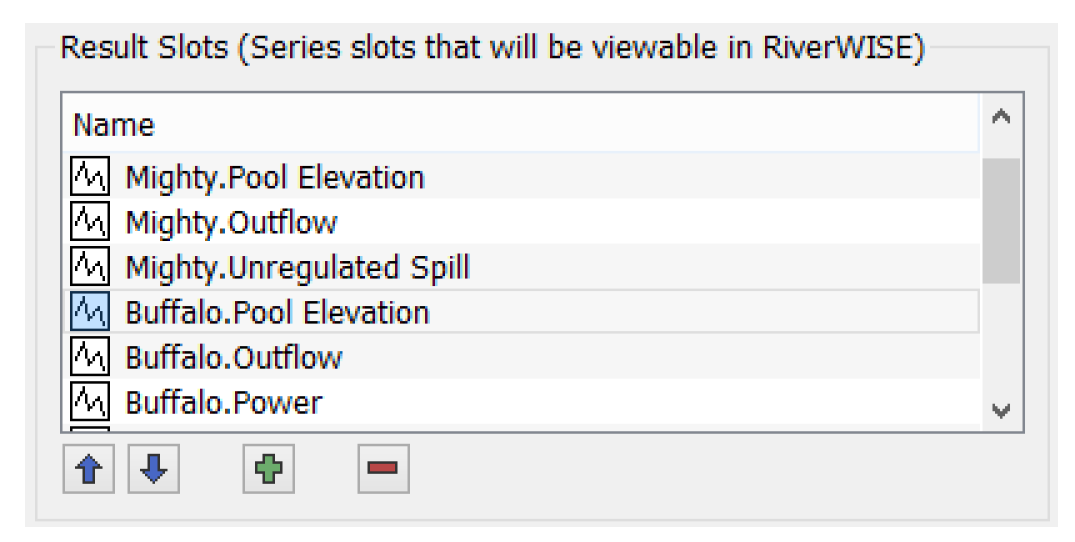
Result Slots
The result slots panel specifies an ordered list of the series slots whose values stakeholders will be able to view in RiverWISE. Only series slots are permitted in this list as most run results ares held in series slots.
To add slots to this list, select the Add Slots  button below the panel. This will open a dialog in which you can choose one or more slots to add to the existing list. If a slot is already selected in the input slots list when you select the Add Slots button, the new slots will be added after that slot, otherwise they will be appended to the end of the list.
button below the panel. This will open a dialog in which you can choose one or more slots to add to the existing list. If a slot is already selected in the input slots list when you select the Add Slots button, the new slots will be added after that slot, otherwise they will be appended to the end of the list.Figure 1.9
Do the Export
When the configuration is complete and you are ready to export the WISE file, select one of the export buttons, as follows.
• Export. Create the WISE file.
• Export & Open in RiverWISE. Create the WISE file and open RiverWISE as a separate process. When RiverWISE starts, it will automatically open the WISE file you have just exported.
Note: The RiverWISE file has a model and baseline scenario within it. Depending on the size, it could take significant time to write this file and open it in RiverWISE.
Revised: 07/05/2022