
RPL Analysis Tool
The RPL analysis tool assists the user in analyzing and documenting a RPL set. For this section, items refers to rules, groups, assignments, statements, predefined functions and user defined functions. In particular, this dialog displays two general types of information on items in the RPL set:
• Relationships amongst items within a RPL set, i.e. a listing of what functions are called by a rule or block or what rules or blocks call a given function.
• Performance information on each item in the RPL set. In addition, name, state, description and arguments are listed.
This information is useful for a number of common user tasks.
• Performance. Examining the calling relationships and performance data of rules, blocks, and functions can be useful when analyzing and improving the performance of a RPL set.
• Analysis and Understanding. Navigating through the calling-tree while reading the description text can be useful for interpreting a RPL set.
• Documentation. Printing a portion of a calling-tree along with its item’s descriptions and state provides concise documentation of a RPL set.
RPL Analysis Dialog
The RPL Analysis Dialog is available for each of the RPL sets in RiverWare including rulesets, object level accounting method sets, expression slot RPL sets, iterative MRM rulesets, and RPL based optimization sets. In this document, a block refers to the upper level expression for each of these sets and will be used in all descriptions. A block is analogous to such items as a rule, method, or expression slot assignment.
Display of Items and Data
The RPL analysis dialog allows the user to examine a wide range of information about any of the items in the RPL set. The user can customize the information that is displayed for all the items in the dialog. Among the list of information to possibly display (from the Window, then Columns menu) is: name, description, active, return-type, num arguments, argument list, item-type, priority, out-degree, in-degree, time, evaluation, and orphan.
In addition to the set, groups, functions, and blocks, the dialog provides access to other items. This is useful for examining performance information and relationships amongst predefined functions, blocks, and functions.
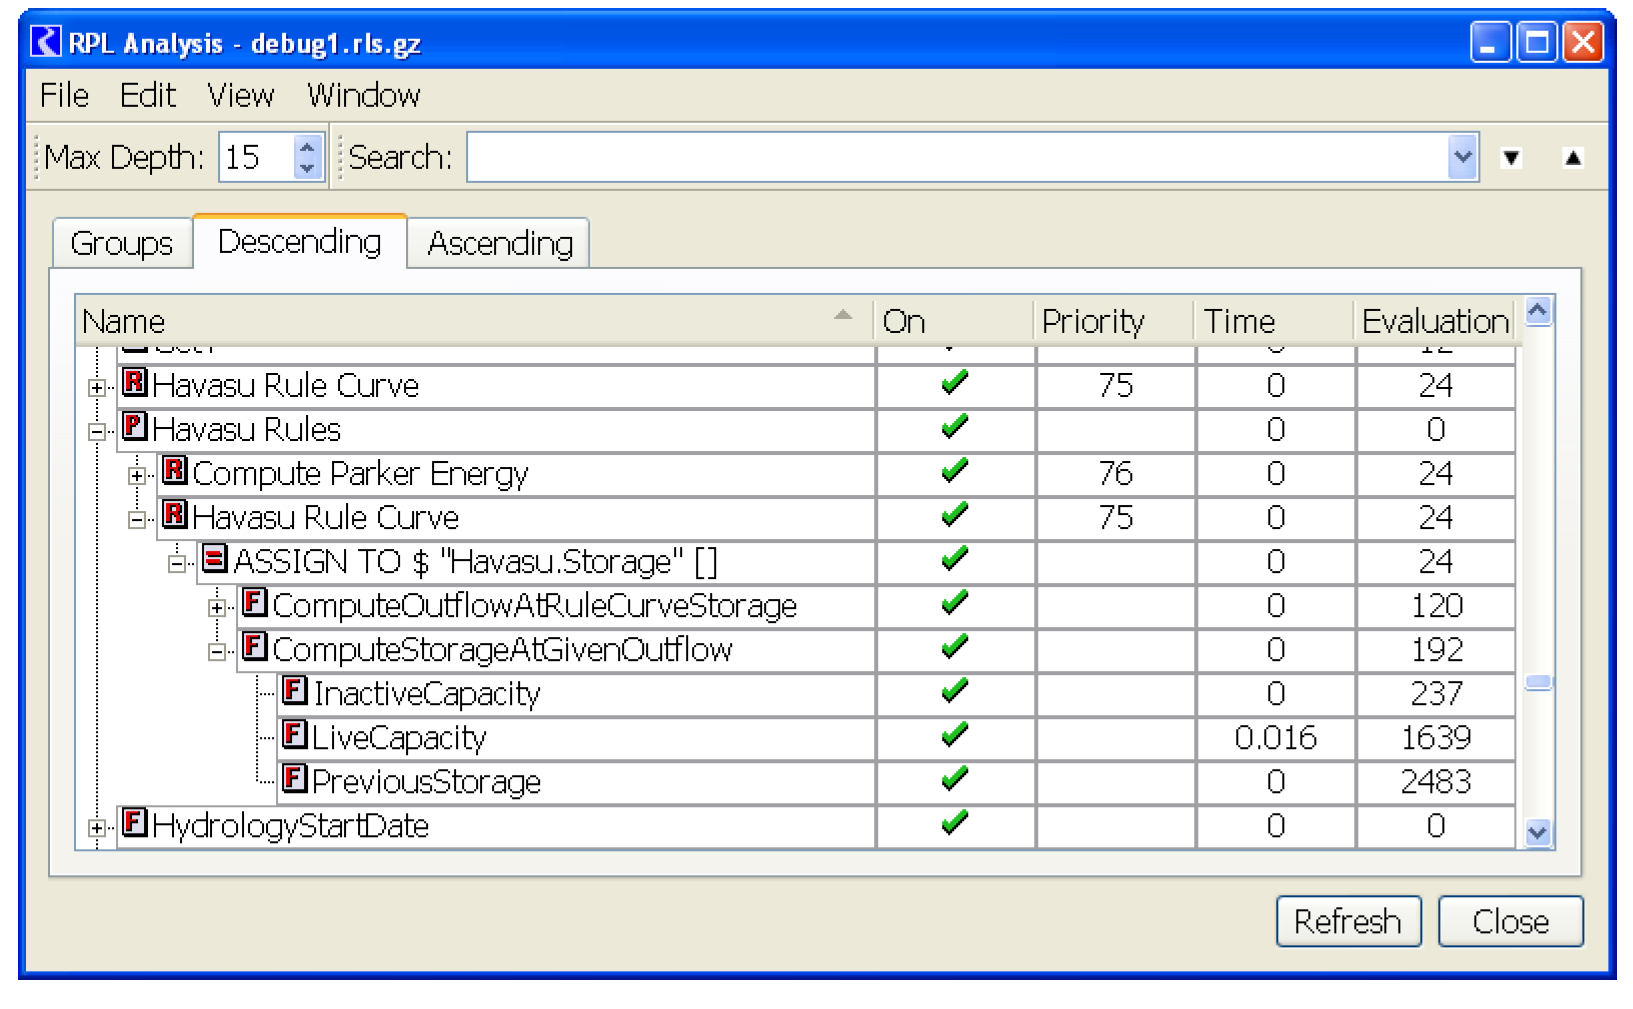
The dialog also displays RPL statement items inside rules or blocks, such as assignments, for-each statements, and print statements. These statements are assigned names based on the left-hand-side of the statement, such as “ASSIGN TO Reservoir.Inflow[]”.
The complete list of items which can be displayed or filtered (from the Window, then Objects menu) is: sets, groups, blocks (rules), print statements, statements, user functions, and predefined functions.
The Views
The second major component of the RPL analysis dialog is its three expandable treeviews. These treeviews display different relationships between items in the RPL set. These are all static relationships, i.e. relationships based on the definition of the RPL set not based on any specific model run.
By default these treeviews are linked, so that selecting an item in one of the treeviews selects and scrolls to this object in the other two views. Thus, the three treeviews can be thought of as different views on the same focused object. The user can quickly examine the selected object from the different perspectives of these three treeviews:
• Groups view. The first treeview is the classic view of utility and policy groups and their members as displayed in the RPL set editor dialog. It is provided here as an entry point into a RPL set because it will be familiar to users. This view differs from the RPL set editor dialog, because it also includes the RPL Statement items defined for each block or function.
• Descending view. This treeview displays the items that are called by a given item. Expanding the treeview under an item reveals the items that are called by the given item. This view is called the descending view because it provides a descending view of the static call graph.
• Ascending view. This treeview displays the items that call a given item. Instead of descending the static call graph as in the previous view, it ascends the call graph to reveal all the items that call the given items.
The descending and ascending views both provide views onto the static call graph of the entire RPL set. By selecting an item in either of these views, the user can examine the entire portion of the call graph containing the selected item; the descending view shows the call graph below the item and the ascending view shows the call graph above the item.
Using the RPL Analysis Dialog
The RPL Analysis Tool is automatically enabled for all RPL sets to view the relationship amongst items in the RPL set.
Opening the Dialog
The RPL Analysis dialog can be opened from any of the RPL editor dialogs. Each editor dialog has a menu item for Analysis (i.e. depending on the type of RPL set, the menu is called Ruleset, Set, Methods, etc). For example, from the ruleset:
• From the ruleset editor: Ruleset, then Analysis
• From the RPL group editor: Group, then Analysis
• From the Rule editor: Rule, then Analysis
• From the Function editor: Function, then Analysis
When the RPL analysis dialog is opened from a RPL editor, the editor’s item will be the currently selected item, e.g. opening the RPL analysis dialog from a function editor will force the function to be the currently selected item in the analysis dialog.
The RPL analysis dialog can also be opened using the key-command Ctrl+Y on Windows.
Switching Between Views
As the three listviews provide different views on the same set of RPL items, it is often helpful to switch between these different views during a session. As long as the Window, then Sync Views is active by default), the three listviews will focus on the same selected item in all three views.
The user can switch between views by selecting the desired tab: Groups, Descending, or Ascending. In addition, the View menu provides menu items and key-commands for rapidly switching between views: View, then Groups View or Ctrl+G, View, then Descending View or Ctrl+D, View, then Ascending View or Ctrl+A.
Navigating Within a Treeview
The listviews provide several ways of navigating up and down.
• Use the mouse to move the vertical scrollbars up and down.
• Navigate up and down using the keyboard using the Up-arrow and Down-arrow keys.
• Pressing a letter on the keyboard will navigate to the next item that begins with the given letter.
• The user can move between children and parents in several ways.
• The [+] and [-] buttons on the left side of each row to expand and collapse the row.
• The Left-arrow and Right-arrow keys on the keyboard expand and collapse rows and navigate between children and parents. The first arrow press moves up or down a level and the second arrow press expands or collapses the level.
• View, then Expand All or Alt + Right-arrow will expand all the rows in the current listview. Note that for very large RPL sets, expanding all rows may require significant computational time.
• View, then Collapse All or Alt + Left-arrow will collapse all the rows in the current listview.
• View, then Expand Children or Ctrl + Right-arrow will open all child rows of the current item. This is a quick way to expand just a portion of the current treeview.
• View, then Collapse Parents or Ctrl + Left-arrow will close all the parent rows of the given item. This is a quick way of collapsing a large block of a treeview to simplify the current view.
Sorting
As with many other listviews in RiverWare, each listview can be sorted by a specific column. Selecting the column header in either the Descending or Ascending view will sort the top-level items by that column. An arrow next to the column’s name indicates the sorting column and the direction.

Sorting can be useful to quickly group together common items, such as all orphans (sort by Orphans column) or the most computationally expensive items (sort by Time). To eliminate confusion, the classic Groups view only allows sorting by priority number.
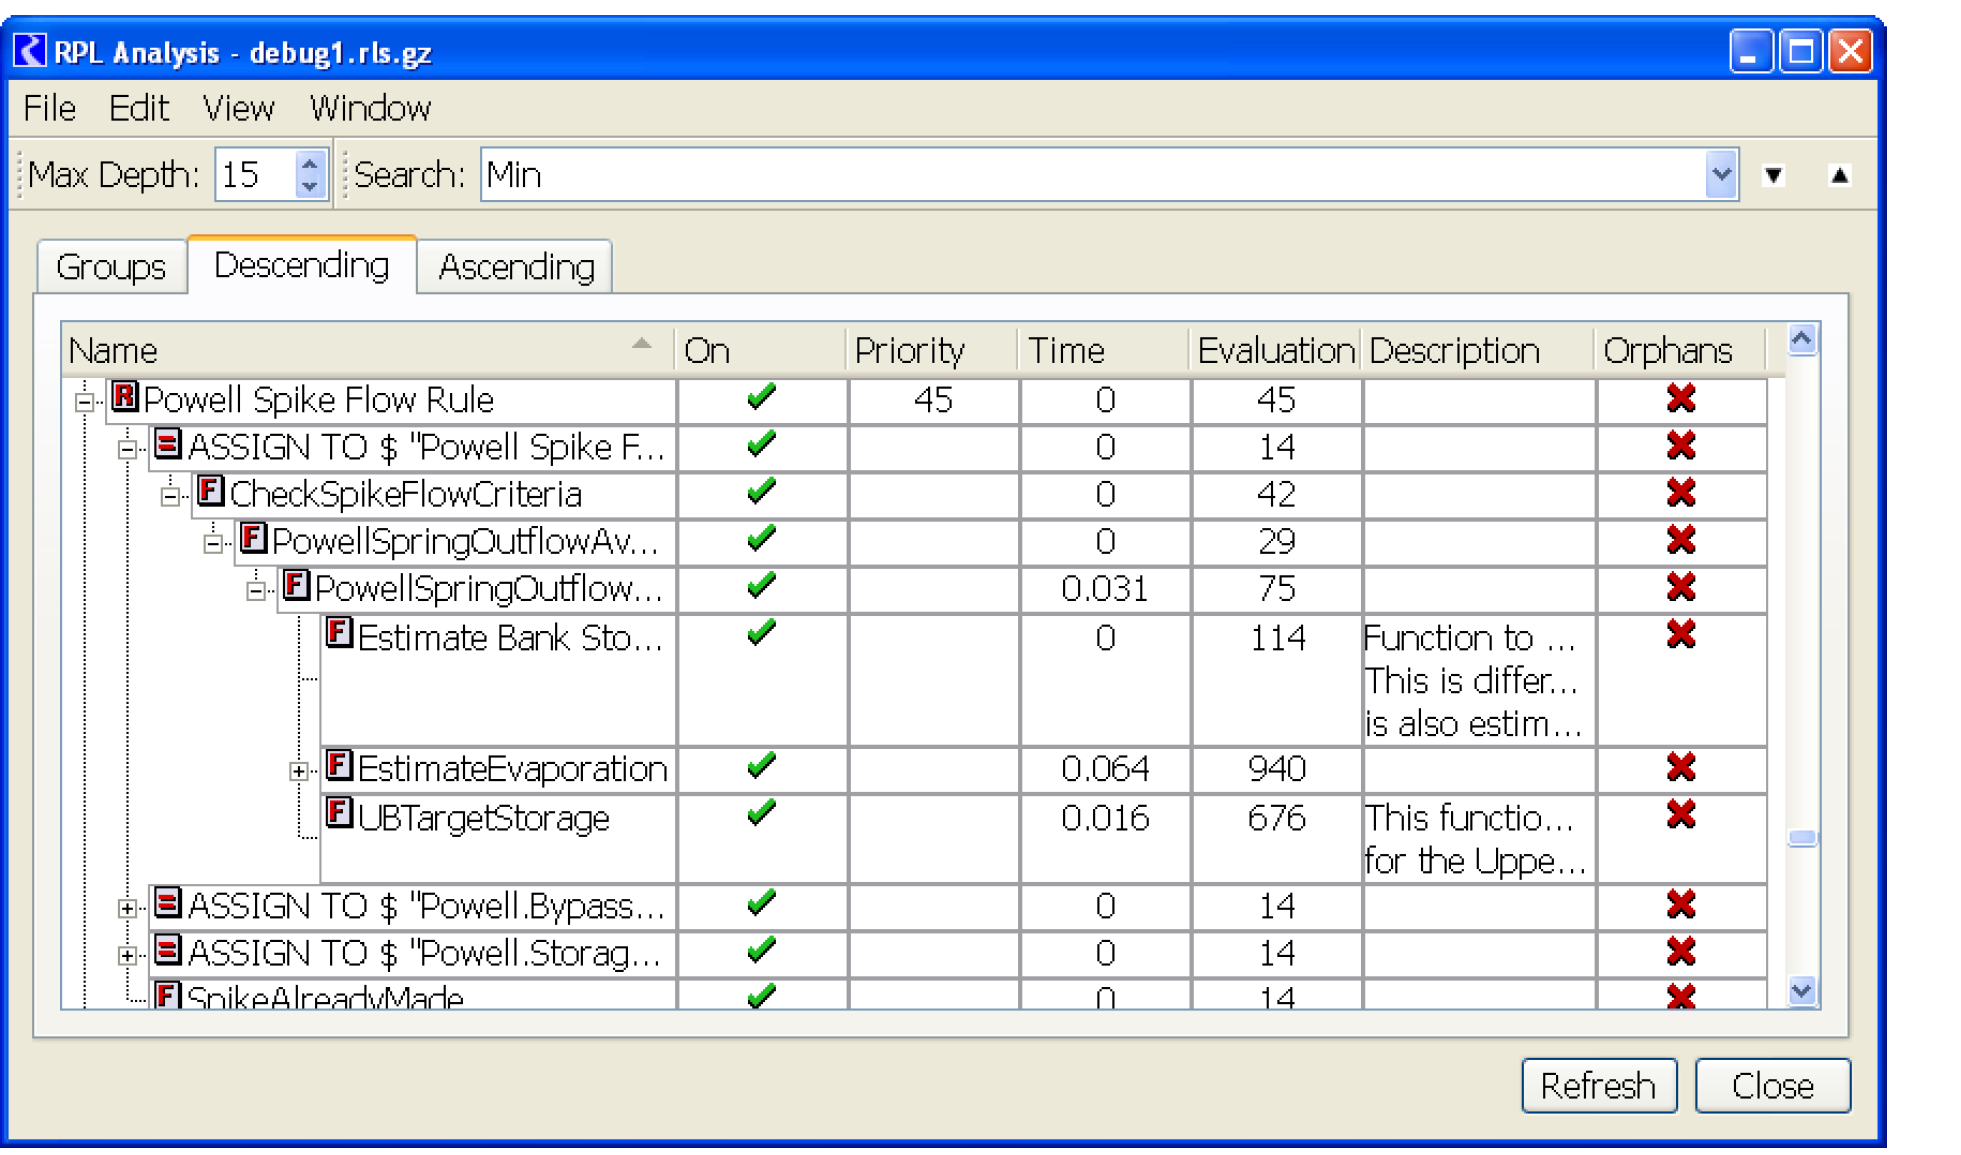
Search
The user can quickly navigate to an item by typing in the name in the Search toolbar. This toolbar is activated by right-clicking the main menu bar and selecting Search Toolbar.

The search will stop on the next item that contains the entire search string. It is not required that the item name exactly match the search string, only that the name contains the search string.
The Search text box will preserve all the typed search text strings. These past searches can be accessed by selecting the drop down arrow next to the text box.
A search is initiated by pressing the Find Next button. By pressing the arrow to the right of the button, the user can select an ascending or descending order. The button will honor the last search order.
Pressing a letter on the keyboard will navigate to the next item that begins with the given letter; see Navigating Within a Treeview for details.
Opening RPL Editors
It is often useful to examine the RPL editor dialog for an item. An editor dialog can be opened several ways:
• Double-click an item in a listview.
• Edit, then Open Editor or Alt+E.
For cases when the user is opening a large number of editor dialogs, the Window, then Replace Existing Editor option can be useful. With this option enabled, each new editor dialog opened will close the previous editor dialog so only a single editor is visible at one time. This eliminates the need to close each editor before opening a new one to eliminate screen clutter.
Customizing the Views
The RPL analysis dialog has been designed to be user-customizable. With a few menu selections, the user can show only the items and information that is useful for the given task.
As shown in Figure 4.14, the dialog can display a large amount of information. For most tasks, however, only a subset of that information is useful. The Window menu allows the user to quickly specify which types of items and information to display in the current views.
All user settings are saved with the user’s RiverWare preferences file. So settings made in the current session will be preserved for future RiverWare sessions run from the same login, regardless of the model or RPL set loaded.
Figure 4.14
Selecting the Columns to Display
The Window, then Columns menu contains a list of all available columns.
• Name. Name of the RPL item. For RPL statements, this name is generated from the left-hand-side of the statement and cannot be modified by the user, e.g. “ASSIGN TO Reservoir.Slot[]”. This column also displays an icon representing the items type.
• Description. The user-specified description text associated with an item. This text can be edited using the item’s RPL editor which can be opened by double-clicking the item in the treeview, using the key command Alt+E, or selecting Open Editor from the context-menu or Edit, then Open Editor from the main menu.
• On. Whether the item is currently active. This field can be edited from the RPL set or RPL group dialogs.
• Return type. The return-type of a function.
• Num arguments. The number of arguments that must be passed to a function.
• Argument list. The specific list of argument types that must be passed to a function.
• Object-type. The text name for the item’s type. An icon representing the item’s type is also displayed in the Name column.
• Priority. The numerical priority of a block.
• Out-degree. The number of RPL items called by this item, i.e. the number of children of this item in the Descending view.
• Orphan. An orphan is an item that is not being called by any other item. In the Ascending view, an orphan has no children.
• In-degree. The number of RPL items that call this item, i.e. the number of children of this item in the Ascending view.
• Time. The number of seconds spent in evaluating this item during the most recent model run. This value is computed using the ANSI-C clock() function which returns the number of CPU cycles the program has used (user time), measured in some system-dependent units (milliseconds on Windows). The value displayed in this column is the difference of the clock() values returned before and after executing the item, then scaled using the CLOCKS_PER_SEC macro to get a final value in seconds.
• Evaluations. The number of times this item was executed during the most recent model run.
• Dispatch Count. For a Rulebased Simulation rule, this is the number of dispatch methods that have executed due to values being set by the rule.
• Dispatch Time. For a Rulebased Simulation rule, this is the time spent executing dispatch methods as a result of values being set by the rule
Note: For the Time, Evaluations, Dispatch Count, and Dispatch Time columns, the value for a RPL Set and a Policy Group is the sum of the member items. For Utility groups, no total is provided; it is always zero.
A newly activated column will be placed at the right-side of all the listviews. The order of columns can be modified by dragging the column’s header at the top of the listview to a different location in the header. The same size, position, and set of columns is displayed in all three listviews.
Selecting the Item Types to Display
The Window, then Objects menu contains a list of all available items. Selecting an item-type will show/hide all items of this type. Hiding a container item such as a set or group, does not hide its children.
• Sets. The top-level RPL set.
• Groups. Policy or utility groups.
• Blocks. block items such as rules, methods, or expression slots.
• Print statements. Print statements contained in blocks.
• Other statements. All statements, besides print statements, contained in blocks. Unlike print statements, these statements all assign values in their left-hand-side.
• User functions. All internal (RPL language) user functions.
• Predefined functions. The predefined functions and the utility groups that contain them.
Printing and Exporting
A major goal of the RPL analysis dialog is to support documentation of RPL sets. To assist with documentation, the user is able to print or export to a tab-delimited file for importing into a third-party tool such as Excel.
Both printing and export generate output for the currently visible treeview. The user can generate output of the entire treeview or just the selected portion of the treeview. In both cases, the output will contain only the expanded rows in the treeview. If a row is not expanded in the treeview, its children will not be expanded in the output. In both cases, only the currently selected columns will be included in the output.
File, then Print, then All and File, then Export, then All generates an output of all the expanded rows in the currently visible treeview.
File, then Print, then Selected and File, then Export, then Selected generates an output of the currently selected rows in the currently visible treeview. Rows can be selected by: dragging a set of rows using the left-mouse button, adding a set of items by holding down the Shift key, or adding or removing specific rows by holding down the Ctrl key.
Customizing Other Behavior
In addition to the customizations for columns and item types, several other behaviors can be customized by the user. As with all customizations, these settings are saved as part of the user’s RiverWare preferences which are recalled with each new RiverWare session.
• Window, then Sync Views. When this is active, selecting an item in one of the listviews will also select it in the other two listviews.
• Window, then Replace Existing Editor. When this is active, opening a RPL editor (by double-clicking an item or using the Edit, then Open Editor menu item) will close the previous RPL editor and replace it with the new editor. This saves the user from having to close each editor dialog when quickly examining the contents of numerous editors.
• Window, then Show Multiple Lines. When this is active, the treeviews will display all the lines of a multiple line description. This can be turned off when the user would rather see just the top-line of multiple line descriptions.
• [Depth Toolbar], then Maximum Depth. Sets the maximum depth of in the treeviews. This value is typically only of interest with RPL sets that use recursion, i.e. where two functions call each other. With recursive RPL sets, the Expand Children or Expand All features need to specify a maximum depth since the recursive calls would continue infinitely. In this case the treeview will only expand to this depth.
This toolbar can be enabled by right-clicking the menu bar and selecting Depth Toolbar.
Revised: 07/05/2022