
Name Mapping
It is likely that RiverWare object or slot names do not match their associated database names. For example, in RiverWare, the reservoir inflow is called Inflow in, while in DSS Part C, it is called RES-INFLOW. Because different databases use different naming conventions, there is no way for RiverWare to know the database naming convention. The name mapping tool provides a way for you to specify the link between the two naming systems. The name mapping tool allows you to define multiple name mappings.
Note: If the names are mapped within the database itself, as they are in HDB, a Name Map is not needed.
Note: For DSS datasets, there is no need to create a name map if the map is strictly to specify a different letter case; this is taken care of automatically. For example, if a reservoir is called BigLake in RiverWare and BIGLAKE in the DSS database, a name map is not necessary.
Configuring Name Mapping
To open the name mapping editor from the DMI Manager, select Utilities, then Name Maps.
This opens the Name Map Manager dialog. Select the  icon to add a new Name Map to the editor.
icon to add a new Name Map to the editor. 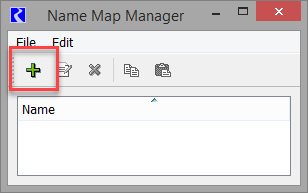
Double-click the newly added Name Map to open the Name Map dialog as shown in the following figure. In this dialog, the user is able to edit the name of the Name Map. Selecting Name Map, then New adds a new entry to the list.
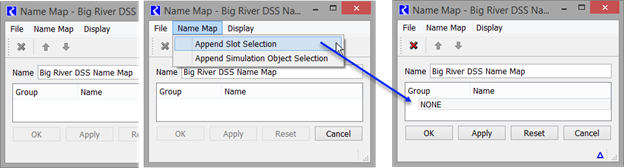
Selecting the newly selected entry opens the context menu options shown in Figure 4.29. Either select Append Slot Selection or Append Simulation Object Selection. This action adds an item to the list. Double Click the “NONE” item to open the selector dialog for the appropriate selection.
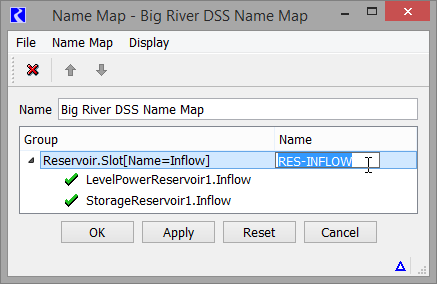
Select the desired slots or objects that will be part of this Name Map. If accounting is enabled, supplies, accounts, exchanges, and paybacks are also available. Use the filters and wildcards to select generic slots. For example, the user could select Reservoir.Inflow as an entry. See Creating a Name Map of All Reservoir.Inflow Slots in User Interface for details on using the selector. The selections made here are considered dynamic root selections. That is, the selection is saved with the model file and is automatically updated if objects or slots are added to or removed from the model. This is especially useful when using wildcards.
To define the alternate name, that is, the name in the database, select the blank area to the right of the entry under the word Name. Figure 4.29 shows an example.
Figure 4.29 DMI Name Map with alternative name specified
Name Map Ordering and Priorities
The entries in the Name Map are prioritized. If there is a conflict between two entries, the entry with the highest priority takes precedence and the other entry becomes disabled with a red X. Thus, if there is a red X, there is a higher priority selection that controls the item. For example, in Figure 4.30, the first entry for ResA.Inflow (INFLOW) takes priority over the second entry (RES-INFLOW). The green check marks show that the first item is controlling the selection. This functionality allows you to create a name map for a generic case but redefine it in special case.
Figure 4.30 Screenshot of DMI Name Map with entries impacted by the ordering
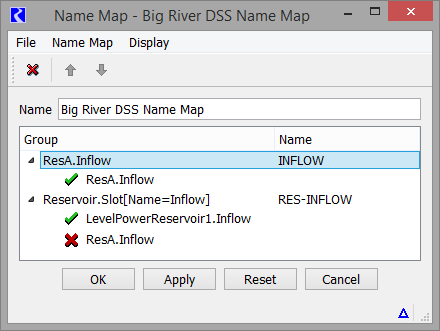
The priority order is based on the least exact match (the more general case, for example Reservoir.Inflow) to the more exact match (the more specific case, for example, ResA.Inflow)
Sometimes you might want to change the display order. Use the Display menu and selecting Custom. Once in custom mode, select an entry and then use the up and down arrows  or Display, then Move Up or Move Down file choices to rearrange rows. To return to prioritized mode, the select Display, then Priority. Regardless of the ordering, the name maps are stored according to priority; custom order is just for display.
or Display, then Move Up or Move Down file choices to rearrange rows. To return to prioritized mode, the select Display, then Priority. Regardless of the ordering, the name maps are stored according to priority; custom order is just for display.Creating a Name Map from a JSON file
Instead of creating the Name Map in the RiverWare interface, you might have tools/scripts to create a JSON text file that represents the name map. Or perhaps, you find it easier to work with text files. Once you have the JSON file created in the correct format, use the File and then Import Slot Mapping from JSON File.
When the JSON file is imported, the Name Map creates a slot selection mapped to its alternate name for each slot in the file. This is functionally equivalent to selecting each slot and entering its alternate name. The name map also provides detailed feedback on the import – which slot mappings were created, which slot mappings could not be created (for example, because a slot doesn’t exist in the model) and any syntax errors in the JSON file.
The JSON file format supports simulation object, account and supply slots. The format is as follows:
{
"SlotList": [
{
"ObjectSlot": "<Object Name>.<Slot Name>",
"AltName": "..."
},
{
"ObjectAccountSlot": "<Object Name>^<Account Name>.<Slot Name>",
"AltName": "..."
},
{
"SupplySlot": "<Supply Name>.Supply",
"AltName": "..."
}
]
}
Tip: Create a template JSON file (basically, the text above) that you can edit. Use the File and then Create Empty Template Slot Mapping JSON File.
The name map uses the term “AltName”, which is the name in the database, for example an SDID in HDB. You need to specify the <Object.Slot> and “...” for the AltName in the file. For example, the following file could be imported to map Coachella Valley. “Coachella Valley.Diversion” to location/parameter 10066 in the database.
{
"SlotList": [
{
"ObjectSlot": “Coachella Valley.Diversion”,
"AltName": "10066"
}
]
}
Note: You cannot export a Name Map as a JSON file. To use a name map in another model, see Export. The export is available from the File and then Export Name Map.
Revised: 06/04/2022