
Post-processing Scenarios
The Scenario List Post-Processor dialog box displays a three-level tree view that lists the activated scenarios at the top level. Within each scenario, the events performed by post-processing are listed; and within each event, the completed activities are listed. To open this dialog box, select Scenarios, then Simulate Scenarios on the RiverSMART menu.
To initiate post-processing of scenarios, select one or more scenarios and one or more files, and then select Scenarios, then Post-Process Checked Scenarios. When a scenario is post-processed, its output files (that is, RDF or CSV) are run through the linked processes that follow each output file icon on the RiverSMART workspace. Post-processing typically involves taking an RDF file and running it through events, such as RDF Annualizer or RDF To Excel, to generate Excel workbooks that can be used for data analysis.
Files resulting from post-processing are managed by RiverSMART and are added to the Scenario\ folder of the study, in a folder with the scenario name. Log files or intermediate results are added to the Working\ folder of the study, in a folder with the event name.
If you need to halt post-processing while it is in progress, select Scenarios, then Stop Post-Processes. Post-processing of the current scenario is allowed to finish, and subsequent scenarios are not post-processed.
Viewing Post-processing Details
Figure 2.4 illustrates the following post-processing details for a scenario.
A—the Boatable Flows RDF file is not selected for post-processing.
B—the Boatable Flows RDF file was skipped when the selected scenario was post-processed; consequently, the scenario is partially post-processed, as indicated by the half-green and half-gray Post-Processing Status icon.
Figure 2.4 Scenario post-processing details
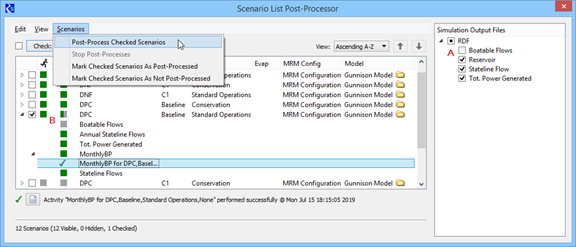
The Run icon displays the scenario simulation status: green for successful; red for unsuccessful; gray for not run.
The next column displays the Post-Processing Status icon. For a scenario, the post-processing statuses are: green for all run successfully; red for all failed; half-red and half-green for some steps successful and some failed; gray for not processed. You can manually override the Post-processing icon color by selecting Scenarios, then Mark Checked Scenarios As Post-Processed or Mark Checked Scenarios As Not Post-Processed. This is useful if the study was not saved after post-processing, causing the icons to indicate an outdated status.
If you select the File Folder icon at the end of a scenario row, a Windows Explorer window opens to the folder where the output files for the scenario are located.
When you expand a scenario tree view, additional post-processing details are displayed. The Post-processing icon displays the status of each post-processing event for the scenario.
When you select an event, its post-processing status is displayed in the status area of the window. If the event was unsuccessful, the reported error message is displayed in a second line of the status message.
If a post-processing event reports detail about its activities, the activities are listed at the next level in the tree view under the event. A green check indicates the activity was successful, and a red check indicates the activity failed.
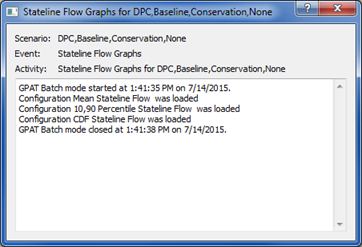
When you select an activity, its post-processing status is displayed in the status area of the window. If a log file was generated for the activity, the File icon in the status message is enabled and you can select it to open the log file for viewing. This is useful in troubleshooting issues for failed activities.
Following is a sample log file generated by GPAT Graphs for the successful Stateline Flow Graphs activity highlighted in Figure 2.4.
Hiding and Deactivating Scenarios in Post-processing
The Scenario List Post-Processor window also provides options to deactivate or activate, and dynamically hide or show scenarios. These options function in the same manner as those on the Scenario List Organizer dialog box.
Deactivating a scenario makes it unavailable throughout RiverSMART and removes it from all RiverSMART dialog boxes. To deactivate scenarios, select the scenarios, and then select Edit, then Deactivate Checked Scenarios. To activate all inactive scenarios, select Edit, then Activate Inactive Scenarios.
Hiding a scenario does not deactivate it; it simply hides the scenario in the current dialog box and does not affect other dialog boxes. If many scenarios have been successfully post-processed, you may want to hide them to reduce clutter on the workspace. To hide active scenarios, select the scenarios, and then select View, then Hide Checked Scenarios. To show all active scenarios, select View, then Show Hidden Scenarios.
Revised: 08/04/2021