
Simulating Scenarios
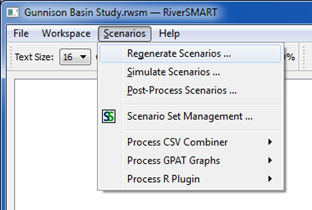
A scenario is a specific combination of RiverWare inputs that create a RiverWare run. The generation, simulation, and post-processing of RiverWare scenarios are controlled from the Scenarios menu in RiverSMART.
Note: These menus are disabled if any Configuration dialog boxes are open for files or events on the workspace; configuring and running scenarios are mutually exclusive actions.
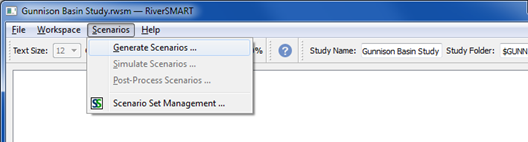
Generating Scenarios
The Scenario List Organizer dialog box allows you to define scenarios from all potential combinations of inputs linked to RiverWare. To open this dialog box, select Scenarios, then Generate Scenarios on the RiverSMART menu.
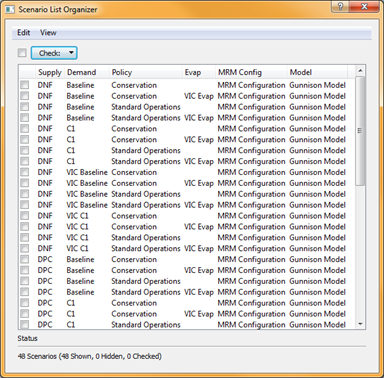
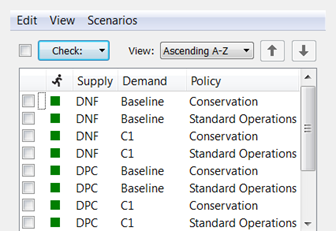
A column is created for each RiverWare input category. In the example, the RiverWare DMIs have been assigned one of three category names in their configuration dialog boxes, so these categories show up as separate columns: Supply, Demand, and Evap.
The scenario name is automatically formed by concatenating the column names from left to right. By default, the columns are displayed in alphabetical order, but you can drag them into any order that is useful for identifying the scenarios.
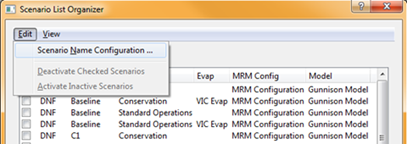
You can make additional changes to scenario names by selecting Edit, then Scenario Name Configuration.
The Scenario Name Configuration dialog box allows you to select the columns to include in the scenario name. It also allows you to define the separator between the components.
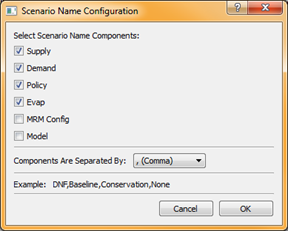
In this example, the same MRM Configuration and Model are used for all scenarios, so including them in the name adds no meaningful information to help differentiate among scenarios. The check boxes for these elements are therefore cleared to exclude them from the name. A comma is selected as the separator in the Components Are Separated By menu. An example scenario name is displayed at the bottom of the dialog box.
Caution: When you generate scenarios, RiverSMART assigns the scenario names to the folders it creates for the generated files. Therefore, if you make changes to the scenario names after you generate scenarios, all simulation and post-processing state information associated with the previous names are lost when the scenarios are regenerated.
The Scenario List Organizer indicates that 48 scenarios have been created from the combination of inputs to RiverWare. Not all of these combinations are meaningful, however—for example, VIC Evap should only be used with VIC supplies. Only 12 scenarios among the 48 should be run for this model.
Hiding and Deactivating Scenarios
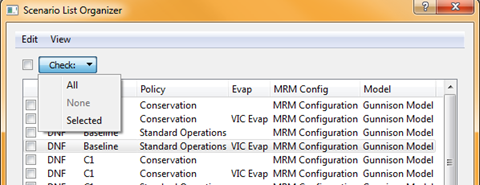
To eliminate unwanted combinations from all dialog boxes, you can select the unwanted scenarios and deactivate them. To select scenarios, select Check and then one of the following options:
• All—selects all rows (scenarios); this is equivalent to selecting the Check check box.
• None—clears all rows.
• Selected—selects the selected rows; this is equivalent to selecting individual row check boxes.
Once you have selected unwanted scenarios, you can deactivate them by selecting Edit, then Deactivate Checked Scenarios. When a scenario is deactivated, it is made unavailable throughout RiverSMART and is not displayed in any RiverSMART dialog boxes.
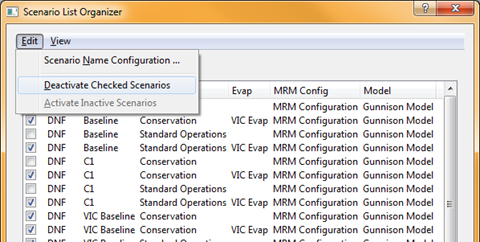
If you deactivate a scenario by mistake, you can reactivate all scenarios by selecting Edit, then Activate Inactive Scenarios. You can then select the correct ones and deactivate them.
You can also dynamically hide and show active scenarios in the current dialog box. Hiding a scenario does not deactivate it; it simply hides the scenario in the current dialog box and does not affect other dialog boxes.
To hide active scenarios, select the rows, then select View, then Hide Checked Scenarios. To show all active scenarios, select View, then Show Hidden Scenarios.
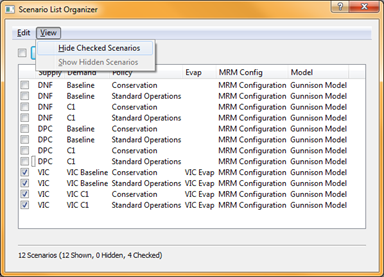
The status line at the bottom of the dialog box displays the number of scenarios active, shown, hidden, and currently selected.
Simulating Scenarios
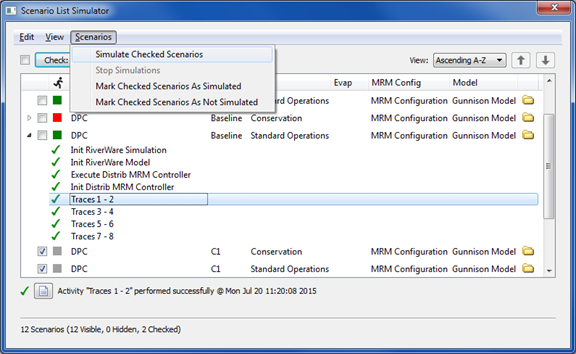
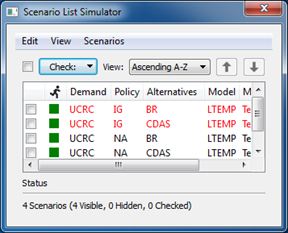
The Scenario List Simulator dialog box displays a two-level tree view that lists the activated scenarios at the top level. Within each scenario, the activities that have been completed during simulation are listed. To open this dialog box, select Scenarios, then Simulate Scenarios on the RiverSMART menu.
To initiate a RiverWare MRM run using the scenario inputs, select the scenario check box, and then select Scenarios, then Simulate Checked Scenarios.
MRM runs are typically set up as distributed runs. If they are not set up that way, they are automatically converted into distributed runs using the default number of processors on the machine. If you select more than one scenario in the Scenario List Simulator, each one runs sequentially until all are completed.
If you need to halt execution while scenarios are running, select Scenarios, then Stop Simulations. The current scenario is allowed to finish, and subsequent scenarios are prevented from executing before they start.
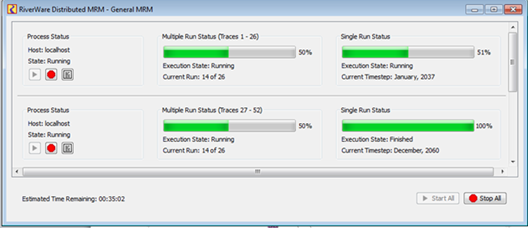
Viewing Distributed Run Progress
If the RiverWare MRM is configured to distribute individual runs of a multiple run across cores on the computer, the Distributed MRM window is displayed during a scenario simulation. This window displays the progress of the traces distributed to each core and the current status of each trace.
If you need to interrupt a scenario while it is running, select Stop All.
Viewing Scenario Simulation Details
The Scenario List Simulator window displays detailed information for each scenario simulation.
If a scenario simulation is successful, the Run icon changes from gray to green. If a simulation is not successful, the Run icon turns red. A check mark indicates the simulation succeeded. If the check mark is orange, the simulation succeeded with a warning.
When you select a scenario, the status line displays the current status information for that scenario, including any warning messages, if applicable.
The simulation success or failure status is saved with the study and is displayed when the study is reopened.
You can manually override the Run icon color by selecting Scenarios, then Mark Checked Scenarios As Simulated or Mark Checked Scenarios As Not Simulated. For example, if a scenario simulation is successful, but the study is not saved afterward, the Run icon is gray when the study is reopened. You can correct this by manually setting the Run icon green.
If you select the File Folder icon at the end of a scenario row, a Windows Explorer window opens to the folder where the generated files for the scenario are located.
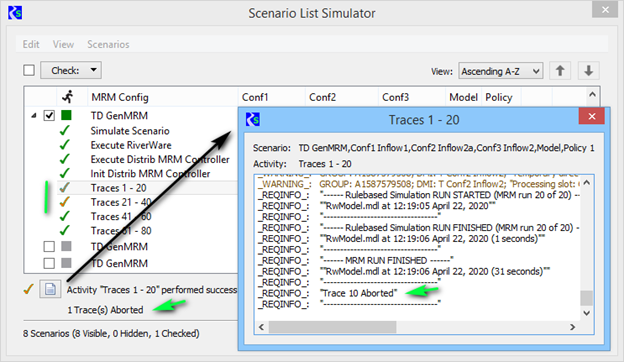
When a scenario tree view is expanded, the activities for a simulated scenario are displayed. An activity represents a step in the scenario simulation, such as initializing the model, executing the distributed MRM controller, or simulating traces. A green check mark indicates the activity was successful; a red check mark indicates the activity failed, and an orange check mark indicates the simulation succeeded with a warning. Selecting the simulation displays the warning.
Note: It is possible for the scenario Run icon to be green, even if one or more of its activities have failed.
CADSWES recommends expanding the activity lists for simulated scenarios and reviewing the activity details for any issues. When you select an activity, its status is displayed in the status area of the window. If RiverWare generated a log file for the activity, the File icon in the status message is enabled and you can select it to open the log file for viewing. This may be useful in troubleshooting issues for failed RiverWare activities. The following figure shows traces that have failed.
When a scenario simulation is run, keyword/value descriptors are created to characterize the scenario and its input events. These descriptors are written to the MRM configuration in the RiverWare distributed model as MRM descriptors. From there, they are optionally available as outputs to CSV and netCDF files from the multiple run. Descriptor keyword/value pairs are created as follows:
• Scenario name—Scenario / scenario_name
• RiverWare Policy event—Policy / event_name
• RiverWare Model event—Mode l / event_name
• RiverWare DMI event—DMI_category / event_name
• RiverWare MRM event—MRM Config / event_name
• User-created keyword/value pairs from the RiverWare MRM event window are also included.
Hiding and Deactivating Scenarios
The Scenario List Simulator window also provides options to deactivate or activate, and dynamically hide or show scenarios. These options function in the same manner as those on the Scenario List Organizer dialog box.
Deactivating a scenario makes it unavailable throughout RiverSMART and removes it from all RiverSMART dialog boxes. To deactivate scenarios, select the scenarios, and then select Edit, then Deactivate Checked Scenarios. To activate all inactive scenarios, select Edit, then Activate Inactive Scenarios.
Hiding a scenario does not deactivate it; it simply hides the scenario in the current dialog box and does not affect other dialog boxes. If many scenarios have run successfully, you may want to hide them to reduce clutter on the workspace. To hide active scenarios, select the scenarios, and then select View, then Hide Checked Scenarios. To show all active scenarios, select View, then Show Hidden Scenarios.
Study Folder Structure for Scenario Results
RiverSMART saves all scenario simulation results to the Study Folder you have specified, using the following structure.
Study_Folder\
Scenario\
scenario_name\
generated files
scenario_name\
generated files
Working\
RiverWare_event_name\
scenario_name\
log files
intermediate results
scenario_name\
log files
intermediate results
• The Scenario\ folder includes a folder for each scenario.
– Each scenario folder includes the RDF, CSV, and netCDF files generated for each scenario simulation.
• The Working\ folder includes a folder for the RiverWare event.
– The RiverWare event folder includes a folder for each scenario.
• Each scenario folder includes log files and intermediate results, which may be useful for debugging problems in event execution.
Archiving Scenarios
Scenario outputs (RDF, CSV, NetCDF, Excel, and R Script output files) can be archived as ZIP files in user-specified archive folder. Archiving is useful if you want to conserve disk space or share outputs.
To configure archiving, select Workspace, then Options from the RiverSMART menu; alternatively, select the Options button on the RiverSMART toolbar.
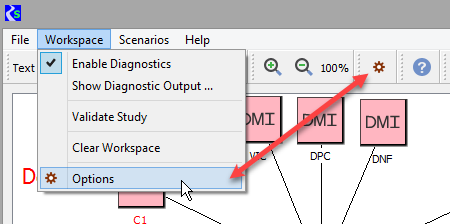
In the Group area of the Options dialog box, select Archiving to configure when and how to archive successful scenarios.
Note: Scenarios are not archived after errors.
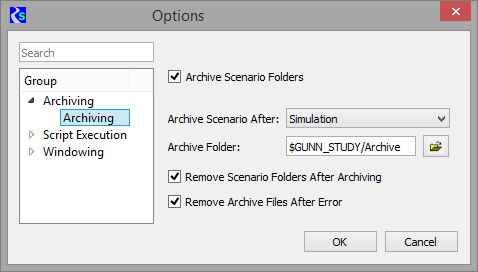
Archive Scenario Folders
Select if you want to archive scenarios. The remaining options are made available.
Clear if you do not want to archive scenarios; this is the default. The remaining options are cleared and made not available.
Archive Scenario After
Select one of the following options to specify when to archive scenarios.
• Simulation—archives after successful simulation; this is the default.
• Post-processing—archives after successful post-processing.
Archive Folder
Required field. Specify the archive folder. You can enter the path in the text box or select it through the File Chooser. The path can contain environment variables.
Remove Scenario Folders After Archiving
Select if you want scenario folders to be removed after the scenario has been archived.
Clear if you do not want scenario folders to be removed; this is the default.
Remove Archive Files After Error
Select if you want archived scenarios to be removed after an error. For example, if a scenario is simulated successfully and archived, then resimulated unsuccessfully, depending on the reasons for archiving, the archived scenario may be considered not to reflect the current state of the scenario, in which case the archive should be removed
Clear if you do not want archived scenarios to be removed after an error; this is the default.
Display Order
When scenarios are generated, simulated, or post-processed, the scenario order is determined by the order of the RiverWare inputs, with the leftmost input changing least frequently, and the rightmost input changing most frequently.
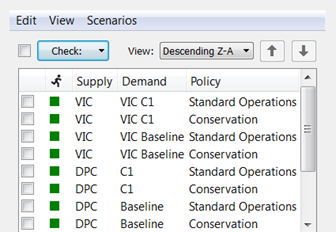
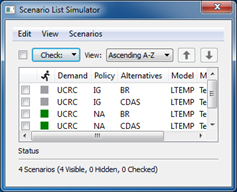
By default, scenarios are displayed in ascending alphabetical order, as shown in the following figure.
To display scenarios in descending alphabetical order, select Descending Z-A.
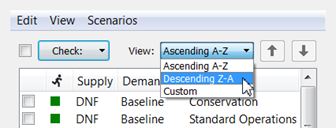
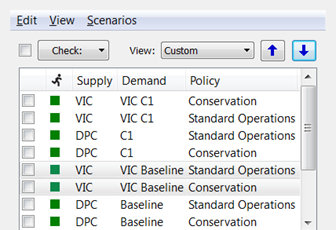
To display scenarios in a custom order, select Custom, then use the Up and Down arrows to move selected scenarios up and down one row at a time.
Updating Scenario Inputs
When input events (DMI, MRM, Model, or Policy) are modified, RiverSMART provides visual indicators to identify portions of the study that are out of date. If any item in an input event configuration dialog box is modified, other than the name, the event label turns red to indicate that scenarios in which the event is included must be regenerated.
If a new input event is added to the study, its label is also red, indicating that scenarios must be regenerated to incorporate the new event.
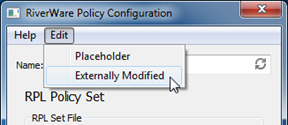
You can also manually indicate that an input event has been modified. This is useful when external files, such as a ruleset or data files, are modified, because RiverSMART is not aware of these changes. To indicate that an event has been modified, select Edit, then Externally Modified in the event configuration dialog box. This has the same effect as modifying the event configuration: the event label turns red, and RiverSMART indicates that scenarios in which the event is included must be regenerated to bring the study up to date.
As an additional indication that scenarios may be out of date, in the Scenario List Simulator and Scenario List Post-Processor dialog boxes, any scenario that includes a modified event is displayed in red text. Scenarios not affected by changes to input events remain black.
Note: In the following figure, the Run status icons are green, indicating the scenario simulations were successful. This is because the scenarios in red text have not yet been regenerated with the new inputs. The Run status is based on the most recent simulation.
To update all scenarios that have had input events modified, you must regenerate scenarios. On the RiverSMART menu, select Scenario, then Regenerate Scenarios.
The Scenario Confirmation dialog box opens, listing the number of scenarios to be added, removed, invalidated, or unaffected, based on modifications made to input events since the last time scenarios were generated. To expand a row and list the scenarios in that category, select the arrow next to the row.
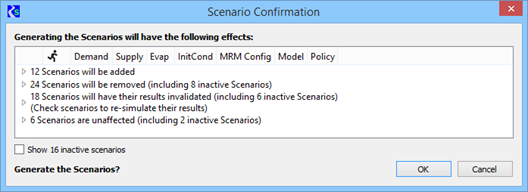
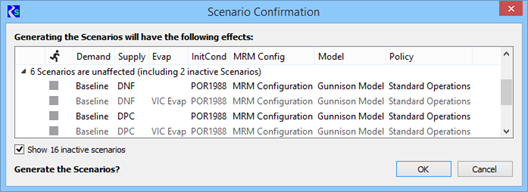
Each category description includes the number of inactive scenarios. To display inactive scenarios, select the Show inactive scenarios check box. Inactive scenarios are shown as unavailable (dimmed).
The Scenario Confirmation dialog box includes information to assist you in making informed decisions about regenerating scenarios.
Figure 2.3 Example scenario regeneration
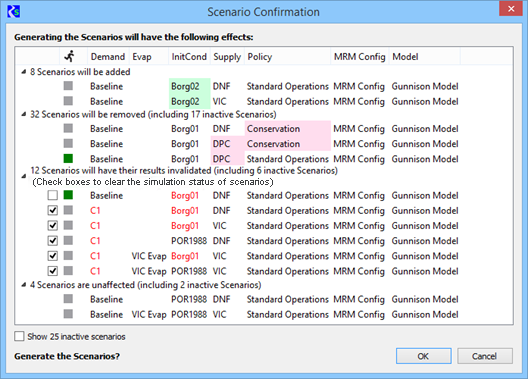
The following discussion relates to the example in Figure 2.3.
Note: Scenarios have been edited from this example to save space; therefore the counts do not match the number of scenarios shown.
In the example, pink highlights indicate scenarios to be removed, and green highlights indicate scenarios to be added. Out-of-date scenarios, whose results will be invalidated, are highlighted to indicate the input events that caused them to be out of date.
Green Run status icons identify the scenarios that have been successfully simulated. Removing these scenarios or invalidating their results could represent a loss of significant time and effort, and the simulation status informs you of this potential loss.
You can modify some input events to add scenarios without invalidating existing ones. For example, in the DMI Sequence event, extending the sequence adds scenarios without invalidating existing scenarios; however, because of the way it generates scenarios, RiverSMART cannot recognize the distinction and therefore includes the existing scenarios with the ones whose results will be invalidated.
In this example, the “InitCond” DMI sequence event was modified to add scenarios with initial condition “Borg02”. This causes scenarios with initial condition “Borg01” to be out of date. The user removed the check from the box for the “Baseline\Borg01” scenarios to preserve their results, which eliminates the need to re-simulate those scenarios. The user checks the boxes for all “C1” scenarios because they are also out of date due to the “C1” demand being modified.
When you select OK to regenerate the scenarios, all options configured in the Scenario List Organizer are reapplied; see Generating Scenarios for details. Once scenarios are regenerated, all event labels and scenario names in the Simulator List Simulator and Scenario List Post-Processor dialog boxes return to black. Any added scenarios and scenarios that had results invalidated by the regeneration display a gray Run status icon, indicating the scenario needs to be resimulated. Unaffected scenarios continue to display the Run status they displayed before the scenarios were regenerated.
At this point, scenarios with a gray Run status icon can be resimulated and post-processed. Scenarios with a green Run icon do not need to be resimulated because their results were not affected by the changes to the input events.
Revised: 08/04/2021