
Distributed Simulation Package Procedures
This section includes procedures for running distributed simulation packages.
Topics
Create Simulation Package Files
Use this procedure to create simulation package files for running distributed simulations.
Note: This procedure assumes a standard study has been configured in RiverSMART.
You can use either of the following methods to distribute scenarios in the simulation packages.
Automatic
With this method, RiverSMART automatically distributes scenarios so the traces are balanced across the simulation packages as evenly as possible. By including the same number of traces in each package, this method minimizes the scenario simulation times (assuming the traces require the same amount of time to simulate). With this method, there is no set pattern to the way scenarios are distributed across the simulation packages.
Scenario Sets
With this method, you can manually distribute scenarios across the simulation packages by defining scenario sets and then associating each scenario set to a simulation package. This method gives you control over how scenarios are distributed among the simulation packages; for example, you can add all scenarios using a particular hydrology to the same simulation package.
Regardless of method, the number of simulation packages is generally equal to the number of available computers or virtual machines in a cloud computing environment.
Each simulation package file is a zip file named PackageName_pkg.zip (for example, DNF_pkg.zip). The package file includes the entire study folder contents—that is, all files necessary to simulate the scenarios—and an automatically generated study file, PackageName_study.xml, configured for simulating just the scenarios associated with that package.
1. Open the study in RiverSMART.
The bottom-right corner of the workspace displays “Full Study”. This indicates the study is currently in standard mode.

2. Optionally, remove unnecessary files from the study folder. This minimizes the size of the simulation package files when the scenarios are regenerated.
Note: Once you have regenerated scenarios, it is recommended that you not modify the contents of the study folder manually, to maintain the necessary folder and file structure and ensure all required files are present.
3. Use the following steps to regenerate scenarios.
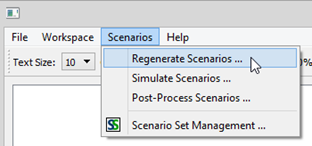
a. On the RiverSMART menu, select Scenarios, then Regenerate Scenarios.
b. In the Scenario List Organizer, select the scenarios to be active, their naming format, and so on, in the same manner as for a standard study.
Note: At this point, you are selecting scenarios for the full study, not subsets for the packages.
c. Proceed as follows, depending on the method you will use to distribute scenarios among simulation package files:
• To use the Automatic method, proceed to Step 5.
• To use the manual Scenario Sets method, proceed to Step 4.
4. If you will use the Scenario Sets method to define simulation package files, use the following steps to create scenario sets. You must create one scenario set per package.
Note: To minimize overall simulation time, define the scenario sets so the number of traces for each is relatively balanced, assuming the simulation computers all have the same computing capacity.
Note: These scenario sets need not correspond to scenario sets created for other purposes in the study, such as post-processing.
a. On the RiverSMART menu, select Scenarios, then Scenario Set Management.
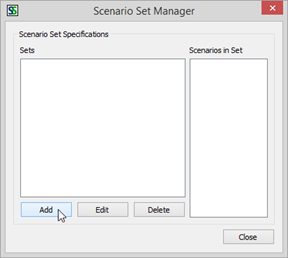
b. In the Scenario Set Manager, select Add.
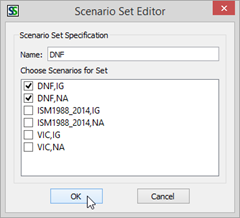
c. In the Scenario Set Editor, enter a name in the Name text box, and select the check boxes of the scenarios to include in the set.
d. Repeat Step b. and Step c. to add as many scenario sets as necessary. Youmust create one scenario set for each simulation package.
5. Optionally, save a backup of the original study using a different name. This is good practice because RiverSMART automatically saves this study as a simulation master study when you save the simulation package files.
6. Use the following steps to define and save the simulation package files.
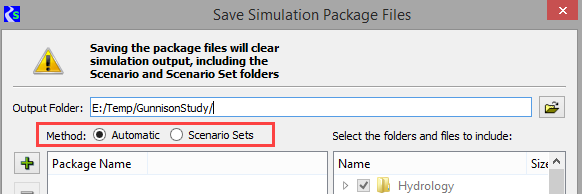
Note: When you save the simulation package files, any existing simulation output is cleared; this includes any files in the Scenario\ and ScenarioSet\ folders.
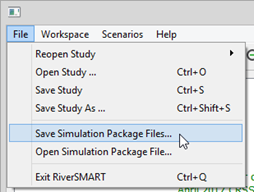
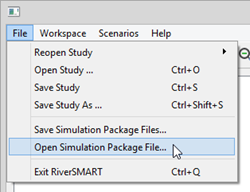
a. On the RiverSMART menu, select File, then Save Simulation Package Files.
b. Select the File Chooser, then navigate to the folder where you want to save the package files.
Caution: Do not save package files in the study folder, especially for large studies. Each time RiverSMART creates a simulation package file, it creates a zip file of the entire study folder. If you save the package files in the study folder, the first package file is included in the second package, the second package file is included in the third package, and so on, causing the size of each successive package file to grow exponentially.
c. In the “Select the folders and files to Include” list, select the folders and files to include in the simulation package files.
Note: Folders managed by RiverSMART are unavailable and cannot be selected or deselected.

d. Select the method for distributing scenarios in the simulation package files, as follows:
e. Use the following steps to distribute scenarios using the Automatic method. RiverSMART will automatically distribute the scenarios among the simulation packages, balancing the traces as evenly as possible.
1. Select Plus to add a simulation package.
2. Edit the default name—for example, Package000—and enter a user-defined package name. This name is used as the simulation study folder name on the simulation computer.
3. Repeat Step 1 and Step 2 to add as many simulation package files as necessary. When done, select Save.
4. Proceed to Step g.
f. Use the following steps to distribute scenarios manually using the Scenario Set method.
1. Select Plus to add a simulation package.
2. Edit the default name—for example, Package000— and enter a user-defined package name. This name is used as the simulation study folder name on the simulation computer.
3. Open the Scenario Set menu and select the scenario set; there can be only one per package.
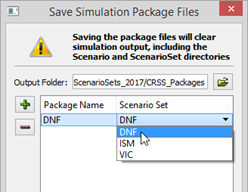
4. Repeat Step 1 through Step 3 to add as many simulation package files as necessary. When done, select Save.
5. Proceed to Step g.
g. RiverSMART creates the simulation package files in the designated output folder. Each file is a zip file named PackageName_pkg.zip (for example, DNF_pkg.zip). If files with the same name already exist in the output folder, they are overwritten with no confirmation dialog box.
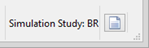
RiverSMART also saves the study file in simulation master mode, and the words “Simulation Master” replace “Full Study” in the bottom-right corner of the workspace. This is the study mode you will use to import the results files after the simulations have completed.
Note: You can import results files only into the simulation master study from which the simulation package files were generated; you cannot import results files into a full study. Therefore, you must save this study file in its current state; if you save the study with a new name, you will not be able to import the results into the new study.
Note: You cannot modify a study when it is in simulation master mode. To make changes to the original study while simulations are running, you must save the study with a new name. Then in the new study, select File, then Revert to Full Study to revert to the full study. Leave the original simulation master with the original file name.
7. Copy each simulation package file from the output folder to the simulation computer or cloud virtual machine where you want to run the simulation.
Open Simulation Package Files and Simulate
Use this procedure on the simulation computer or cloud virtual machine to simulate the scenarios included in the simulation package. Perform this procedure for each simulation package.
Note: Before you can perform this procedure, each simulation package file must be copied to the simulation computer or cloud virtual machine where you will run the simulation. Each simulation computer or virtual machine must have the proper versions of RiverSMART and RiverWare installed.
1. On the simulation computer or cloud virtual machine, create the Study Folder for the simulation package. Assign it the same name as the package; for example, if the package file name is DNF_pkg.zip, create a folder named DNF. Make sure the folder is empty before you proceed.
2. On the RiverSMART menu, select File, then Open Simulation Package File.
3. In the Open Simulation Package dialog box, complete the following fields, either by entering the full path in the text box or by selecting File Chooser and navigating to the location. When done, select Open.
– Package File—specify the package file .zip file
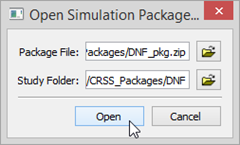
RiverSMART extracts the contents of the package into the study folder and opens the simulation study that was automatically generated for this package. The words “Simulation Study” and the package name appear in the bottom-right corner of the workspace. You cannot modify the study.
4. Use the following steps to simulate the scenarios, in the same manner as for a standard study.
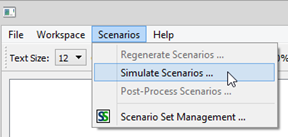
a. On the RiverSMART menu, select Scenarios, then Simulate Scenarios. The Regenerate Scenarios and Post-process Scenarios options are not available.
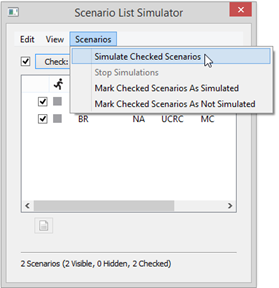
b. In the Scenario List Simulator, select the scenarios to generate.
c. Select Scenarios, then Simulate Checked Scenarios, in the same manner as for a standard study.
d. Let the simulations run to completion.
Create Results Files
After the scenario simulations have completed, use this procedure to create simulation results files. Perform this procedure for each simulation study.
Each results file is a zip file named PackageName_res.zip (for example, DNF_res.zip). It includes the Scenario\ folders with study outputs, and some working folder files required by the simulation master study.
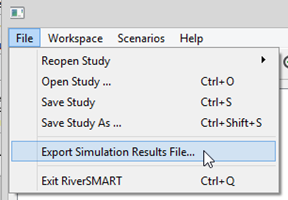
1. In RiverSMART session with the simulation study, select File, then Export Simulation Results File.
2. In the File Chooser, specify the folder where you want RiverSMART to save the simulation results file.
3. RiverSMART immediately creates the simulation results file in the specified folder.
4. Copy the simulation results file to the computer with the simulation master study.
Import Results Files and Post-process
Use this procedure to import all simulation results files into the simulation master study for post-processing.
Before you can perform this procedure, the results files must have been returned to the computer with the simulation master study. This procedure is performed on the computer with the simulation master study.
1. On the simulation master study menu, select File, then Import Simulation Results File.
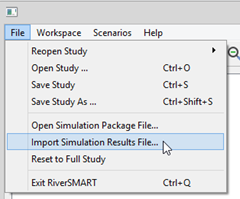
2. In the File Chooser, select a simulation results file.
Note: You must import all the simulation results files before you reset to full study mode. You cannot import additional simulation results files once the study has been switched to full study mode.
4. On the RiverSMART menu, select File, then Reset to Full Study. Resetting to full study mode is required for post-processing.
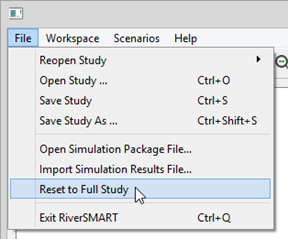
The bottom-right corner of the workspace displays “Full Study”. You can now post-process the results in the same manner as for a standard study.
5. On the RiverSMART menu, select Scenarios, then Post-process Scenarios.
Revised: 08/02/2021