
Working With RPL Dialogs
Whether you are looking at the editor or the viewer, the RPL dialogs consist of menus, name and buttons, the expression, and optional additional panels. Figure 2.18 illustrates, and these items are described in this section.
Figure 2.18 Annotated Screenshot of a RPL Editor
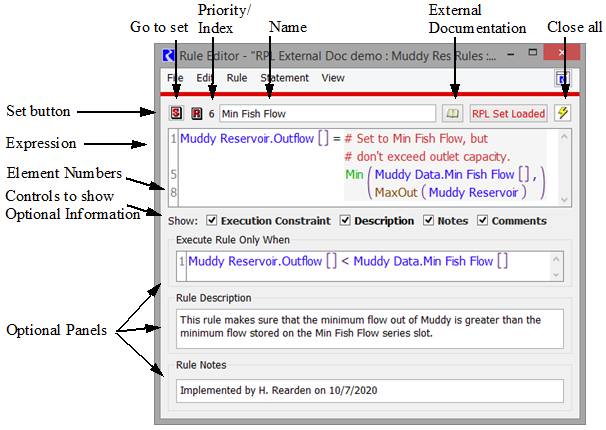
• Type of Set. The icon indicates the type of set to which this editor belongs.
• Name. The name field is where you specify the name.
• External Documentation. The button, when configured, opens the external documentation; see RPL External Documentation for details.
• Close All. The button invokes a dialog in which you can close all open RPL dialogs except the top level editor.
• Set Button. Icon button allows you to show the containing set for each RPL dialog.

• Priority / Index: This area shows the priority or index. The tool tip indicates the value and type. See Table 2.2 for a list of which sets use priorities and which use index.
• Expression: This area contains the expression.
• Element Numbers: This column shows the first element on that line. See Element Numbers for details.
• Optional Information: Optional information can be shown for various types of RPL dialogs. These are described in the following sections. If there is an entry in these panels (or a non-default value) a box is drawn around the toggle.
Execution Constraint / Execute Block Only When
A block can be set up to execute only when a given condition is true. This functionality can be used to increase performance or it may be necessary to implement your RPL set correctly.
• From a RPL editor, select View, then Show Execution Constraints or select the Execution Constraint toggle.
An area is added to the bottom of the window. By default, the block executes only when TRUE. This means that the block will always execute when it comes up on the agenda. You may want this block to execute only when some other condition is true. The TRUE expression can be replaced with any logical structure that can be constructed from the palette
Note: If you enter a boolean expression to replace the default TRUE, then clear this expression, an unspecified expression will remain. This unspecified expression will invalidate the rule. To prevent this, if you clear out this boolean, make sure you re-type TRUE to get the default behavior.
Descriptions
A special expanded area of the RPL dialog is used to enter a description of the block. The area is opened and closed by selecting View, then Show Description in the menu bar, or selecting Description at the bottom of the window.
Note: If there is any description entered, the Description option will have bold text. Hover over the word Description to see up to 140 characters of the description as a tooltip. Descriptions can be optionally included in Model Reports.
Description can be included in Model Report RPL items (RPL Group, RPL Rule/Goal, RPL Set) with the Show Descriptions settings. See RPL Group in Output Utilities and Data Visualization for details.
Notes
Notes, like Descriptions, can be entered in a panel at the bottom of the dialog. Notes can be used when you have information that you want to enter that doesn’t belong in the Description field. For example, development notes or change logs could be entered in the Notes panel.
The area is opened and closed by toggling View, then Show Notes in the menu bar or selecting the Notes toggle at the bottom of the window.
Note: If there is any note entered, the Notes toggle will have bold text. Hover over the word Notes to see up to 140 characters of the note as a tool tip.
Notes can be included in Model Report RPL items (RPL Group, RPL Rule/Goal, RPL Set) with the Show Notes settings. See RPL Group in Output Utilities and Data Visualization for details.
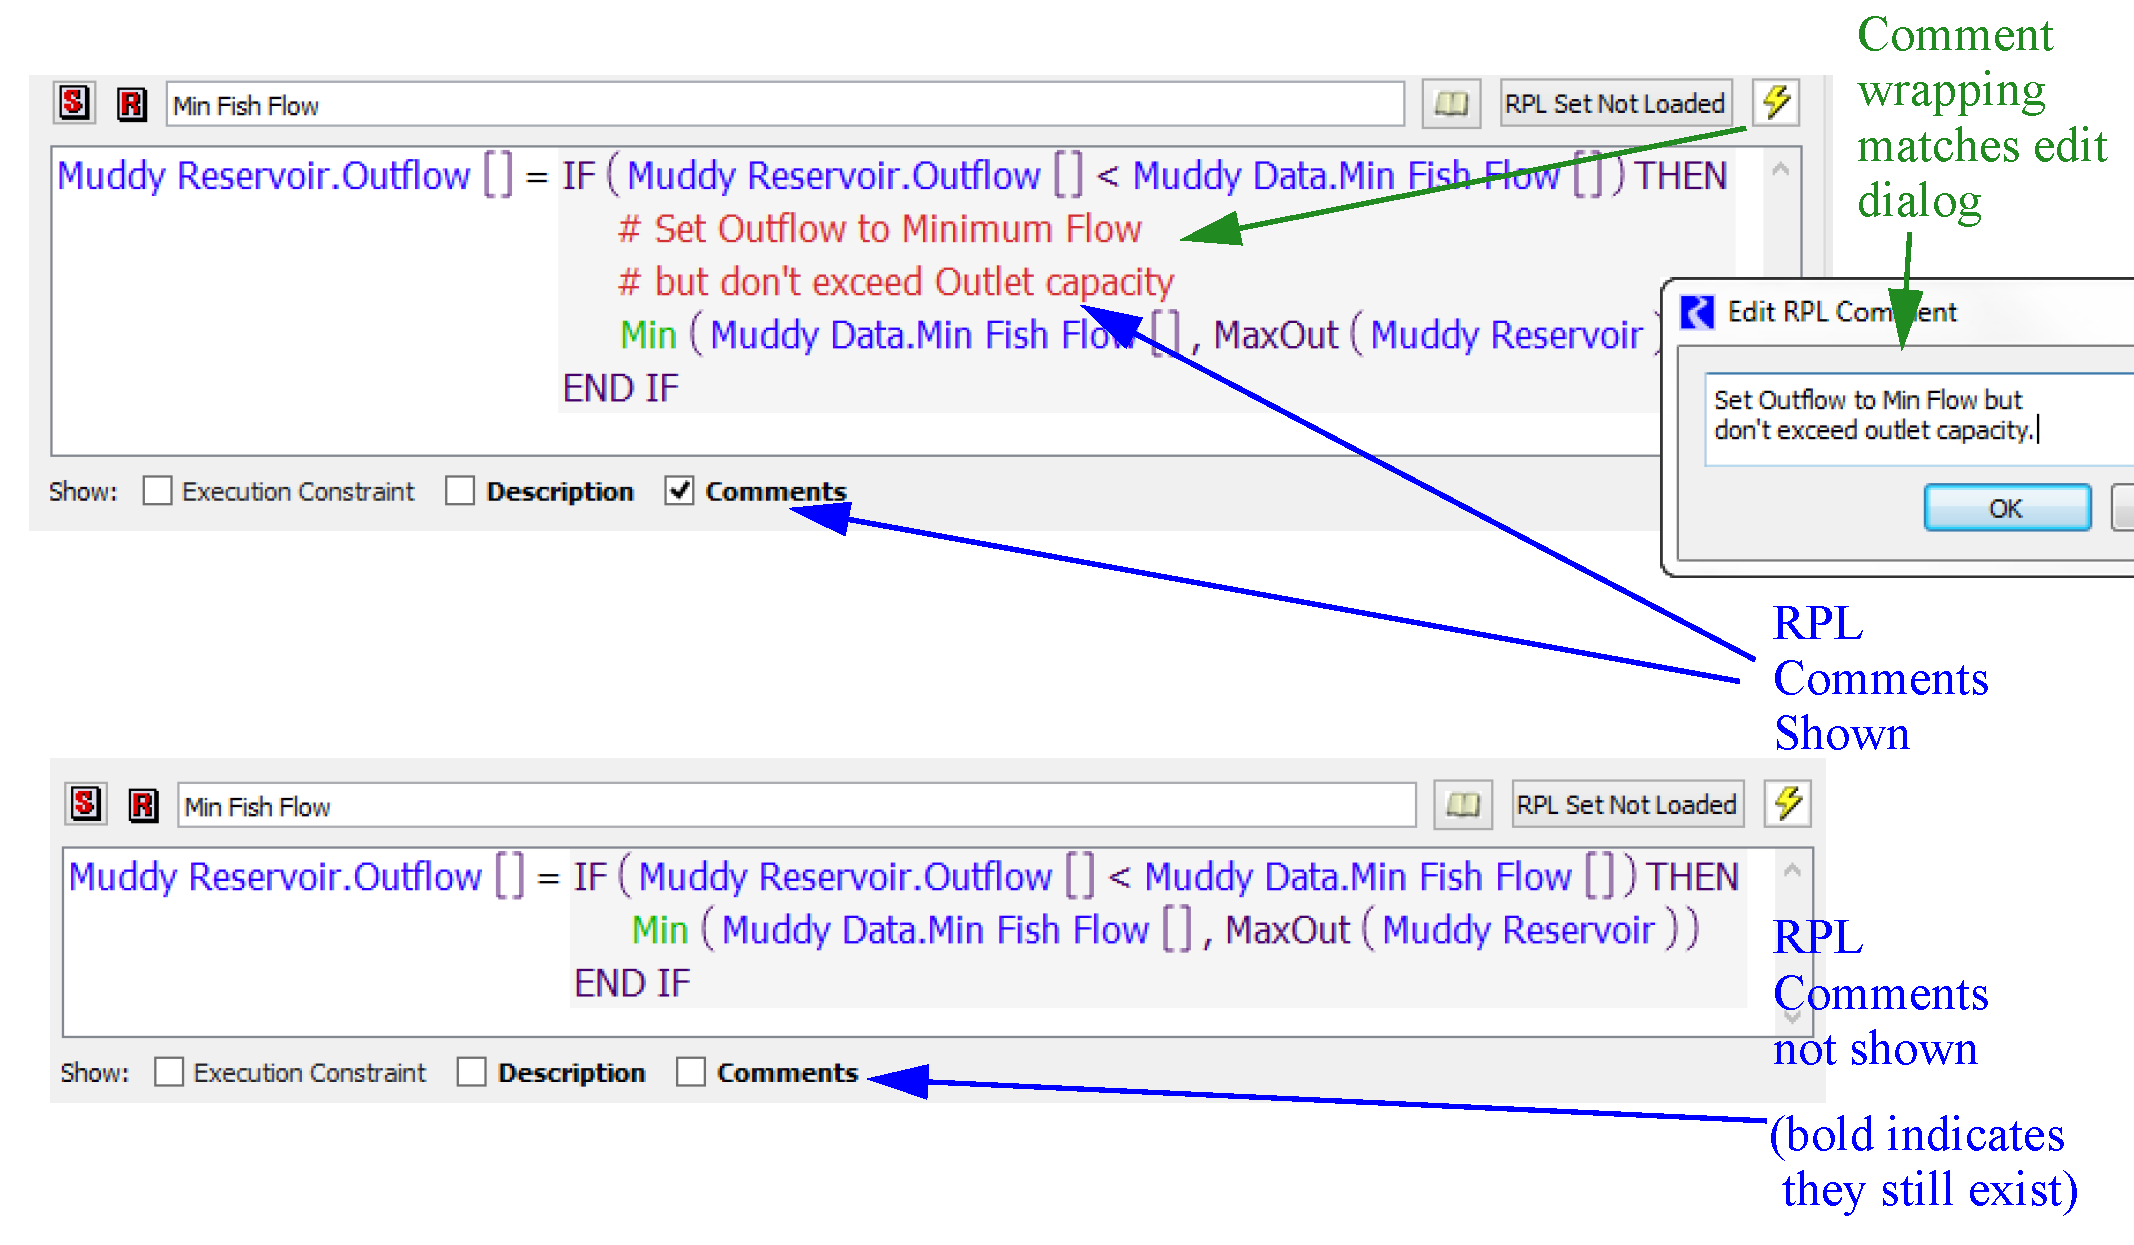
Comments
Inline Comments are added from the palette using the Add Comment button. A separate dialog is opened that allows you to type in a comment. In the RPL editor, the comment is displayed with # characters on the left, lines are wrapped as they were in the comment editor dialog. Double-clicking the comment reopens the edit dialog.
Inline RPL comments can be optionally shown/hidden using the View, then Show Comments menu or the Comments toggle.
Note: If there are any comments defined, the Comments toggle will have bold text. Also, Comments are shown by default; if you do not want to see them, you must explicitly hide them. Figure 2.19 illustrates.
Figure 2.19
Executing DMIs From Blocks
RPL blocks can be used to execute DMIs or DMI groups. See DMI User Interface in Data Management Interface (DMI) for details.
To add a DMI, Select Rule/Method, then Add Pre-execution DMI or Rule/Method, then Add Post-execution DMI. Then, select the name of a DMI or DMI group that is defined in the model.
To remove a DMI, use the Rule/Method, then Remove Pre/Post-execution DMI menu.
A pre-execution DMI is executed as the first step of the execution, a post-execution DMI is executed as the last step of execution. Values imported by the pre-execution DMI are available for use by the statements. The order of execution for a rule is as follows:
1. If the Execution Constraint evaluates to TRUE, continue. Otherwise terminate the rule early.
2. Run the Pre-execution DMI.
3. Evaluate the body of the rule.
4. If the rule evaluation is successful, run the Post-execution DMI. If the rule is empty, terminates early, or is ineffective, the Post-execution DMI is not run.
To prevent unexpected solving of objects and/or conflicts between values, input DMIs executed from RPL blocks can only import values to unlinked series slots on data objects. Furthermore, values imported from a DMI executed from a RPL block are given the following flags:
• Control File-Executable DMIs. Imported values are given the INPUT (I) flag (priority zero).
• Database DMIs. Imported values are given the OUTPUT (O) flag and the priority of the rule executing the DMI.
An example application of this feature is executing an external water quality model at each timestep. In this example, the water quality model might take as input RiverWare values which reflect the current state of the system and return a recommended reservoir release value. At each timestep the block would first execute an output DMI to export current values from relevant RiverWare slot(s), e.g., inflow on a reach. An input DMI then runs the external water quality model (which reads the data from the output DMI) and then imports the resulting recommended reservoir release values.
Note: You can turn on Diagnostics to see when rules and Rule DMIs execute. Use the Rule Execution and DMI, then Rule DMI diagnostic categories; see Rulebased Simulation Diagnostic Groups in Debugging and Analysis for details.
Stop On NaN
Typically, when a RPL block accesses a slot but the slot is NaN, the block terminates early but the run continues. Under certain conditions, you may wish to specify that a block does not terminate early but instead stops the run when a NaN is encountered. This could be useful for data checking rules; if the referenced slot value has not been specified, then you wish to stop the run and fix the data error.
To specify that a block should Stop On NaN, use the Block, then Stop On NaN menu. When enabled, a check mark is added next to the menu. Any time a slot expression accesses a NaN, the run will stop and a diagnostic will be posted that explains which block referenced a NaN.
Note: In the context of initialization rules the run is not stopped immediately when an invalid value is encountered, but rather it is stopped only after all of the rules have executed. This allows RiverWare to report on all missing data with a single run.
Revised: 08/02/2021