
Linking Slots on Objects
Links are the connections between slots on objects which pass information during a simulation run. They propagate a value from a slot on one object to a slot on a different object. Links are bidirectional in general, but in a pure simulation run, if values propagate in both directions during a single timestep, the model is overdetermined, and the run aborts.
A slot may be linked to more than one other slot. Also, several links may exist between different slots on two objects, but only one line is represented on the workspace.
Viewing Existing Links on the Workspace
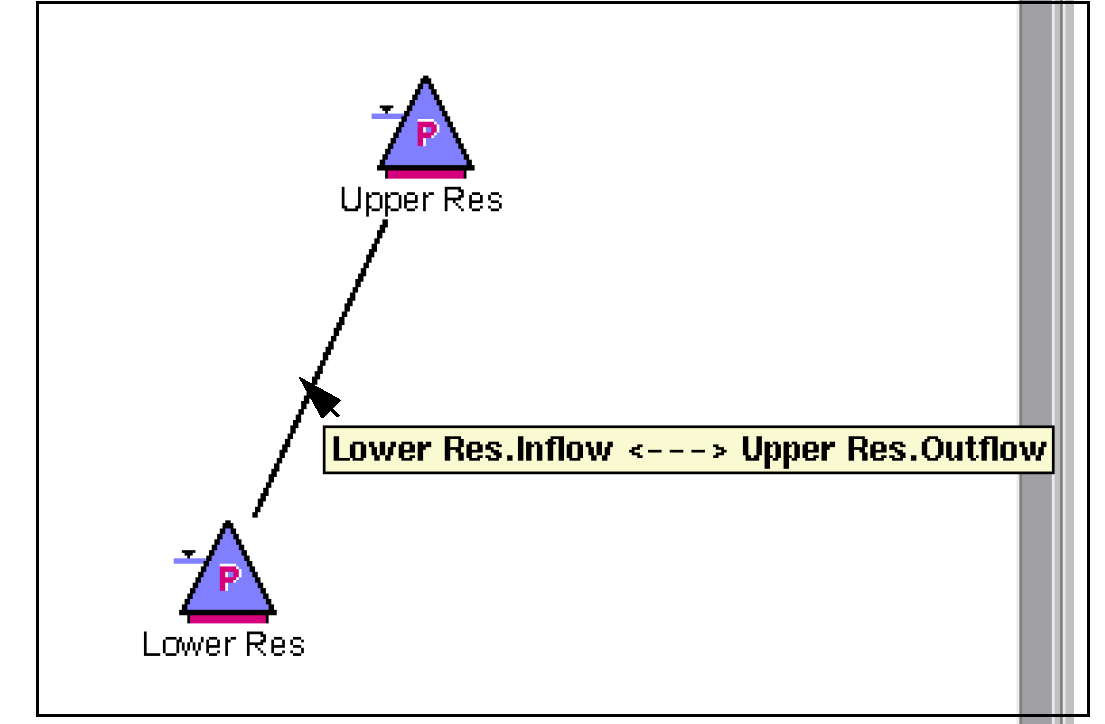
In models with many links, it can be difficult to determine which objects and slots a particular link is connecting. By hovering over the link with the mouse cursor, all the connected objects and slots associated with that link are displayed in a tool-tip pop-up window as shown. The link name is also shown in the workspace status bar (lower left corner). This can be useful because as long as the mouse is over the link, the name is shown in the status bar. Tool tips only show the name for a few second.
Also, in the Object Viewer (or Open Object), Slots tab, linked slots are marked with a  . Right-clicking on a linked slot brings up a context menu. Highlighting Linked Slots displays a list of all slots linked to the selected slot. Selecting a slot on this context menu will open that slot.
. Right-clicking on a linked slot brings up a context menu. Highlighting Linked Slots displays a list of all slots linked to the selected slot. Selecting a slot on this context menu will open that slot.Editing Links
There are three utilities for viewing, creating, and deleting links:
• Context Menus - Create links between any two slots on the workspace using the context menus. Delete any existing link from the workspace.
• Smart Linker - Create recommended links between two objects. Delete existing multiple links between two objects in one operation.
• Edit Links dialog - Create a links between any two slots. Delete any existing link.
These three approaches are described in the following sections.
Tip: You can also create links (and delete links) in a RiverWare Script. For more information, see Link Slots in Automation Tools.
Context menu
On the workspace, right-click context menus can be used to create or delete links as follows.
Creating Links
Use the right-click context menu Link Slots to link any two slots. Create links by first right-clicking on an object. A context menu dialog appears. Select Link Slots then select the slot you wish to link. A link is started. Then, right-click on another object to which the link will end. Select Link Slots and select the slot on that object. The link is created.
Note: You can link any two dispatch slots in the model regardless if the link makes physical sense.
Deleting Links
Delete links between objects by hovering over the link and right-click. In the context menu, select Delete Link and select a link from the list. The link will be deleted.
Smart Linker
The Smart Linker simplifies the process of linking slots by recommending a set of links between two selected objects based on the type of object, their method selections, and the relationship between the two objects.
For example, if you select a reach and a groundwater object, and you have the Head Based Seepage method selected on the reach and the Head Based Groundwater Grid method selected on the groundwater object, the Smart Linker proposes the following links:
• Reach.Previous Water Table Elevation to Groundwater.Elevation Previous and Reach.
• Seepage to Groundwater.Inflow from Surface Area.
• If you are also modeling evaporation or salinity, another set of links are proposed.
Note: The recommended links have been defined by CADSWES based on common modeling practices, experience, and existing models. It is possible that there are other slots that you may wish to link.
Accessing the Smart Linker
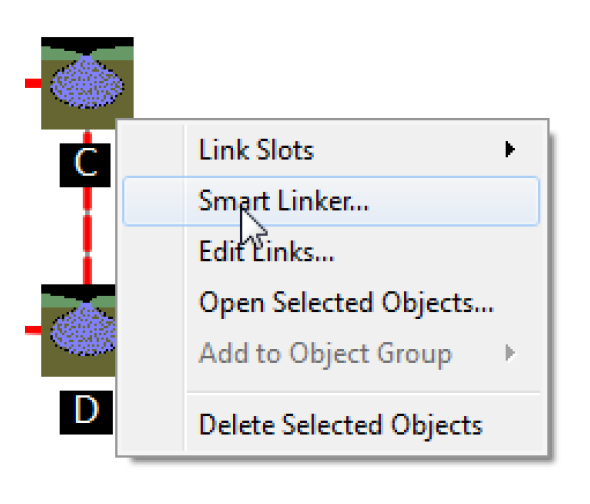
The Smarts Linker dialog is accessed by selecting two objects on the workspace, then one of the following:
• Right-clicking and choosing Smart Linker.
• Selecting the Link icon  on the workspace and choosing Smart Linker.
on the workspace and choosing Smart Linker.• Choosing Workspace, then Smart Linker menu on the workspace.
If there are 0, 1, 3, 4... objects selected on the workspace, a warning box opens. You should select exactly two objects.
If the two selected object do not have any recommended links defined, a warning dialog opens. If you wish to link slots on these objects, use either the Link Slots context menu or the Link Editor.
Overview
Following is screenshot of the Smart Linker tool followed by an overview of the tool.
Figure 1.1
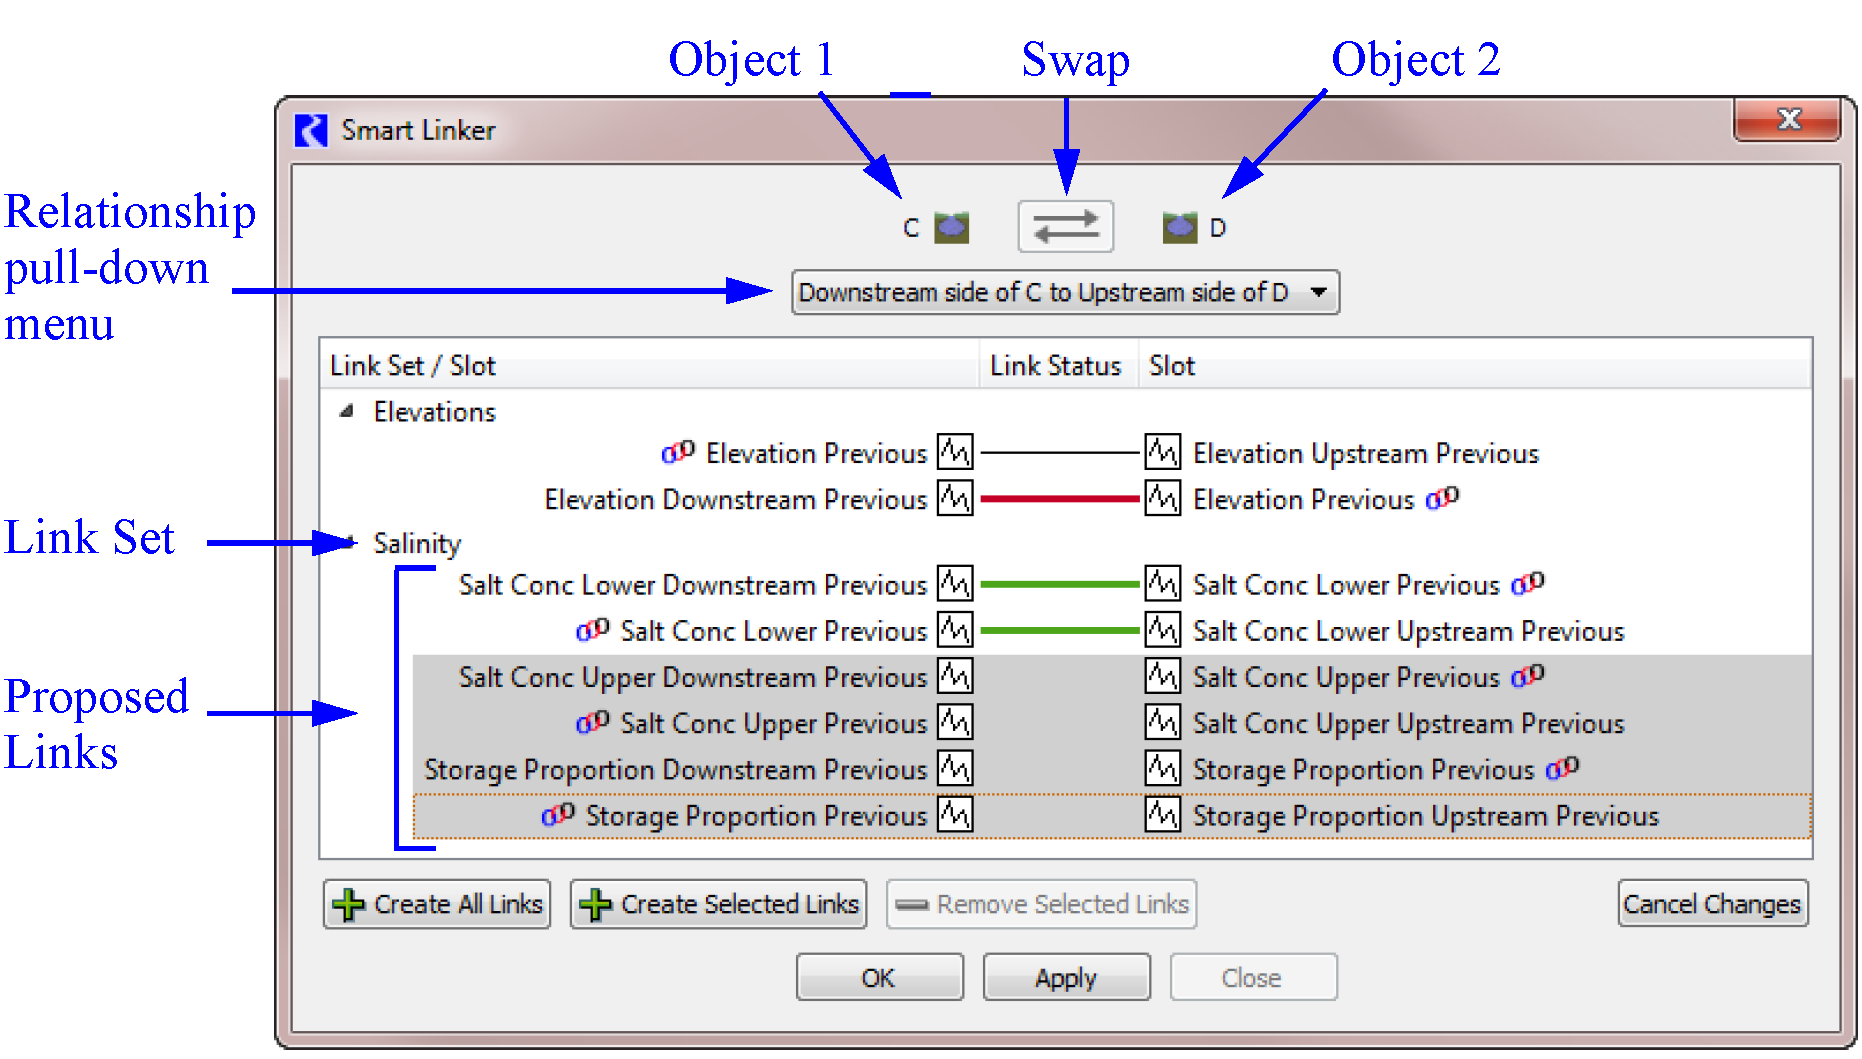
The dialog shows the two selected objects at the top.The double-arrow button  swaps the two objects in the dialog (left to right). It is disabled when there are any un-applied link additions or removals, or if the reversed order is not supported.
swaps the two objects in the dialog (left to right). It is disabled when there are any un-applied link additions or removals, or if the reversed order is not supported. The pull-down menu shows the available spatial relationships between the two selected objects. Use this pull down to indicate the relative position or relationship of the two objects. For example, is Object 1 upstream or downstream of Object 2. Possible examples include upstream / downstream, left / right, diverts from / diverts to, returns from / returns to. The selected relationship will lead to different recommended links.
Listed in the body of the dialog are sets of recommended links in a treeview with the specific slots shown.
Table 1.1 lists the meaning of each type of horizontal line that may appear in the Link Status column.
Image | Color | Description |
|---|---|---|
 | Thin black | An existing link. |
 | Thick Green | A tentatively added link. |
 | Thick Red | A tentatively removed link |
Buttons along the bottom allows you to create or delete selected links. These changes are made tentatively; select OK or Apply complete the operation or Cancel Changes to cancel the changes.
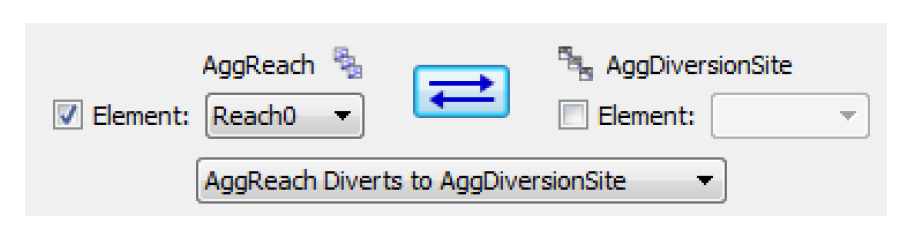
Aggregate/Element Objects
Aggregate objects are handled a little differently. Because the Smart Linker is opened by choosing two objects on the workspace, there is no way to select an element, so the selection of the element is made in the Smart Linker.
When an aggregate object is shown in the Smart Linker, a toggle box labeled Element is shown. Leave it unchecked to link the aggregate object. Check the box and select the element to link the element object. For example, on the screenshot shown to the right, a reach element Reach0 will be linked to the aggregate diversion site.
Creating Links
To link the slots shown in a row, highlight the row and select Create Selected Links. Alternatively select the Create All Links button to create all the recommended links. The Link Status for that row turns to a green line. Select OK or Apply to actually create the links.

Deleting Links
Any existing link can be deleted by highlighting the row and selecting the Remove Selected Links. The Link Status for that row turns to a red line. Select OK or Apply to actually delete the link.
Using the Smart Linker
Following are basic steps to use the Smart Linker to create all the recommended links between two objects.
1. Select two objects on the workspace that you wish to link. Right-click and select Smart Linker.
2. In the Smart Linker, orient the two objects as desired using the swap button.
3. If applicable, use the pull-down menu to specify the relation ship of the two objects. After each change, a different set of slots will be listed as recommended links.
4. Create all of the recommended links by selecting the Create All Links button.
5. Select OK to create the links and close the dialog.
Link Editor
Sometimes the above links operations do not provide enough flexibility to view, create or edit links. In this situation the Edit Links dialog provides a comprehensive location to view, create, and delete links.
From the workspace, selecting Workspace, then Edit Links or selecting the Link Editor toolbar icon,  and select Edit Links. The utility is shown in the following dialog.
and select Edit Links. The utility is shown in the following dialog. Figure 1.2
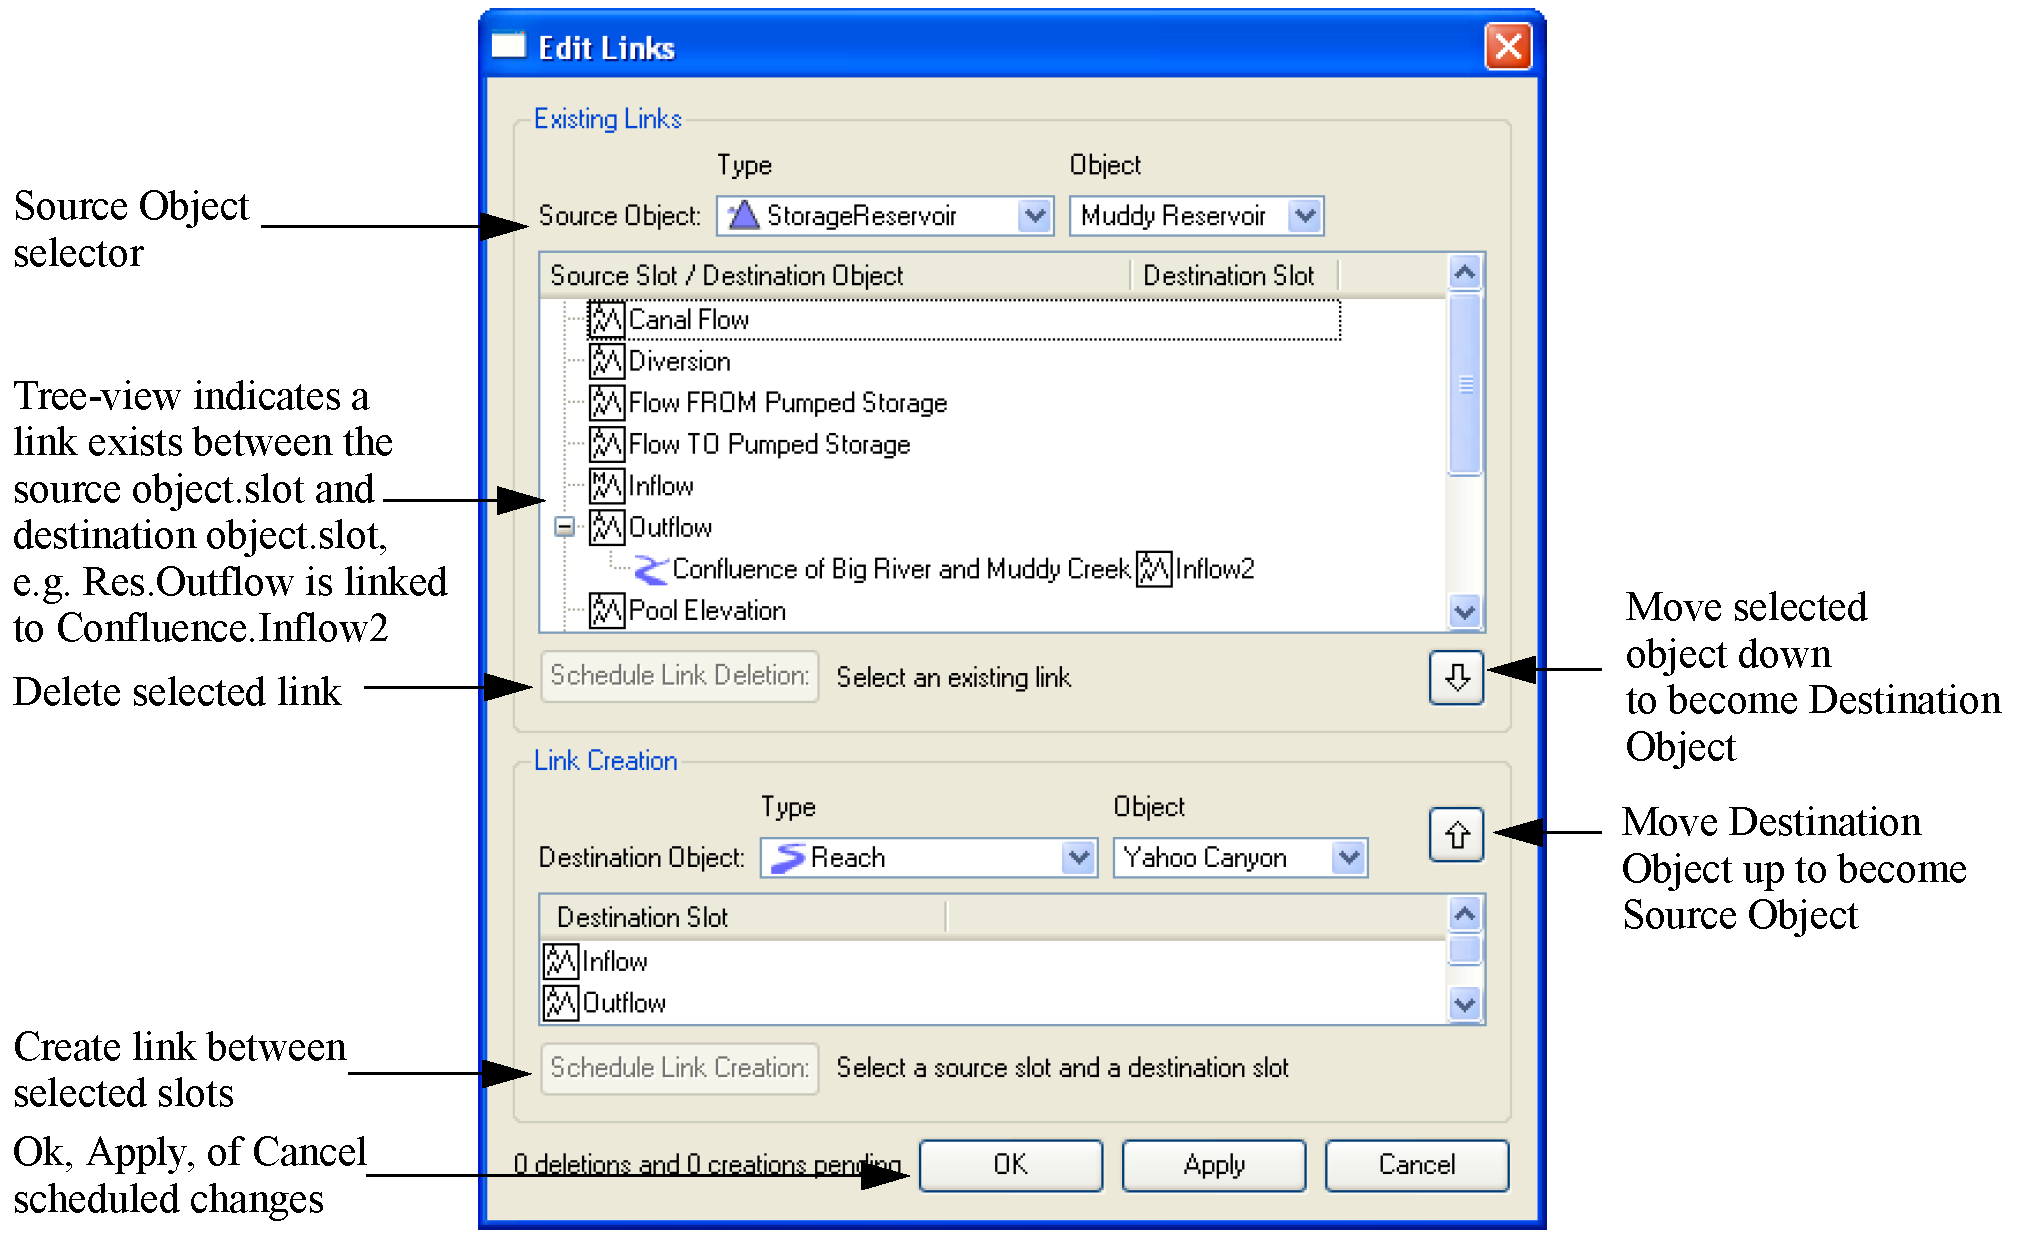
The Edit Links dialog is divided into two areas, one for Existing Links and one for Link Creation.
Existing Links - Viewing and Deleting
The upper portion of the dialog is used to view and delete existing links. A list of slots is generated by selecting a Source Object: Type and an Object. The list of all linkable slots on that object appears in the Source Slots tree-view list. Aggregate Objects show the upper level aggregate and each element with a “+” symbol to display the member slots, similar to the Object Viewer (or Open Object) dialog.
A slot in this dialog has a link if it has a “+” symbol to the left of its name. Selecting the “+” expands the tree view and shows all of the slots linked to the given slot by displaying the Destination Object and Destination Slot.
When the you highlight a row containing a Destination Object and Destination Slot, the Schedule Link Deletion button becomes active. Selecting this button will schedule the link for deletion; the link is actually deleted when the Ok or Apply button is selected. When a link is scheduled for deletion, the text is displayed with a strike through its name and a note next to the button.
Note: You can create a link between two slots, then change methods on one or both of the objects such that the linked slots are no longer visible or in use. The link will remain on the workspace and in the Edit Links dialog, the Source Slot will be shown in italics to indicate that it is not currently visible in the model. You are prevented from creating links between non-visible slots, but links between non-visible slots can be deleted and viewed.
Creating Links
Both the upper and lower portion of the dialog are used to create new links. First select a Source Object: Type and Object in the upper portion of the dialog. Then select a Destination Object: Type and Object in the lower portion. Highlight the desired slot in the upper and lower lists and select the Schedule Link Creation button to schedule the link for creation; the link will actually be created when the OK or Apply button is selected. A link scheduled for creation is shown as green text and the tree view is automatically expanded.
Links can be created between any pair of slots when one slot is listed in the top half and the other slot is listed in the bottom half. These links may not all make physical sense, but any combination can be defined.
Moving the Destination Object to Become the Source Object
Often when using this dialog, you are creating a series of links in a specified order, say upstream to downstream. To accommodate this, the up arrow button  can move the Destination Object in the link creation area up to become the Source Object. Similarly, the down arrow
  can be used to move the Source Object down to become the Destination Object. When using this button, the object in the selected row is moved down; thus, you can either select a slot (or make no selection) and the Source Object will move down. Or, you can highlight the linked Destination Object and Destination Slot row (via the tree-view) and selecting the Down arrow will move the selected destination object down to become the object selected in the link creation area.
can move the Destination Object in the link creation area up to become the Source Object. Similarly, the down arrow can be used to move the Source Object down to become the Destination Object. When using this button, the object in the selected row is moved down; thus, you can either select a slot (or make no selection) and the Source Object will move down. Or, you can highlight the linked Destination Object and Destination Slot row (via the tree-view) and selecting the Down arrow will move the selected destination object down to become the object selected in the link creation area. Revised: 01/04/2021