
User Interface
Model File Management
RiverWare models are saved as text files with or without compression. These files could be viewed and edited with a text editor outside of RiverWare, but their complexity and frequent format changes make direct editing difficult and dangerous. CADSWES neither recommends nor supports direct editing of model files.
Loading Models
Loading a new model clears any existing model on the workspace after prompting the user for verification. In the case of a blank workspace, no verification is needed.
Opening Models With the File Chooser
To load a model, select File, then Open Model from the main workspace menu bar or select Open Model File. on the toolbar. A File Chooser dialog appears.
on the toolbar. A File Chooser dialog appears.The file chooser filters by commonly used file extensions for Model Files, as follows:
• Model Files: *mdl, *.mdl.gz *.rw and *.rw.gz (default)
• gzip Files (*.gz)
• All *
For RPL sets, the filters include the following:
• Ruleset files (*.rls, *.rls.gz)
• Goal Set files (*.opt, *opt.gz)
• Global function sets (*.gfs, *gfs.gz)
• gzip files (*.gz)
• All (*)
In addition, the user can use asterisks (*) as wildcards in the File name to further filter. Once a file has been selected and the Open button has been selected, the cursor turns into an hourglass while the model is loading. Once the model is loaded a diagnostic window pops up with information regarding the date and time when the model was last saved, by whom the model was saved, and which version (release) of RiverWare.
If the model is configured to display background images in one or more of the Workspace views, then after the model is loaded, RiverWare reads and displays the background image files. While RiverWare is loading these images, a gray placeholder background is displayed in the appropriate views and an animated Busy icon is shown at the bottom of the Workspace. All of the usual workspace interaction is still possible while images are being loaded.
Note: For many background images, the loading process is so brief that it is not noticeable.
Reloading Models
On the Workspace, selecting File, then Reopen Model gives the user previously opened models and directories. This is a quick and easy way to reopen a model. For rulesets there are options to Reopen and Reopen and Load previously viewed rulesets.
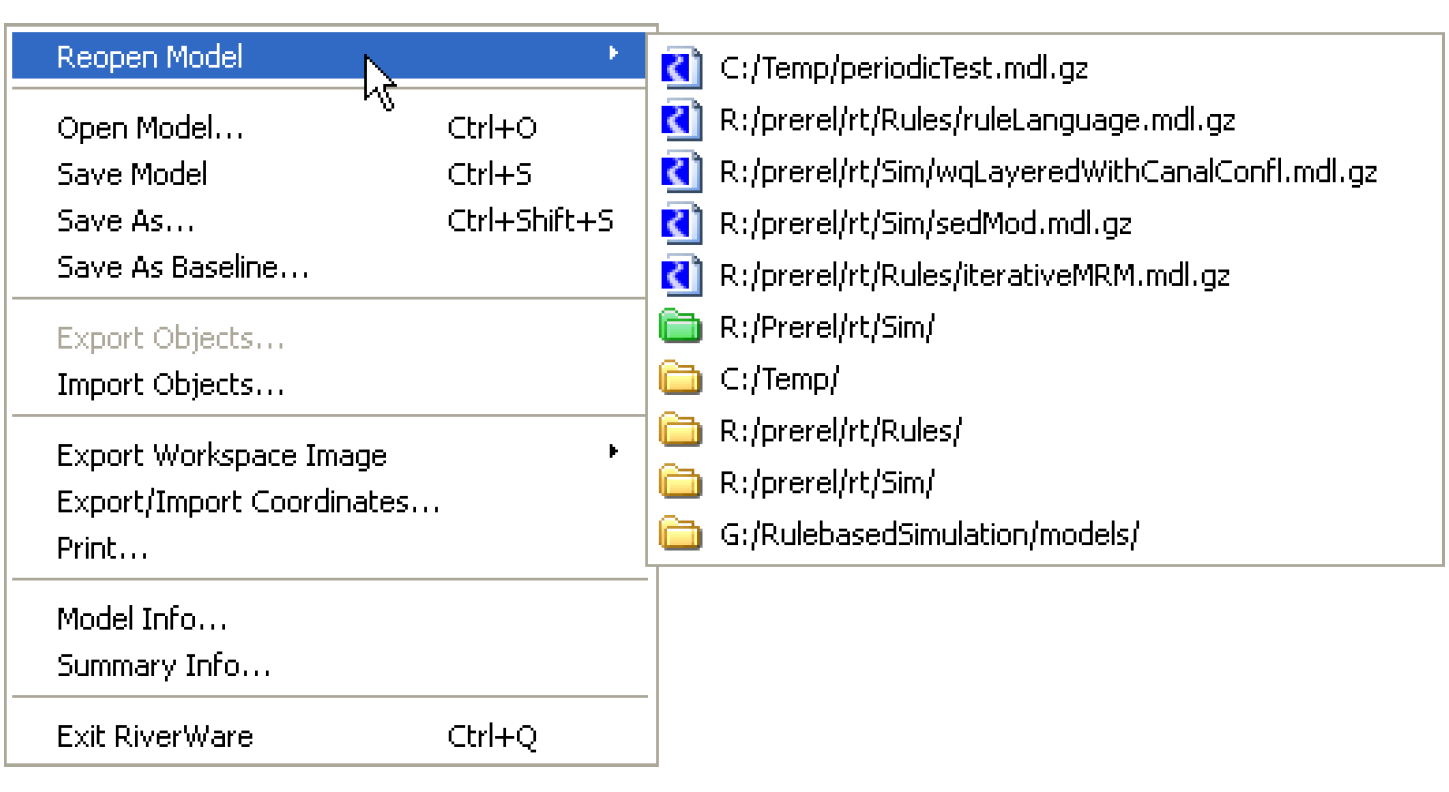
Listed in this menu are previously opened models and a list of recently accessed directories. Selecting a directory item (shown with a yellow folder icon) opens up a file chooser initialized to the specified directory. Also shown is a single user-configured default directory (for the specific type of file), based on an environment variable. This directory is shown as a green folder. If this is defined, the file chooser opened using the File, then Open menu will open to that default directory the first time within a RiverWare session. Table 2.1 lists supported environment variables.
Type of File | Environment Variable |
|---|---|
Model Files | RIVERWARE_DFLT_MODEL_DIR |
Rulesets (RPL) | RIVERWARE_DFLT_RULESET_DIR |
Optimization Rulesets | RIVERWARE_DFLT_OPTSET_DIR |
SCT Files | RIVERWARE_DFLT_SCT_DIR |
Saving Models
There are three ways to save a model in RiverWare: the default Save, Save As, and Save As Baseline.
Save
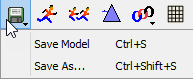
The Save command saves the current model with the same name and in the same directory as it was last opened or saved. Use the Save button and then Save Model.
Save As
The Save As command invokes a file chooser to select a new name and/or directory into which to save the current workspace. Once a Save As has been performed, any subsequent Save will use the same file name and directory until a new model is loaded, the RiverWare session ends, or a new Save As overrides it.
Use the Save button and then Save As.
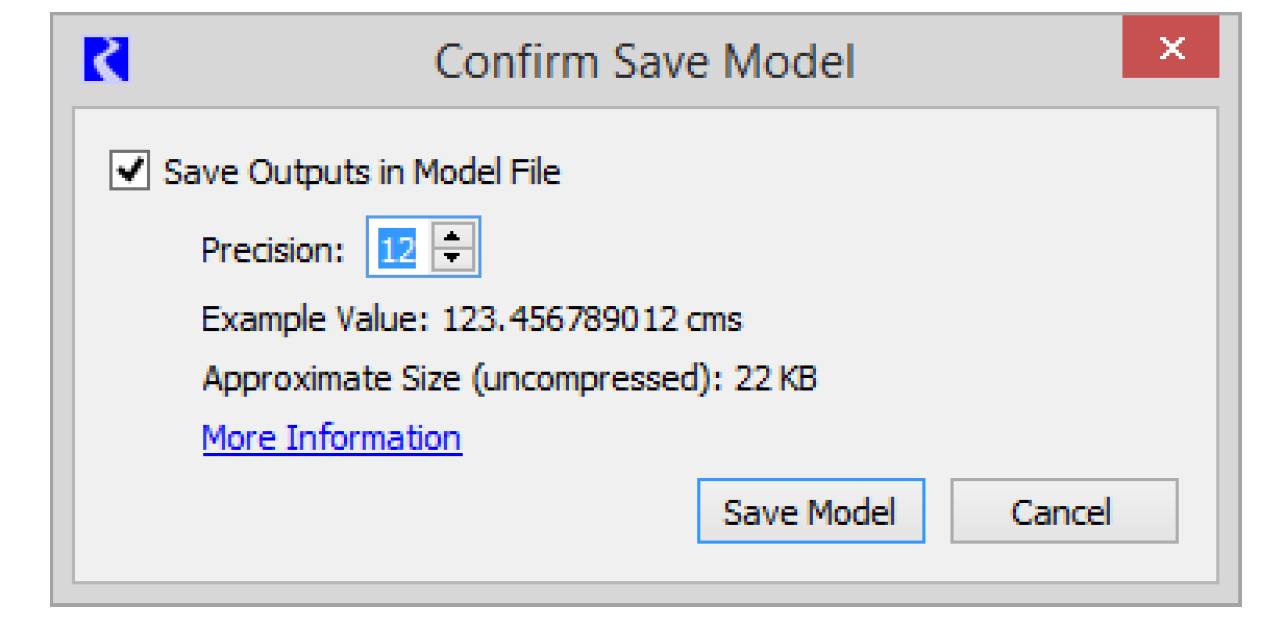
When using Save As, after you specify the file, a confirmation will allow you to specify whether to Save Outputs in the Model File and the Precision with which to save outputs. See “Saving Output Values” for details.
Save As Baseline
The Save As Baseline option is used to create an unalterable baseline model for generating alternate simulation scenarios with the Scenario Manager. Creating alternate scenarios is described in greater detail in the Scenario Manager section.
Note: You can save a model for use in the RiverWare Interactive Scenario Explorer (RiverWISE) using the Export to RiverWISE option. See “RiverWare Export to RiverWISE” in RiverWISE Model Developer’s Guide for details.
Saving Output Values
As models can be large and take up significant disk space, several options are available for minimizing the saved model size.
Saving Output Options
One option is whether or not to save the model with its calculated output values (series values with the Output or Rule flag). The model file size is greatly reduced if the output values are not saved. This is the recommended option for saving small, frequently run models. Since only the input values are required to reproduce a run, the output may be regenerated by re-running the simulation once the model has been re-loaded. But, if your model is large or takes a long time to run, you will likely want to save results, so that you can look at output values without re-running. Only Save As prompts for whether or not to save output values. The selected choice is then applied for all subsequent Saves until a new model is loaded, the RiverWare session ends, or a new Save As overrides it. The default Save behavior for a new session or model is to save output values. All series slot values with the Input flag (I, Z or i flag) and all values on non-series slots are always saved in the model file with full precision (17 digits).
Precision for Outputs
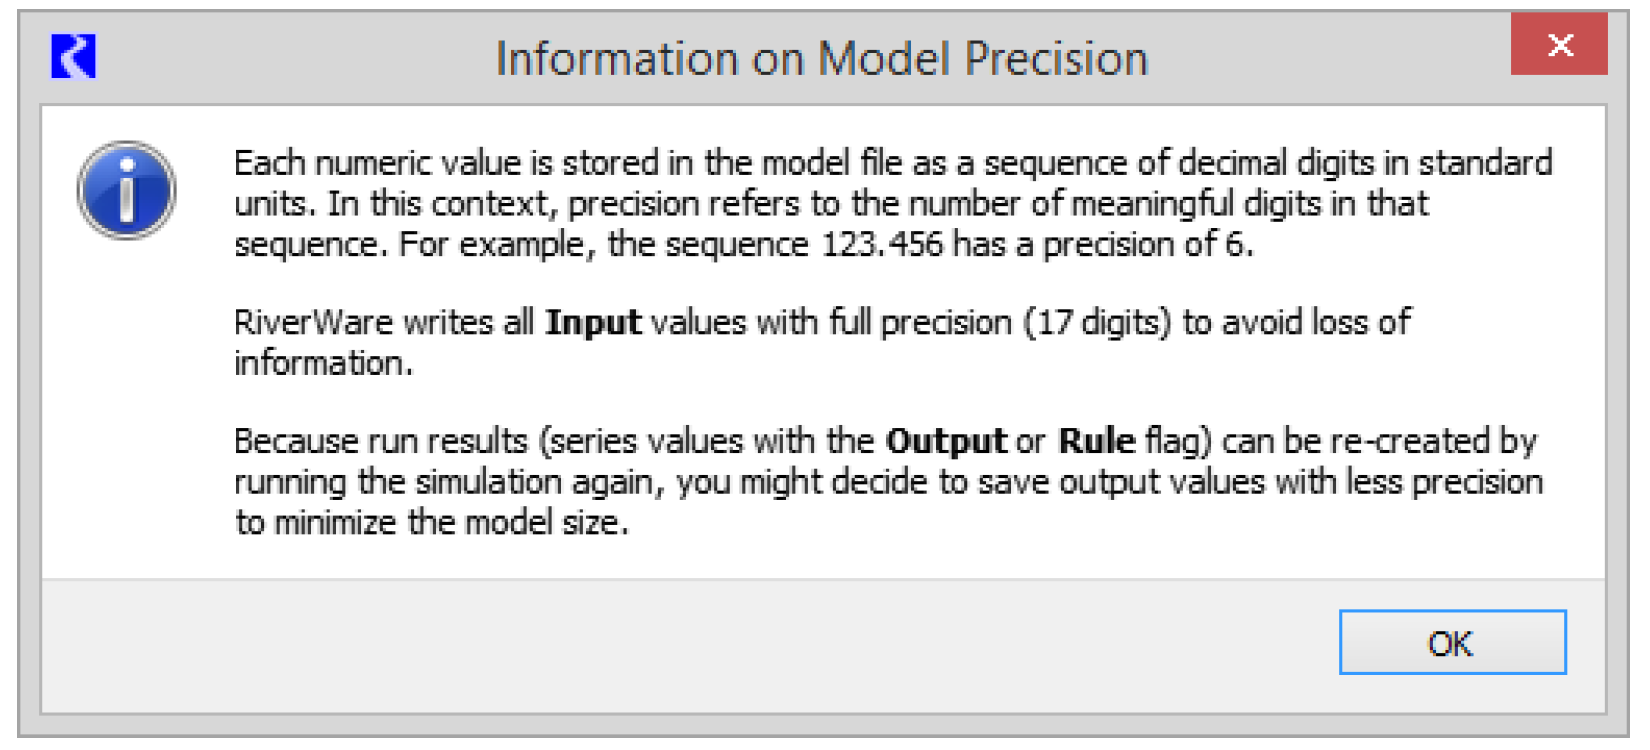
Precision refers to the number of meaningful digits in a numeric value. In the Save As confirmation, if you select the option to Save Outputs in the Model File, you will also have the option to set the Precision with which to save output values. You can save outputs with 1 to 17 digits of precision. Saving with higher precision will increase model size. In the interface, select the More Information link for additional information about precision. All series slot values with the Input flag (I, Z or i flag) and all values on non-series slots are always saved in the model file with full precision (17 digits).
Naming Conventions
Although there is no required extension for RiverWare model files, the .mdl extension is often used to identify a file as a model file, and a .rls extension is used to identify a ruleset file.
Further, files that end in the .mdl extension will display the RiverWare model file icon in windows explorer. Double-selecting the icon will open the latest installed version of RiverWare and load that model.
Compressing Model Files
Model files may be automatically compressed when they are saved by giving their file name a .gz extension (the gnu zip compression). When the model is re-loaded, the extension is detected, and the file is uncompressed automatically. Manually compressing and uncompressing files in WINDOWS is accomplished using any zip program such as WinZip. Manually compressed model files which do not have a .gz extension will not be recognized by RiverWare, and will produce an error upon loading. Thus, the .mdl.gz extension is often used to identify a file as a model file and a .rls.gz extension is used to identify a ruleset file when compression is desired.
In Windows, the association between RiverWare and the .gz file extension has not been made because of the general nature of the .gz extension,. You can manually associate .gz files with RiverWare so that RiverWare will automatically open when you double-click a .gz file. To do this (in XP), right-click a .gz file and select Properties. Then select the Change button and select RiverWare from the list of files.
Backup Files Created When Saving Manually
The first time a model is saved to an existing file, a backup of the original file is made. This prevents data loss if an overwrite is unintentional or the save process fails and the model is corrupted. The backup file has the same name as the original with a .bak extension. A single backup file is made for each model. When upgrading to a newer version of RiverWare, the backup model file name will contain the previous RiverWare version number to the model file (e.g., SampleModel.6.5.mdl.gz). This ensures that there will be a model file compatible with RiverWare version 6.5 until the user explicitly removes it.
Automatic Backup Save
The automatic backup save utility saves a backup file in a temporary directory at a defined interval. It is strictly a backup save of the model file, and it never overwrites the model open currently.
The feature is configured from the workspace File, then Automatic Backup Save Configuration menu item, which opens the Automatic Backup Save Configuration dialog.
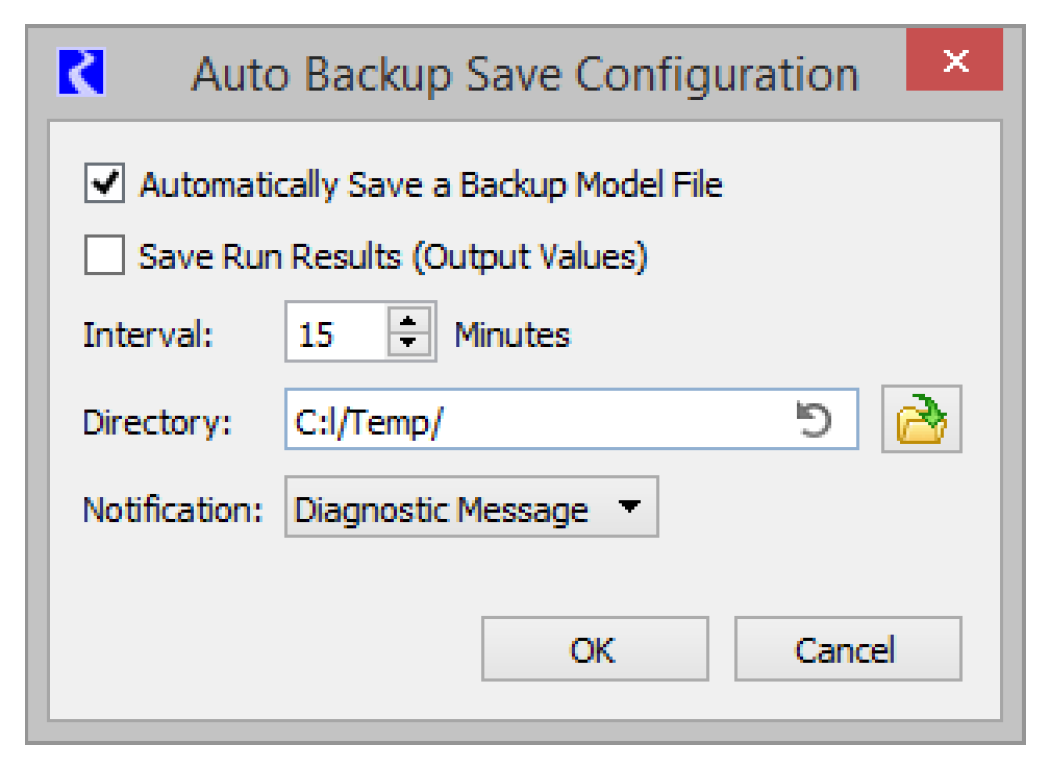
From the dialog, you configure the following:
• Whether the model file should be Automatic Backup Saved. If unchecked, the remaining fields are irrelevant.
• Whether the Automatic Backup Saved backup file should contain run results (output values).
• The Automatic Backup Save interval. See “Automatic Backup Save Interval” for details.
• The Automatic Backup Save directory, by default the user's temporary directory. See “Automatic Backup Save Directory” for details.
• The Automatic Backup Save notification:
– None. RiverWare beeps at the beginning of the Automatic Backup Save and provides no further notification.
– Diagnostic Message. RiverWare beeps at the beginning of the Automatic Backup Save and displays a diagnostic message upon its successful completion. A single message is posted in green if successful.
– Status Dialog. RiverWare opens a notification window at the beginning of the Automatic Backup Save and closes the window upon its successful completion. If the Automatic Backup Save is unsuccessful the notification window remains open and displays the error.
In all cases, if the Automatic Backup Save is unsuccessful an error message is displayed and Automatic Backup Save is disabled (with a red highlight message in the diagnostics):
Auto-saving the model file failed: Cannot open "C:\Bad\Directory\Model.mdl" for writing: No such file or directory
Automatic Backup Save has been disabled for model file(s)
If you want to see additional messages on the automatic backup save process, turn on Workspace, then Model Load/Save diagnostic category.
Automatic Backup Save Interval
RiverWare performs activities during which an Automatic Backup Save is not appropriate, for example during a simulation. If an Automatic Backup Save comes due during such an activity the Automatic Backup Save feature enters retry mode:
• The Automatic Backup Save interval is set to one minute.
• Within a minute of the activity's completion the model file is Automatic Backup Saved.
• The Automatic Backup Save interval is restored to its configured value.
Automatic Backup Save Directory
By default the Automatic Backup Save directory is the user's temporary directory. On recent versions of Windows this is:
C:\Users\<user name>\AppData\Local\Temp
It's unlikely a user will have write permission for another user's temporary directory. To facilitate sharing models, if a user loads a model file with Automatic Backup Save enabled and doesn't have write permission for the Automatic Backup Save directory, the Automatic Backup Save directory is changed to the user's temporary directory (with a green highlight diagnostic message):
Automatic Backup Save directory has been changed to: C:/Users/Voltaire/AppData/Local/Temp/
Finally, because the Automatic Backup Save directory might not be obvious to all users, the configuration dialog has a Reset button, which resets the Automatic Backup Save directory to the user's temporary directory, as shown in Figure 2.1.
Figure 2.1

Open Automatic Backup Save Model Menu Item
If the model file has been Automatic Backup Saved, the backup file can be opened by selecting the File, then Open Automatic Backup Save Model menu item. (If the model file hasn't been Automatic Backup Saved, the menu item is hidden.) This is equivalent to selecting the File, then Open Model menu item, navigating to the Automatic Backup Save directory and selecting the backup file.
Backup File Name
If the model file name ends with either .mdl or .mdl.gz, the extension is preserved and the backup file name is <file name>.~1~.mdl or <file name>.~1~.mdl.gz. Otherwise the backup file name is <file name>.~1~. If there is not a model file loaded from a named file, the backup file name is Workspace.~1~.
Model History and Comments
When a model is loaded, a diagnostic window opens with the Model Save History. The model save history appears as a brown diagnostic message with information regarding the date and time when the model was last saved, the username of person who save the model, and the RiverWare version in which the model was last saved. The last save is part of the Model File Information and is stored with the model file when a model is saved. The model save history is automatically updated each time a model is saved.
The save history is also accessible within the Model Info dialog accessed by selecting File, then Model Info from the main RiverWare workspace. This dialog includes the Last Save, Run History and Comment.
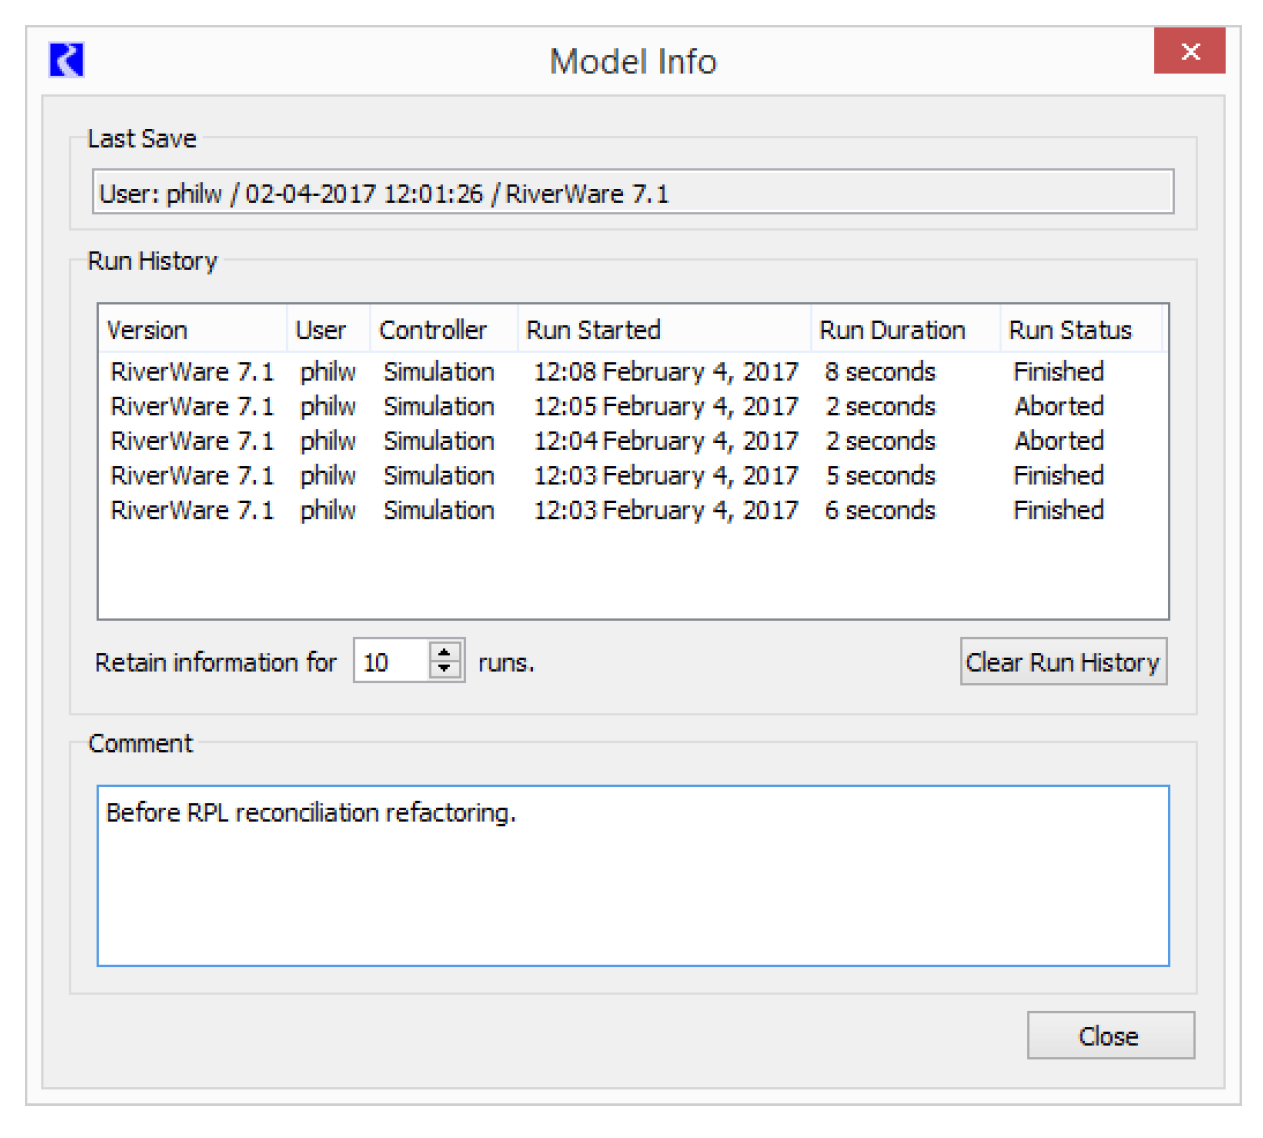
Last Save
The Last Save shows a single line, as information for only the last save operation. This text can be selected and copied to the system clipboard.
Run History
The Run History panel lists a user specified number of run history records including
• Version
• User
• Controller used
• Time the run was started
• Run duration
• Run status
You can control how many run history records to save in the Retain information for N runs field. This panel has a Clear Run History operation to clear all of the records. Because the records are saved in the model file, specifying a large number of runs to save will make the model file larger. Clearing these can recover that space.
Note: Since run history items are stored in the model file, items for runs performed since the model load will be retained in the model file only if the model is subsequently re-saved.
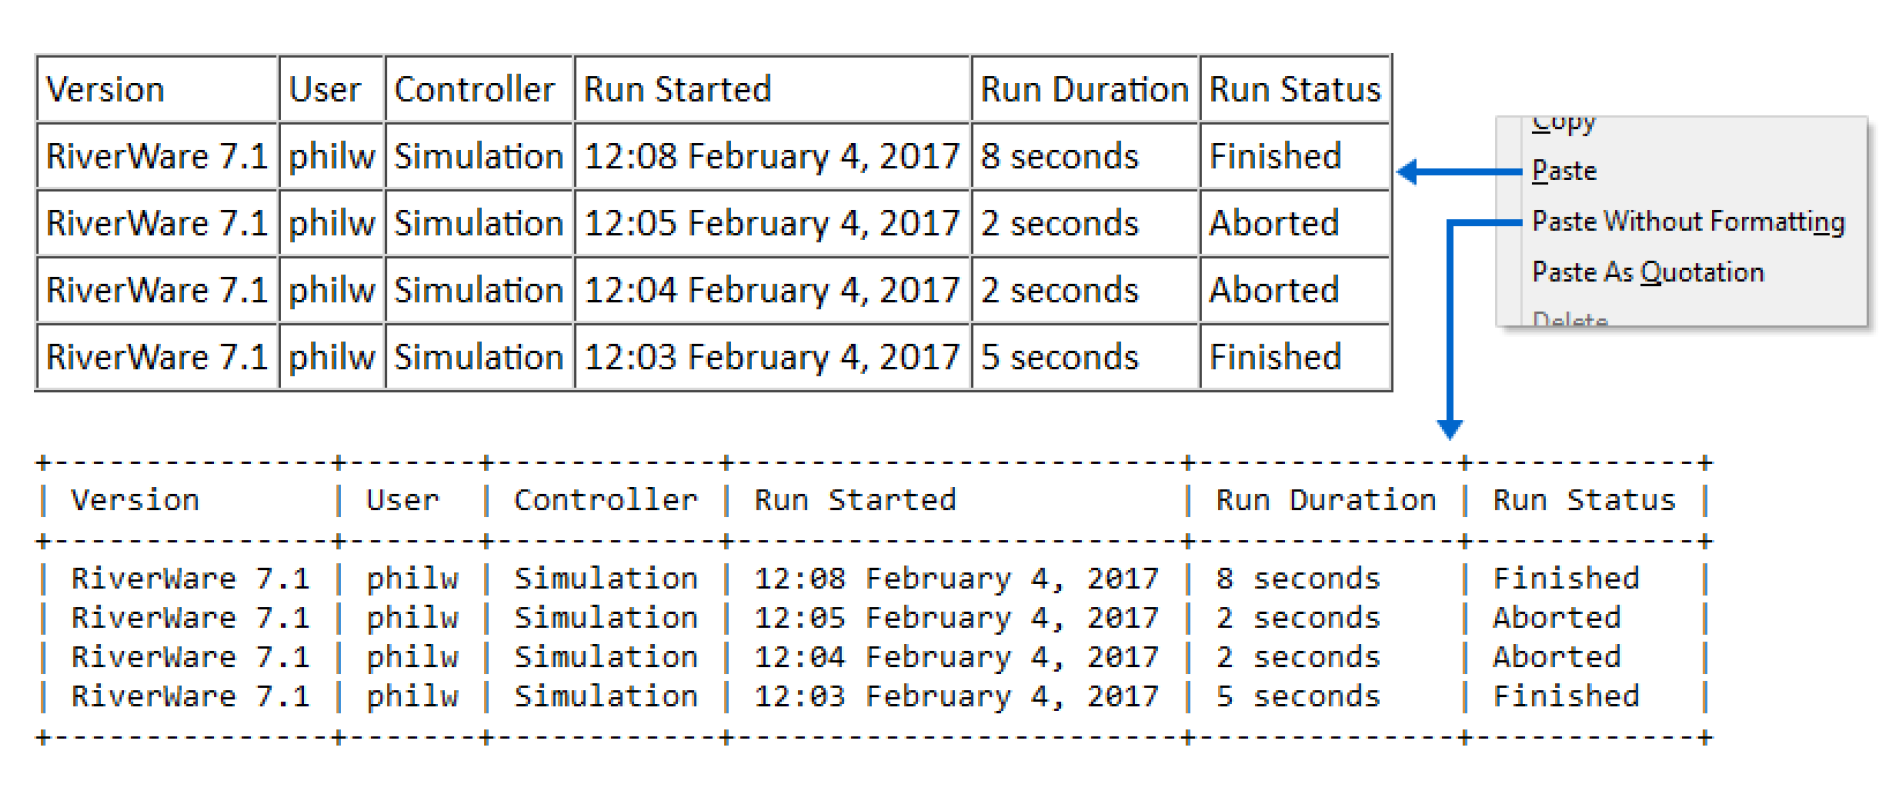
The Run History panel allows you to right-click and Copy selected items to the system clipboard. When you paste, you can either paste in a standard formatted (i.e. HTML table) or unformatted tabular form. Figure 2.2 shows a sample of the paste results for an email program.
Figure 2.2
Comments
Enter comments about a model into the Comment section. Like the save history, this information is saved together with the model file. You can write comments or a brief description of a model.
Note: Model Info can be shown in a Model Report using the Model Information (see “Model Information” in Output Utilities and Data Visualization) and Run History (see “Run History” in Output Utilities and Data Visualization) items.
Locking Models
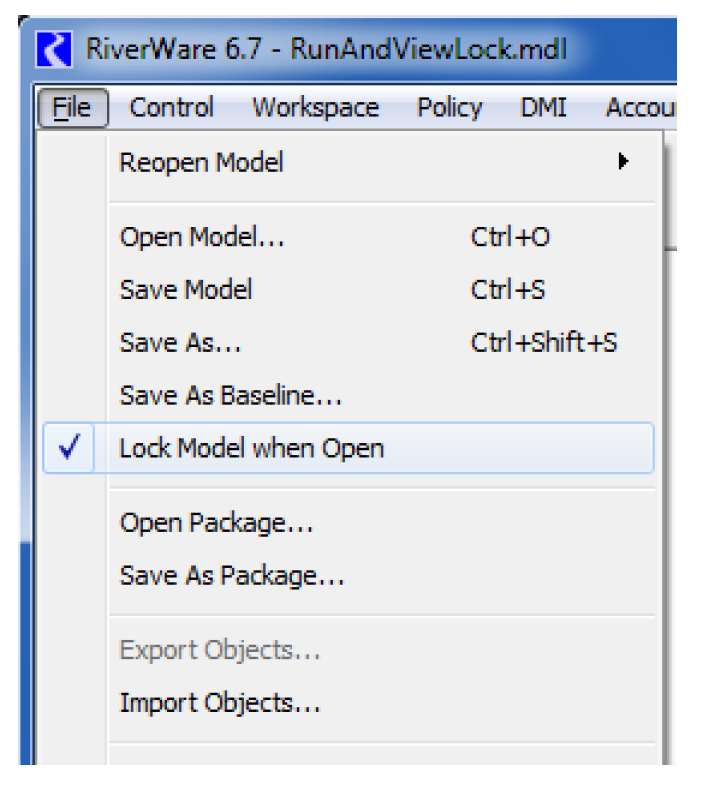
If more than one user is working on a model, then you may want to lock the model when open to prevent others from simultaneously changing the file. To do this, use the File, then Lock Model when Open menu item and then save the model. Then a lock file is created in the same directory as the model. This lock file is also created when the model is opened.
The person who first opens the model is notified that they have locked the model file, which prevents write access by other instances of RiverWare. The lock file is in the same directory path as the model file and has the name of the model plus the .lock extension. When the model is closed, the lock file is automatically removed.
If the model is opened when a lock file already exists, the user is notified that the model file is locked by another instance of RiverWare. The time the lock file was created and the owner of the lock file is shown if that information is available from the system. Then, the model is in a state where the Save functionality is disabled. But, you can still make changes within the opened model and Save As a different name.
Model Comparison Tool
When developing a model, it is often desirable to compare a model to some previous version of the model to identify differences. In addition, comparison tools are essential when multiple people are developing a model or there are multiple versions of a model that are to be merged together.
Model Comparison Use Case
The need for a model comparison tool can be illustrated by the following use case.
1. Bob acquires a copy of the current “official” version of the model file, modifies it, and saves a new model file. The modification process could be lengthy and involve many different sorts of changes, e.g., adding objects and slots, running DMIs, executing runs, interactively changing data, etc.
2. Bob provides the new model file to Susie, who would like to understand the ways in which the new model differs from the original one. A comparison tool helps Susie locate and understand the differences.
3. Having reviewed Bob’s changes, Susie might then incorporate some or all of these modifications into a new model and then save this new model as the new official version.
Note: If only some of Bob’s changes are to be incorporated into the official model, or if the official model has changed since Bob originally obtained a copy of it, then Susie cannot simply replace the current official model with the model provided by Bob. Instead Susie should compare Bob’s model with the original or updated “official” model to see what has changed and then make those same changes to the original model.
The Model Comparison Tool compares many entities of two models. It looks at the properties of the entities and their values. It then shows the differences and allows you to see which items have changed.
Following are the limitations of the Model Comparison Tool:
• A subset of model entities are currently compared by this tool. The compared items are shown in the model selection dialog and in Table 2.2. In general, objects, accounts, slots, slot values, DMIs, and RPL Sets saved within the model are compared.
• This tool doesn’t support automatic merging but allows you to copy from the selected property values panel and paste into the opened model.
Accessing the Model Comparison Tool
From the RiverWare workspace, select Utilities, then Model Comparison Tool.
Selecting Models to Compare
The tool opens and shows a dialog where you specify the two models to compare.
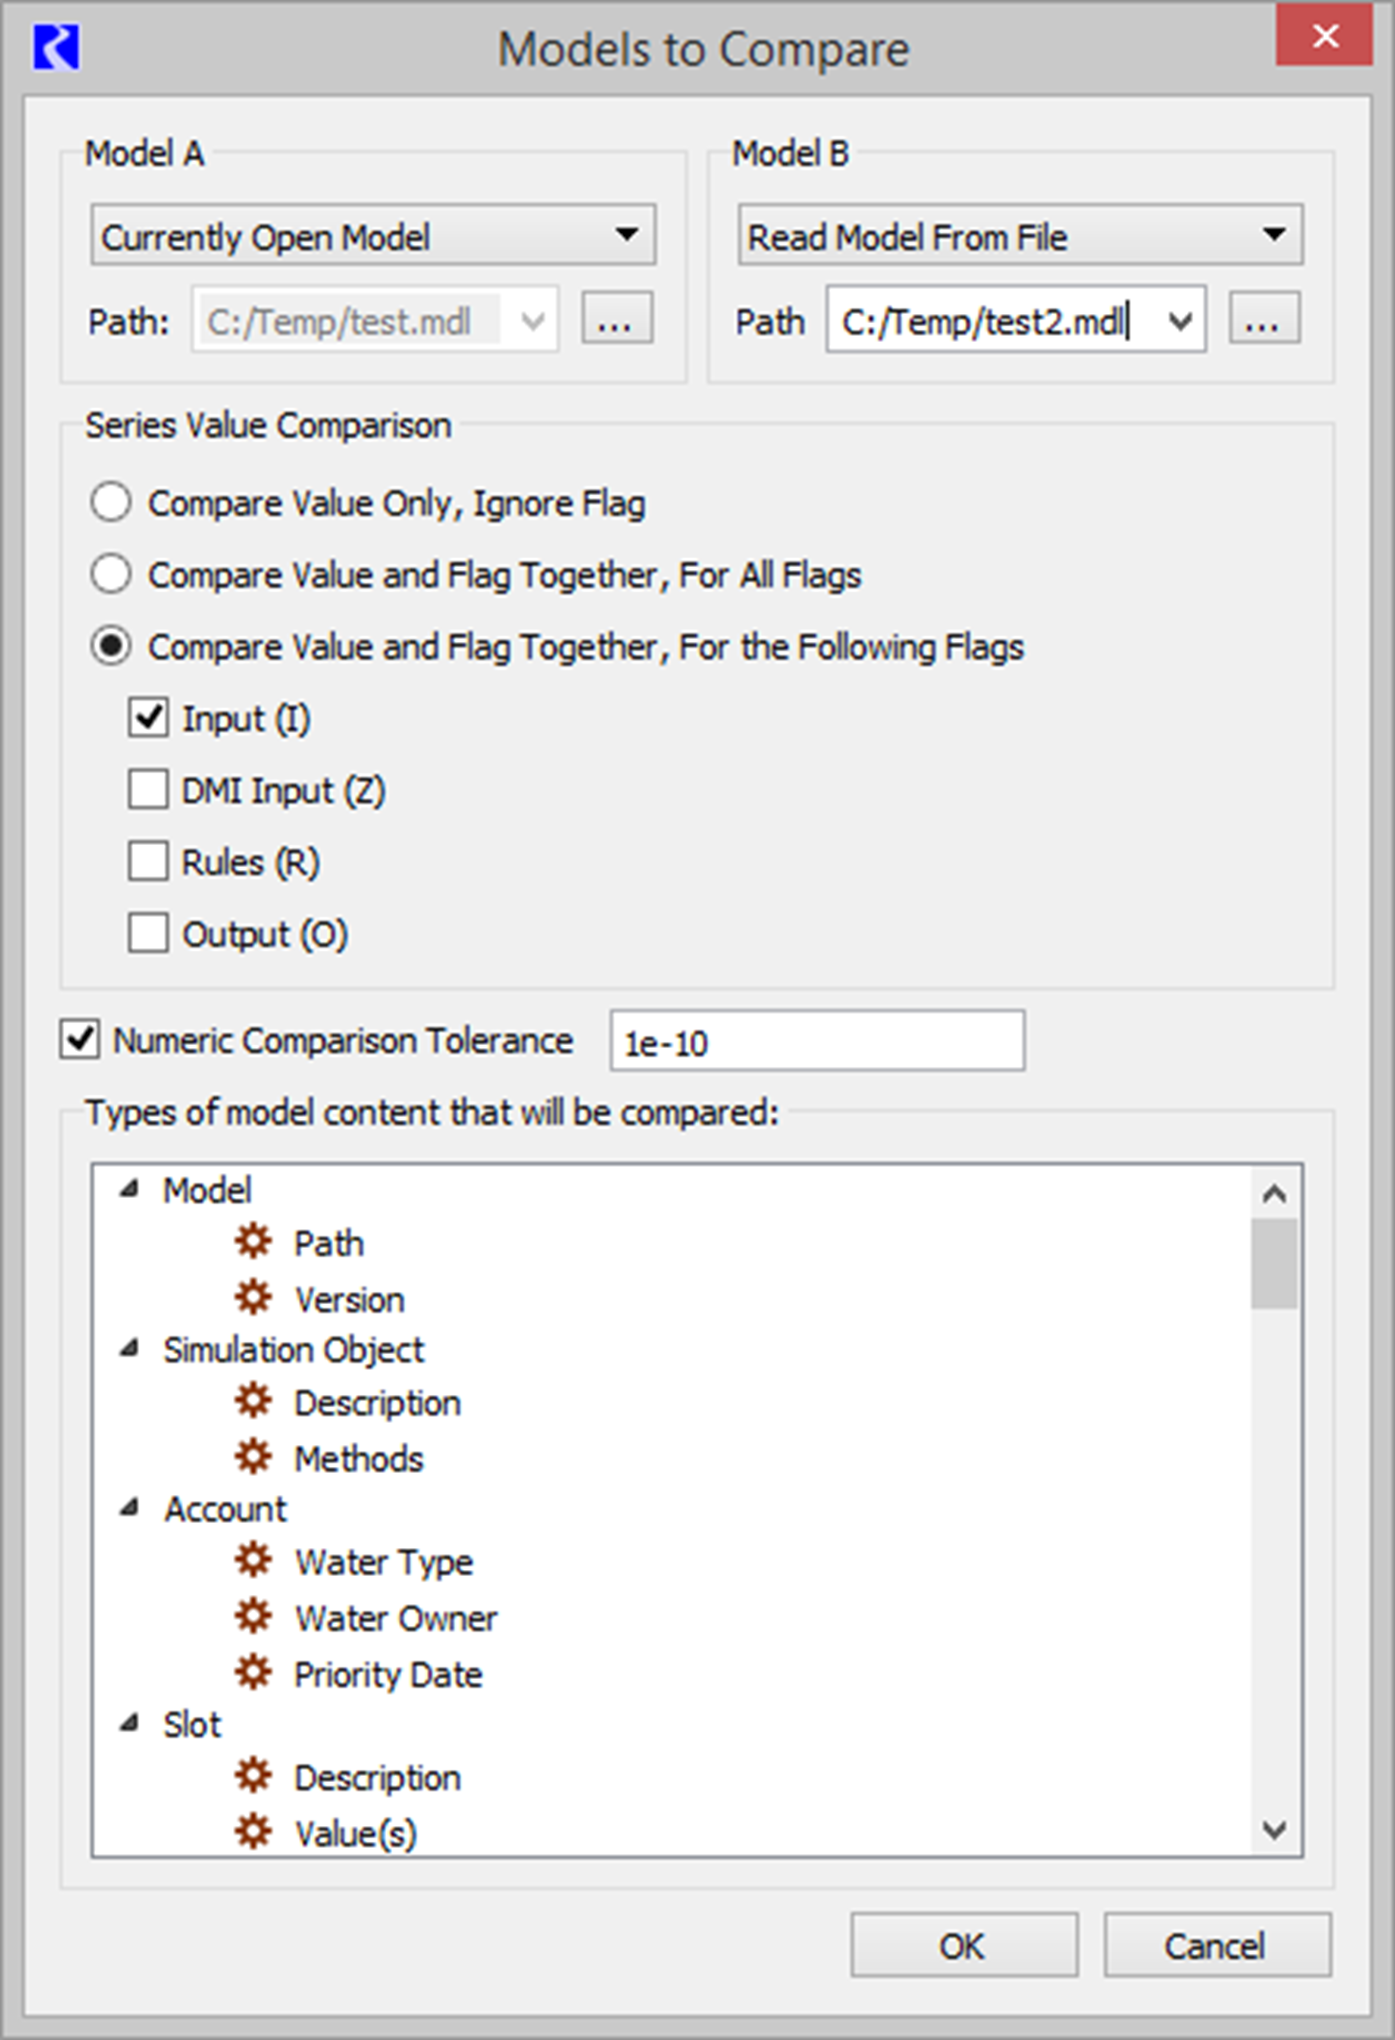
The two models are referred to as Model A and Model B. For both models, choose one of the following:
• Currently Open Model. Choose the currently opened model, including any changes made since last saving the model.
• Read Model from File. Choose a model on the file system. Use the ellipsis button to open a file chooser to select the model.
The middle portion of the dialog shows which entities and properties in the model file will be compared. In general, objects, accounts, slots, slot values, and RPL Sets embedded within the model are compared.
Note: This is a small subset of entities/properties in the model file. For example the path of the two models is compared, but the run timestep is currently not compared. The list of content will be expanded in future releases.
All RPL sets saved or embedded in the model file are automatically compared including:
• Expression Slot Set
• Global Function Set (when saved in the model as described “Save Location” in RiverWare Policy Language (RPL))
• Initialization Rules
• Iterative MRM Ruleset
• Object Level Accounting Method Set
• Optimization Goal Set (when saved in the model as described “Save Location” in RiverWare Policy Language (RPL))
• Rulebased Simulation (RBS) Ruleset (when saved in the model as described “Save Location” in RiverWare Policy Language (RPL))
Those saved as separate files are not compared with this tool, but can be compared using the RPL Set Comparison tool.
Table 2.2 provides a description of each entity compared, and for each of the entities, the properties that are considered.
Note: Not all entities of a given type will have all of the properties, e.g., not all slots have expressions.
Entity | Properties |
|---|---|
Model | • Path - The location of the model on the file system are compared as text. • Version - The RiverWare version from the last save. |
Simulation Object | • Description - The text description as shown on the Open Object dialog’s Description tab are compared as text. • Methods - The user-selectable methods, shown on the object’s Methods tab are compared as text. Note: The tool compares all categories and methods, whether they are visible or not (perhaps because they are specific to a certain controller or dependent on other methods/categories). They are listed alphabetically by category. |
Account | • Water Type - For each account, the Water Type is compared. • Water Owner - For each account, the Water Owner is compared. • Priority Date - For each account, the Priority Date is compared. |
Slot | • Description - For each slot, the description is compared as text. • Value(s) - The values of slots are compared using the tolerance described below. The slot values are shown in the appropriate format based on the type of slot. For tables, periodic and scalar slots, the values are compared using the full precision in standard values on the slots. For series slots, the comparison uses the setting shown in the Series Value Comparison, described in the next section. Note: Some slot types or values may not display exactly as shown in RiverWare dialogs. For example, values using the DateTime unit type are compared but the values shown are the numeric encoding. This will show you a difference and you can look at the slot for the actual DateTime value. • Expressions - For expression slots, the RPL expression is compared. |
DMI Manager | DMIs are compared in a hierarchical structure. The DMI Manager is the top level item and contains: • Locked Status - Is the DMI locked? Yes/No compared as text. • Show Progress - Will the DMI Progress dialog be displayed? Yes/No compared as text. • Show Status - Will the DMI Status dialog be displayed? Yes/No compared as text. |
Control File-Executable DMI | These items correlate directly to the Control File-Executable DMI dialog. All content is compared as text and toggles are shown as Yes or No. • Name - the DMI name is compared as text • Input or Output - the DMI input/output type is compared as text. • Confirm Warnings - Does the DMI confirm warnings, compared as Yes/No. • Record Invocations - Yes or No, compared as text • Control File - The control file is compared • Executable - The executable and path are compared as text. • Allow Spaces in File Paths - Yes or No • Limit Output Range to Run Range - Yes or No • Line Ending - - Native, windows, or unix • Active User Parameters - Only the active user parameters are compared as text. |
Trace Directory DMI | These items correlate directly to the Trace Directory DMI dialog. All content is compared as text and toggles are shown as Yes or No. • Name - the DMI name is compared as text • Input or Output - the DMI input/output type is compared as text. • Confirm Warnings - Does the DMI confirm warnings, compared as Yes/No. • Record Invocations - Yes or No, compared as text • Allow Spaces in File Paths - Yes or No • Limit Output Range to Run Range - Yes or No • Line Ending - Native, windows, or unix • Top Level Directory - The file path is compared as text. • Control File - The control file (sometimes called a control file template) is compared. • Single Trace Number - The trace number used for a single run. |
Database DMI > Dataset > > Slot Selection | The properties for a Database DMI show a hierarchical structure displaying the following item: • Name - the DMI name is compared as text • Input or Output • Confirm Warning - Yes or No • Record Invocations - Yes or No • User Parameters - Compared as text Then, there is a sub item for each referenced Dataset • Name - The name of the referenced dataset. • Type - Either DSS, HDB, or Excel • Enabled - Yes or No Then, there is another sub item for each referenced Slot selection: • Selection Label - The label shown for this slot selection • Enabled - On or off • Begin Timestep • End Timestep • Slot List - The expanded list of slots for this slot selection |
Database Group | • Name - The group name is compared as text. • Comment - Comments are compared as text • Members - The names of DMIs contained in the group are compared as text. |
DMI Year Mapping Group | • Name - The group name is compared as text. • Comment - Comments are compared as text • Members - The names of DMIs contained in the group are compared as text. • Map Years - The list of map years is compared. |
DMI Parameter | • Name - The parameter name is compared as text. • Minimum Value - The minimum value is compared. • Maximum Value - The maximum value is compared. • List Items - The list of possible values is compare as text. |
DSS Dataset | These items correlate directly to the DSS Dataset dialog. All content is compared as text and toggles are shown as Yes or No. • Name • Name Map • Missing Value Preference • Missing Value Replacement • Unit Preference • Unit List • Read Table Behavior • DSS File • DSS Path • Data Type List |
Excel Dataset | These items correlate directly to the Excel Dataset dialog. All content is compared as text and toggles are shown as Yes or No. • Name • Name Map • Missing Value Preference • Missing Value Replacement • Unit Preference • Unit List • Connection Process • Workbook • Slot Mapping • Header Specification • Header Orientation • Ranges on Same Worksheet • Worksheet • Apply Header Offset • Header Offset • Apply Range Offset • Range Offset • Run Name Type • Single Run Name • Use Begin Timestep • Use Units |
HDB Dataset | These items correlate directly to the HDB Dataset dialog. All content is compared as text and toggles are shown as Yes or No. • Name • Name Map • Missing Value Preference • Missing Value Replacement • Unit Preference • Unit List • Group Slots • Database Name • Table Type • Mapping ID • Model ID • Model Run ID • Runtime Model Run ID • Ensemble ID • Runtime Ensemble ID • Ensemble Agency ID • Ensemble Trace ID • Use Water Year Table • Use Overwrite Flag • Read Validation Character |
Name Map | • Name - The name is compared • Display Order - The ordering of the name maps are compared. |
RPL Set (for all sets that are saved within the model file) | • Name - The set names are compared as text. • Agenda Order - The agenda order (1,2,3... or ... 3,2,1) are compared as text. • Description - The set description is compared as text. • Precision - The set precision is compared as a numeric value. • Is Global? - Is this set a global functions set. • External Documentation - The external documentation toggle is compared as text. |
Utility Group (as part of a RPL set saved within the model) | • Name - The group names are compared as text. • Description - The group description is compared as text. • Notes - The group notes are compared as text. • Is Enabled - The enabled/disabled setting is compared. • Names Color - The colors used for the group name is compared as a color value. • External Documentation - The external documentation toggle is compared as text. |
Policy Group (as part of a RPL set saved within the model) | • Name - The group names are compared as text. • Description - The group description is compared as text. • Notes - The group notes are compared as text. • Is Enabled - The enabled/disabled setting is compared. • Names Color - The colors used for the group name is compared as a color value. • External Documentation - The external documentation toggle is compared as text. |
Report Group (as part of a RPL set saved within the model) | • Name - The group names are compared as text. • Description - The group description is compared as text. • Notes - The group notes are compared as text. • Is Enabled - The enabled/disabled setting is compared. • Names Color - The colors used for the group name is compared as a color value. • External Documentation - The external documentation toggle is compared as text. |
Rule, Goal Method (as part of a RPL set saved within the model) | • Name - The rule names are compared as text. • Priority - The rule priority values are compared. • Description - The rule description is compared as text. • Notes - The notes are compared as text. • Is Enabled - The enabled/disabled setting is compared as true or false. • Execution Constraint - The execution constraints are compared as RPL items. • Pre-Execution DMI Name - The pre-execution DMI names are compared as text. • Post-Execution DMI Name - The post-execution DMI names are compared as text. • External Documentation - The external documentation toggle is compared as text. • Stop on NaN - The Stop on NaN settings are compared as true or false. • Names Color - The colors used for the rule name is compared as a color value. • Statements - The RPL statements are compared as RPL items. |
Function (as part of a RPL set saved within the model) | • Name - The function names are compared as text. • Description - The function description is compared as text. • Notes - The group notes are compared as text. • Is Enabled - The enabled/disabled setting is compared. • Arguments - The functions’ set of arguments are compared as text. • Return Type - The functions’ return type (NUMERIC, BOOLEAN, etc) are compared as text. • Diagnostic Units - The Display Function Diagnostics Scale/Units is compared as text. • Pre-Execution Diagnostics - The pre-execution diagnostic toggle is compared as true or false. • Post-Execution Diagnostics - The post-execution diagnostic toggle is compared as true or false. • Is Time Varying - The toggle for Time Varying is compared. • External Documentation - The external documentation toggle is compared as text. • Post-Execution Checks - The functions’ Post-Execution Checks are compared as RPL expressions. • Names Color - The colors used for the function name is compared as a color value. • Body - The RPL expressions are compared as RPL items. |
Report Item (as part of a RPL set embedded in the model) | • Name - The item names are compared as text. • Item Type - The type of the item (rule, function, object, slot, etc) are compared • Item Parent - The items parent (i.e for a slot, which object is it on) are compared. • Names Color - The colors used for the item name is compared as a color value. • External Documentation - The external documentation toggle is compared as text. |
In the Series Value Comparison region, specify how series data values should be compared. The following choices are available:
• Compare Value Only, Ignore Flag: Compare series values, regardless of the flag. For example, if slot 1 has 100.0 (I) in Model A, but 100 (R) in Model B, no difference will be reported.
• Compare Value and Flag Together, For All Flags: Compare series values and flags. For example, if slot 1 has 100.0 (I) in Model A, but 100 (R) in Model B, a difference will be reported.
• Compare Value and Flag Together, For the Following Flags: Compare series values and flags but only for the specified flags. For example, if slot 1 has 100.0 (I) in Model A, but 100 (R) in Model B, no difference will be reported unless the I or R flag check boxes are selected. Choose which flags to compare: Input (I), DMI Input (Z), Rule (R), or Output (O).
If desired, specify an absolute tolerance for numeric comparisons in the Numeric Comparison Tolerance field. The value 1e-10 is used by default to avoid flagging as different those values with very small differences that occur due to machine precision.
When finished, select OK. The tool then performs the comparison and the main Model Comparison Tool is then shown.
Note: The comparison happens when the selection dialog is confirmed or the Refresh button is selected. Afterwards, the tool displays the results of that comparison, which might no longer apply if you have since changed the workspace or deleted the file.
Tour of the Model Comparison Tool
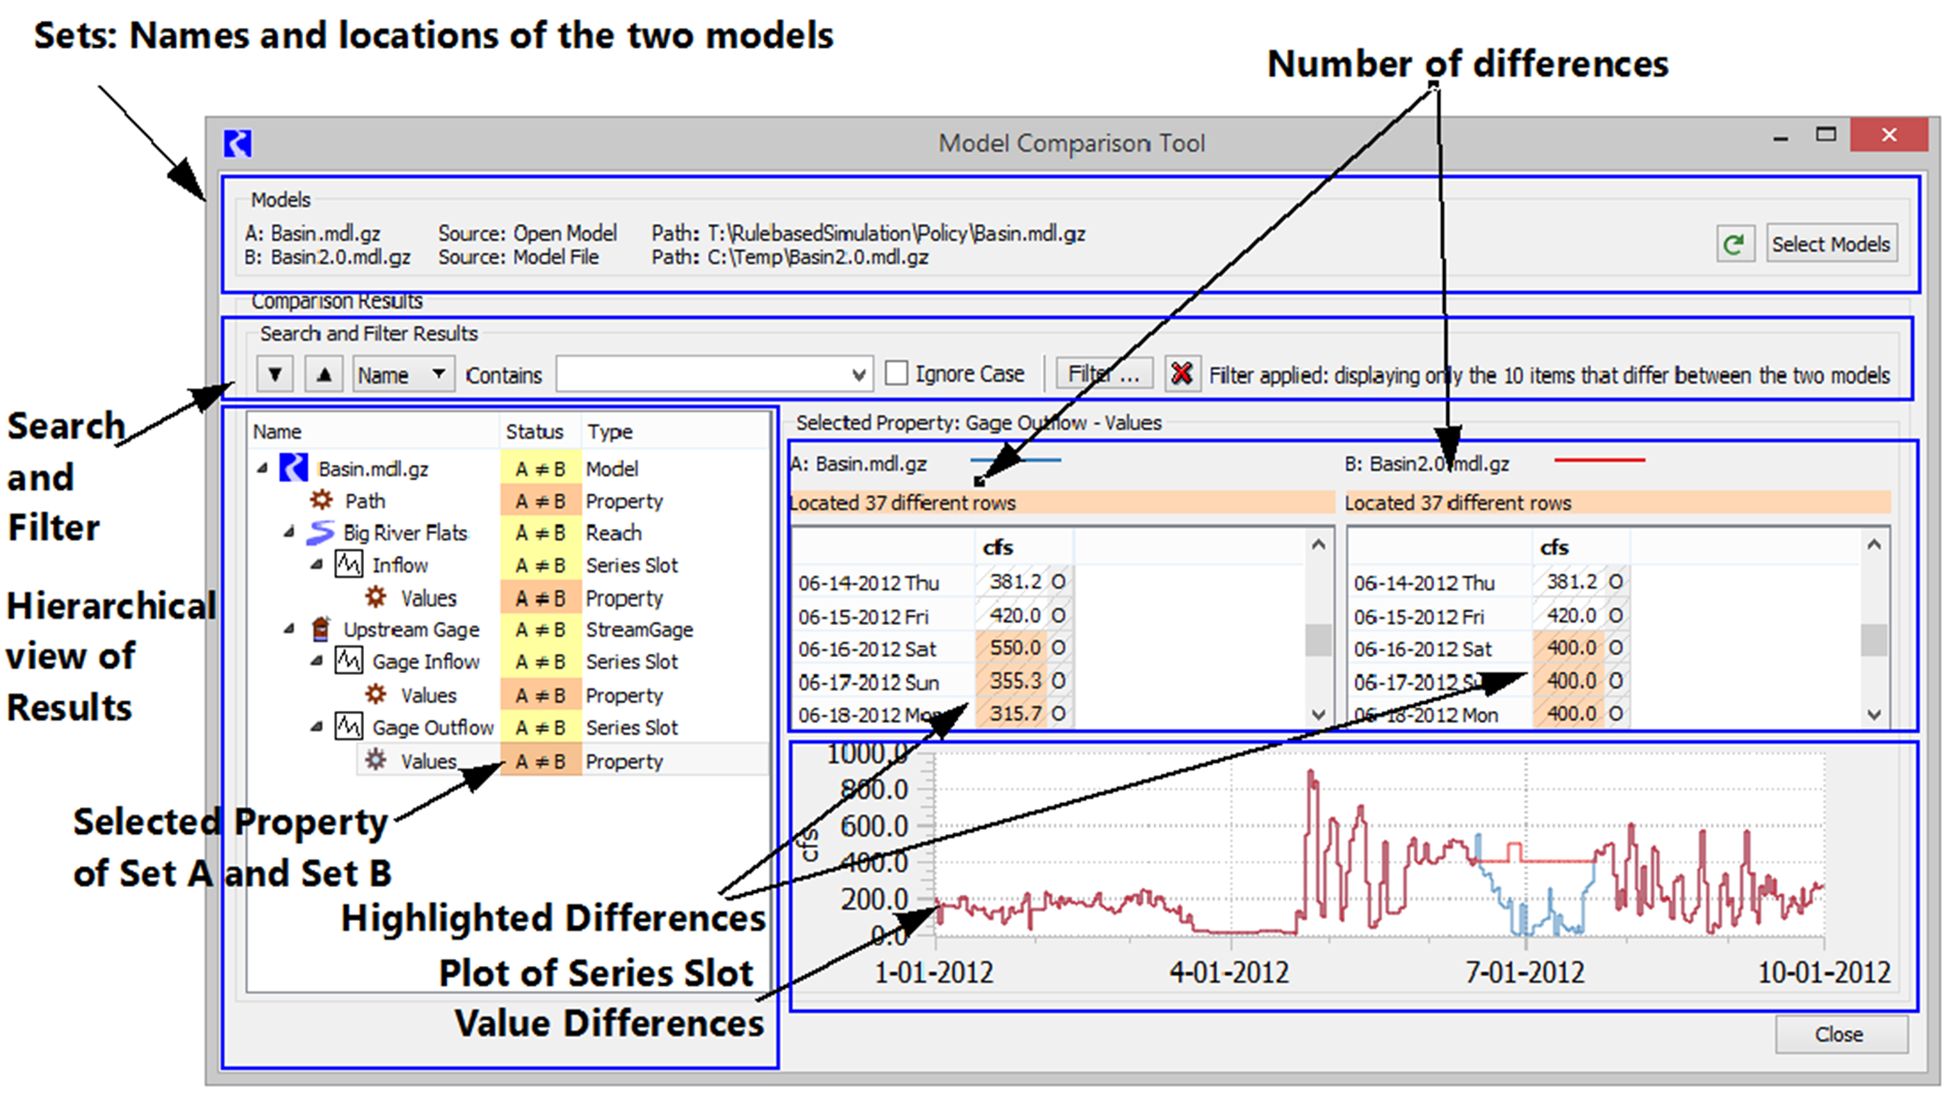
The Model Comparison Tool contains four main areas, as shown in Figure 2.3.
• The Models panel shows the names, sources and paths of the selected models.
• The hierarchical view of results area shows the comparison results. This shows where there are differences between the two models.
• The Search and Filter tools allows for searching and filtering of the results.
• The Selected Property panel shows the property (if any) for the currently selected item in the comparison results view. This shows the differences are highlighted in orange.
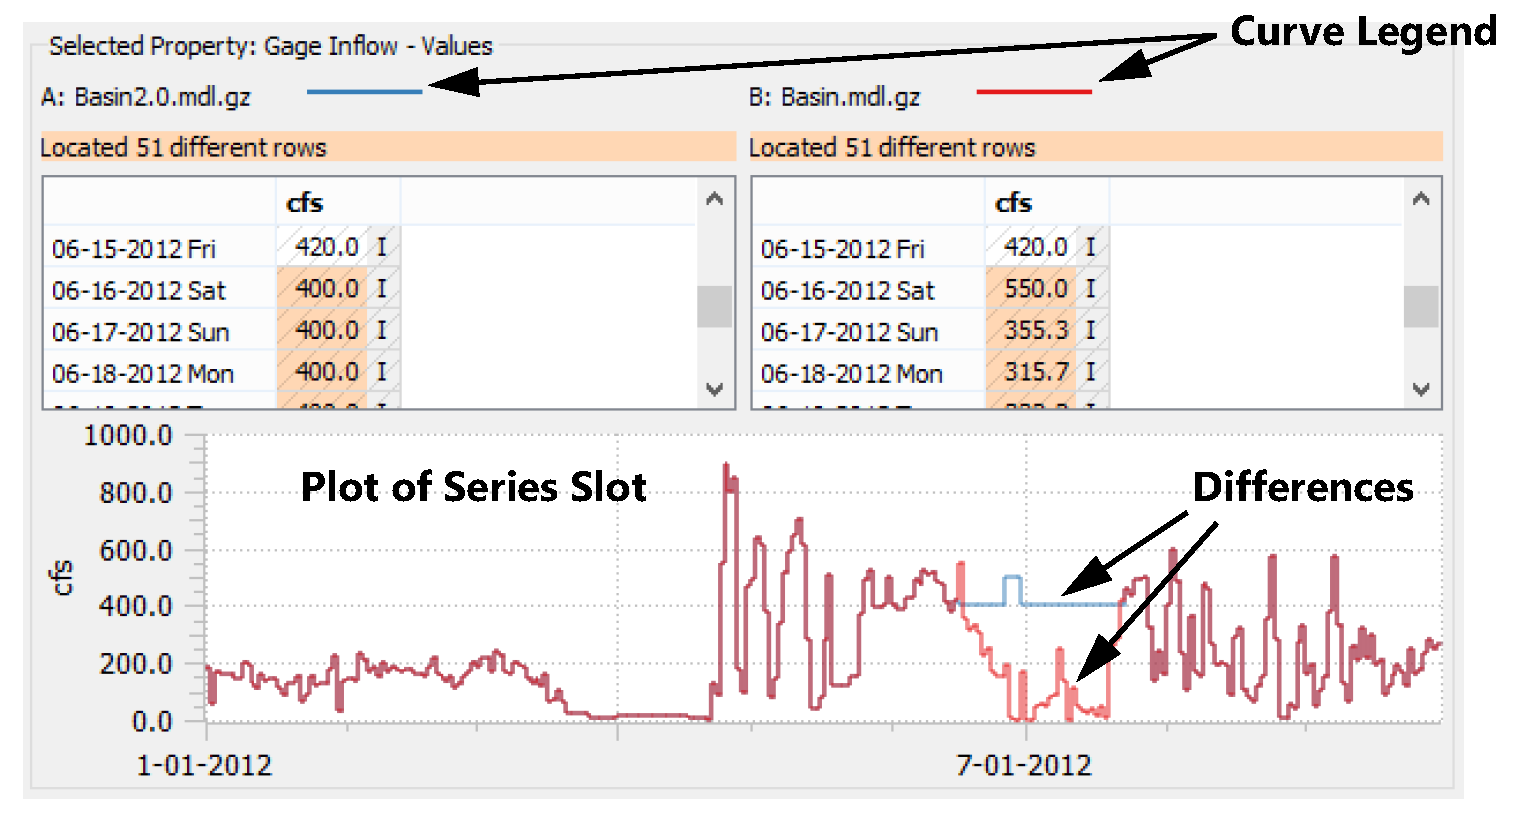
• When a series slot’s values are selected, a plot is also shown. Data from Model A is shown with a blue line, while model B data is shown in red. A legend above the data reinforces the color usage.
Figure 2.3 Screenshot of the Model Comparison Tool showing the main areas of the tool.
The following sections describe these areas and how to use the tool.
Models Panel
The Models panel shows information about the models that were compared, including, for each model, the name (usually the file name), the source (i.e., whether it was the currently opened model or read from a file), and the full file system path. Use the Select Models button to choose different models and initiate another comparison. This opens the Models to Compare dialog; see “Selecting Models to Compare”.
Recompute the differences between the two models by clicking on the green circular arrow.  This is useful if you make changes to Model A or B.
This is useful if you make changes to Model A or B. Note: When the models are selected, the Model Comparison Tool compares the specified models. See “How the Model Comparison Tool Works” for details. If you make changes to one of the chosen models, it is not immediately reflected in the comparison tool. Use the Recompute Differences button  to update the status in the tool.
to update the status in the tool. Comparison Results Panel
The Comparison Results panel shows a hierarchical view of the results of the comparison. The hierarchy is based on the structures of the two model. For example, objects contain slots as children entities. Aggregate objects have object elements as their children. Objects and slots are listed in alphabetical order within the hierarchy level.
Double-clicking an object or slot item will open the appropriate dialog to view the version of that entity, if one of the models compared was the open model.
Columns include the Name, Status and Type. The Model, Objects, and Slots show their particular icon. The Status column shows the results of the comparison. Table 2.3 lists the possible status values and their meanings.
Status | Meaning |
|---|---|
A = B | The item is identical in Models A and B. |
A ≠ B | The item is different in Models A and B. |
A | The item exists in model A but not in Model B. |
B | The item exists in Model B but not in Model A. |
A --> | The item exists here in Model A and elsewhere in Model B and/or the item has been renamed. |
<-- B | The item exists here is Model B and elsewhere in Model A and/or the item has been renamed. |
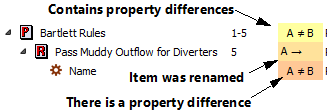
The Type column lists the type of that row: either a Model, Simulation Object (type of object), Type of Slot, Account, DMI item, RPL item or property. The comparison tool ultimately compares Properties of the items, not the items themselves. In the Status column, the color indicates the following meaning. This is also shown in Figure 2.4:
• Yellow indicates that the item contains properties and that within the item there are differences in properties.
• A light orange shading indicates the item’s Name property has changed; that is, the item has been renamed. When an item has been renamed (not copied/pasted or moved), the item will show up twice in the list, once with the name used in model A (the status shows “A ->”) and once with the name used in model B (the status shows “<- B”).
• The darker orange color indicates that the value of the property is different.
Figure 2.4 Legend for Status column colors
Search and Filter Tools
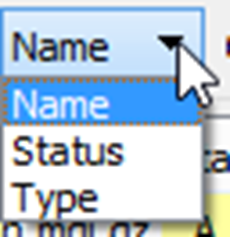
You can search, in either direction, for specific content in any of the three columns (Name, Status, or Type). Use the drop-down menu to specify in which column to search. Type a string into the search field.
Also, the filtering: users now have more powerful mechanisms for limiting the items displayed in the comparison results tree. Previously, there was a single filter control which allowed users to limit the display to items that were not the same in both models. A new filter dialog was created which contains this checkbox as well as controls for limiting displayed items to those with a specific name, comparison status, or type.
Table 2.4 describes the search and filter buttons in the Comparison Results panel.
Button | Text | Meaning |
|---|---|---|
 | Next Match | Select the next item that matches the search criteria. |
 | Previous Match | Select the previous item that matches the search criteria |
 | Search Column | Choose in which column you wish to search. |
 | Search Content | Type in the search criteria. Use the arrow menu to select previously entered items. |
 | Ignore Case | Check the box to ignore case when searching. When unchecked, case is considered. |
 | Filter... | Open a dialog where filters can be applied. This opens the Model Comparison Tool Display Filters dialog; see “Filter Settings” |
 | Cancel | Remove all filters. |
 | Filter Status | Text is shown noting that there are filters applied and the number of items shown. |
Filter Settings
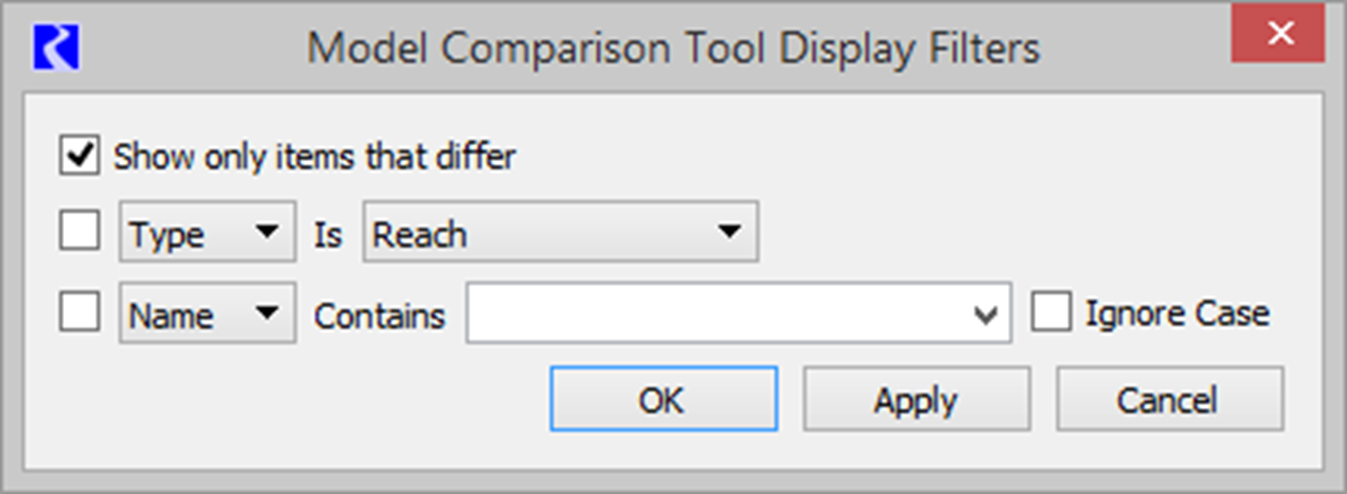
When displaying results for a large model, there can be many differences. Use the Filter button to set up filters to only see desired items. As shown in Figure 2.5, the following types of filters can be applied:
• Show only items that differ
• Two additional filters that can be configured. Options include
– Name: Filter on the Name column to only show results containing the specified text. Choose to Ignore Case if desired.
– Type: Filter on the Type column. The drop-down menu shows the Types that are available in the results.
When a filter is applied, the status in the Search and Filters status is updated. To remove a filter, select the red X.
Figure 2.5 Model Comparison Tool Display Filters
Selected Property
The Selected Property panel shows the values for the selected property where applicable. If a yellow row (Model, Object, Slot, etc.) is selected, a note is shown that “No Property Selected”. Only property values are shown in these views. When a Property row is selected, the panel shows the values for that property. Depending on which property is selected, its value will be displayed as text, a table of slot value, possibly including a plot, or as a RPL expression. For example, in Figure 2.6, there are differences in the Methods on Muddy reservoir. Selecting the Methods row shows the differences in the Selected Properties area. (This is a character by character comparison of the text, hence there are two differences identified.)
Figure 2.6 Model Comparison Tool results with Selected Property highlighted

Right-click the property values and choose Copy to copy the data to the system buffer. This works for both text differences and slot values. You can paste these to an email, document, or spreadsheet.
Plots
When Values for a series slot are selected, a plot is shown within the Selected Properties panel. The plot shows the entire set of data with two lines, one for each model. Model A data is shown in blue, while Model B data is shown in red. A legend is shown above the data. Figure 2.7 illustrates.
Right-click the plot area for options to Auto-Scale, Zoom, Move, Copy Plot Image, Export Image, or Print. Draw a rectangle on the plot to zoom in.
Figure 2.7 Model Comparison Results with a plot of numerical differences shown.
How the Model Comparison Tool Works
In RiverWare, only one model can be loaded at a time. To be able to compare two models, RiverWare must create in-memory representations of the two sets of data and values to be compared. If Model A is the opened model, then RiverWare needs to read Model B and then create representations of values that can be compared. To do so, RiverWare synchronously executes the following batch RiverWare process.
1. Loads the model file.
2. Creates a representation of the model.
3. Writes that representation to a file.
4. The original RiverWare instance then reads the file into memory.
5. It repeats the same steps for the other model, if necessary.
6. With both sets of information in memory, RiverWare can then compare the properties and values and present the results in the tool.
Note: Because of this process, comparing large models can take a long time to load the model, write a representation of the data, and then read that data back into RiverWare.
RiverWare Packages
A model and associated files can be grouped together and saved as a RiverWare package. These always contain a model file and can also contain ancillary files including the following:
• Rulesets
• Global Functions Sets
• Optimization Goal Sets
• System Control Tables (SCTs)
• Workspace Images
A package is used to group the files together into one file and compress them. This functionality is often used to share a set of files with other users. For example, you can package all the files used with a model and send them to a co-worker. The co-worker opens the package to create all the files in the destination directory and then RiverWare automatically opens them.
Packages are accessed through the Workspace File menu. The Save As Package and Open Package menus on the workspace File menu allow you to work with packages.
Saving a Package
Use the Save As Package menu to save a set of files together as a package. This opens the Save As RiverWare Package dialog where you specify the package file name. Use the  button to use a file chooser or type in a file path and name. Also, choose the components to include. By default, all available files will be checked.
button to use a file chooser or type in a file path and name. Also, choose the components to include. By default, all available files will be checked.
The model is not checkable and is always included in the package. This includes the model file and any RPL sets that have been configured to be saved into the model file itself. See “Save Location” in RiverWare Policy Language (RPL) for details on embedding sets in a model.
RPL sets (Rulesets, Goalsets, and Global Functions Sets) that are open and that have been saved as files will be listed as individual options for inclusion in the package. If a set has been created, but not saved to a file, you will get a warning message that the set must be saved to be available in the list.
SCTs that are open and that have been saved as files will be listed for inclusion in the package under the SCT category. You can individually select whether or not to include each SCT from the list. If an SCT has been created, but not saved to a file, you will get a warning message that the SCT must be saved to be available in the list.
If simulation, accounting, or geospatial images are used in the model, they are available as options for inclusion in the model package.
In creating the package, all selected files will be saved to a temporary directory for packaging, as shown in Figure 2.8. When packaging is completed, these files and the temporary directory will be deleted, leaving just the specified package file.
Figure 2.8

Note: Although not mandatory, CADSWES recommends using the .rwp extension to represent RiverWare packages.
If you have made changes to any of these items since they were last saved to files, the copies made for the package will include these changes, but the original files will not. You must save them in normal RiverWare operation to save the changes to the individual files. But, creating a package saves everything as it currently appears in the session without affecting any of the individual files on disk.
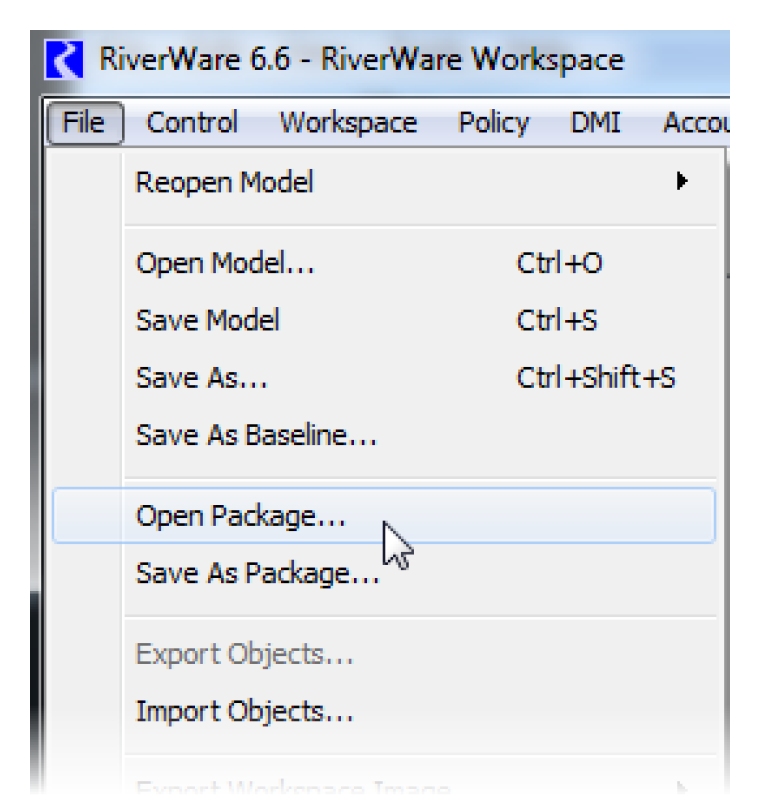
Opening a Package
Use the Open Package option in the workspace File menu to unpacks all the files and then open those files into the RiverWare session. This menu opens the Open RiverWare Package dialog, in which you specify the package file to open and a destination directory to which the files will be unpacked.
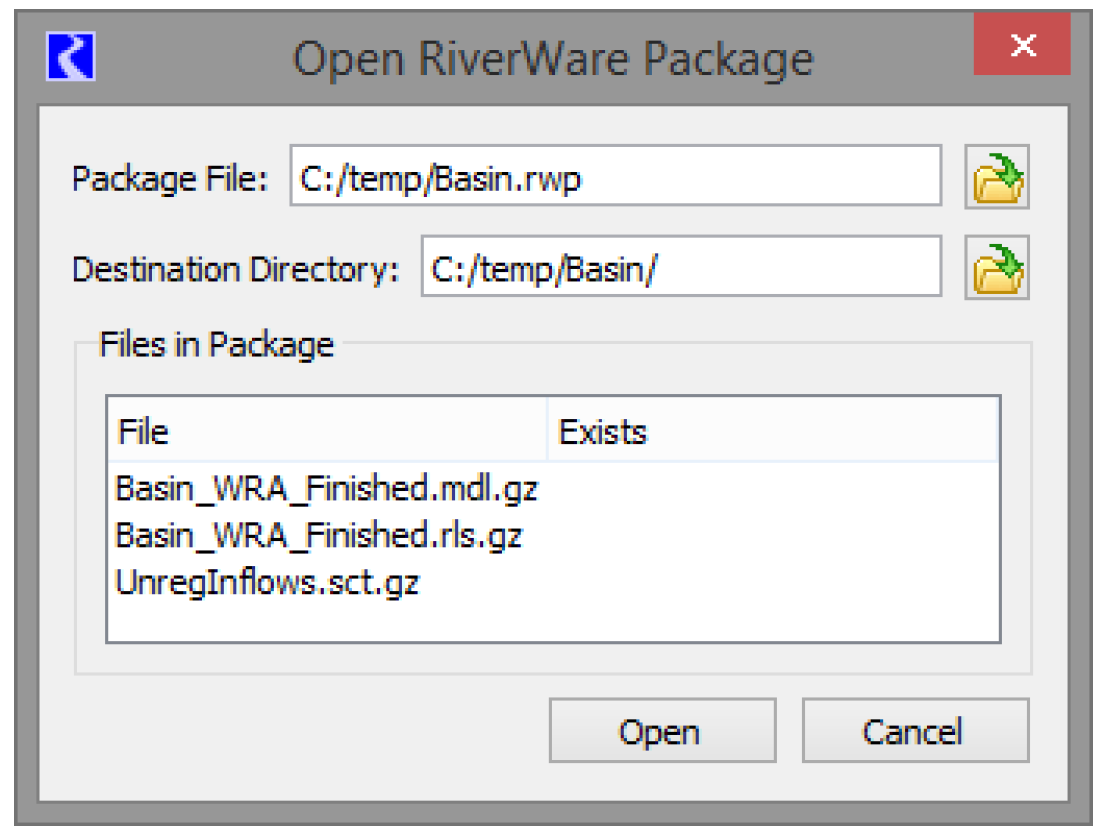
The package file can be chosen via a file chooser  or the name can be typed into the Package File line (environment variables are supported). Similarly, the directory where the files will be opened to can also be specified by selection or by typing.
or the name can be typed into the Package File line (environment variables are supported). Similarly, the directory where the files will be opened to can also be specified by selection or by typing. Once the package file is chosen, a default Destination Directory is shown, which consists of a subdirectory using the name of the package. Change the directory as desired.
The Files in Package list displays the names of the files that are in the package. If files corresponding to these names already exist in the specified Destination Directory, this will be indicated with Yes in the Exists column of the list. If any of the files currently exist, the message at the bottom appears warning that the existing files will be overwritten when opening the package.
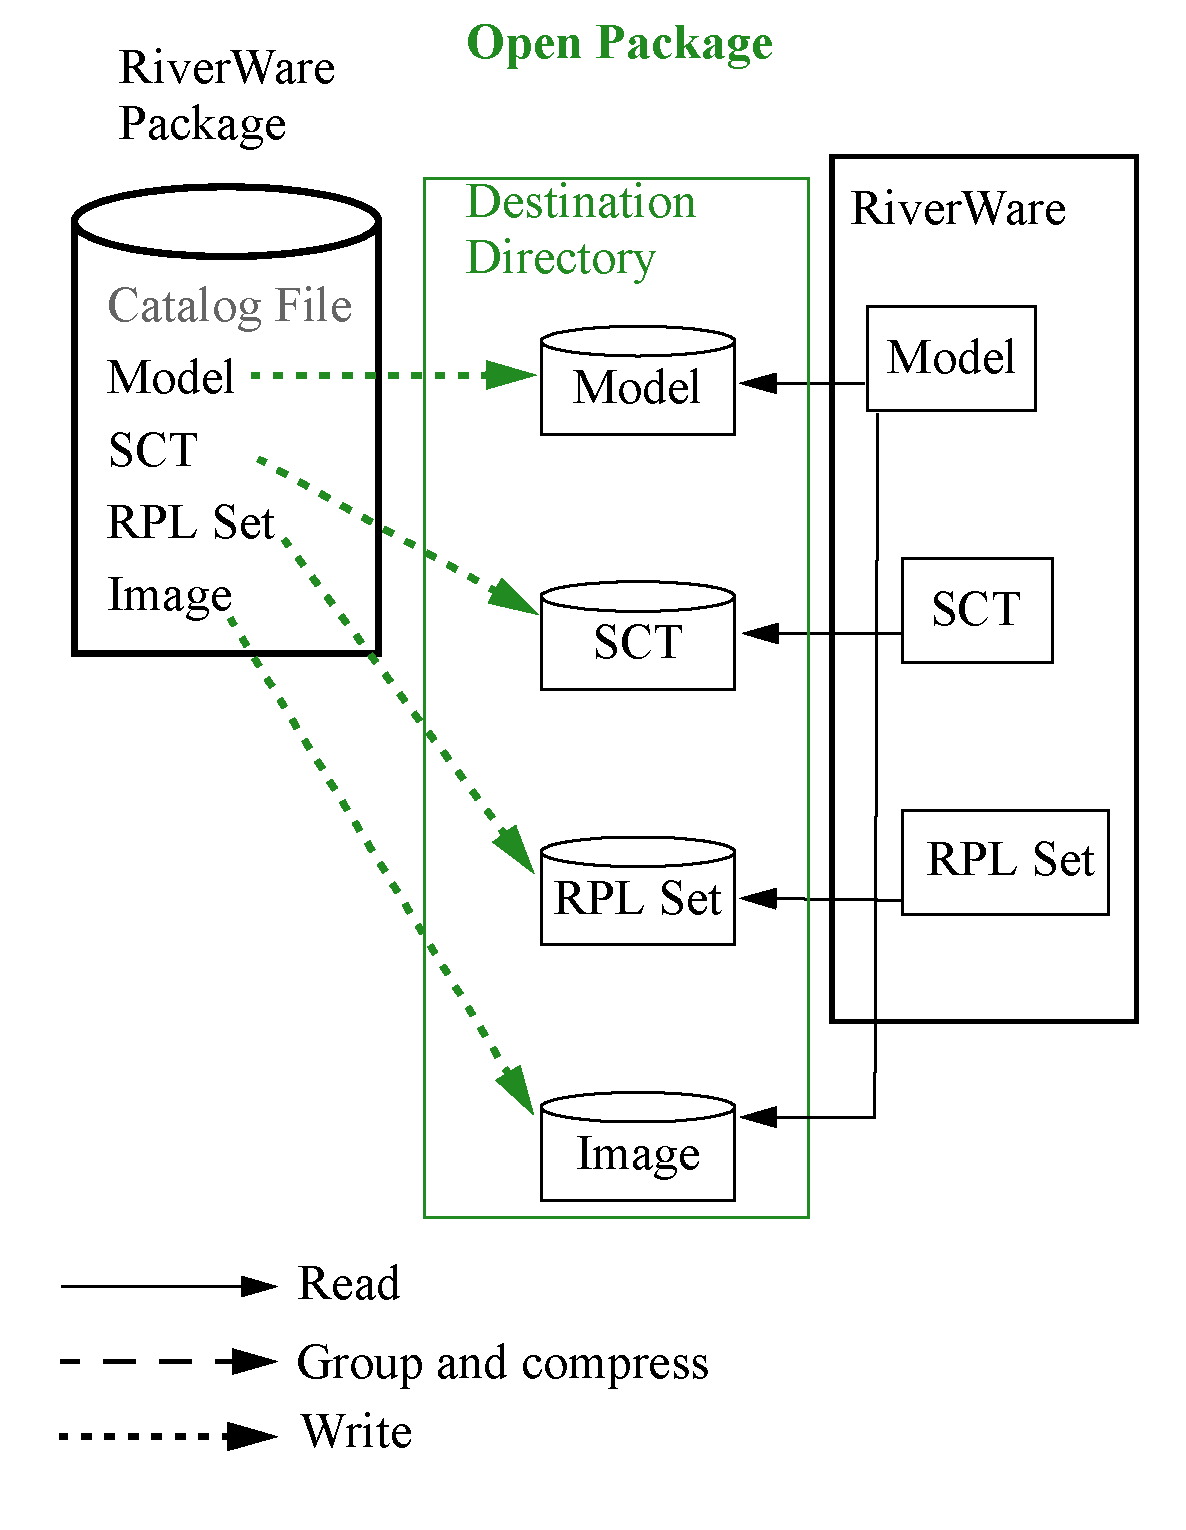
When the package is opened, files in the package will be extracted to the specified directory. The model file will be loaded, and RPL sets and SCT files will be opened. If a RPL set was loaded when the package was saved, it will be reloaded when the package is opened. The workspace images loaded with the model will now have the extracted image files as their source. Extracted files are persistent in their directory even after the RiverWare session is closed, so are just like any other set of RiverWare files. The files can be repackaged at any time into the same, or a different package file using the Save as Package functionality described above. See Figure 2.9.
Figure 2.9
Revised: 11/11/2019