
RPL Assignment Viewer
The RPL Assignment Viewer is a tool to inspect the history of RPL assignments made to a series slot at a specific timestep during the most recent run.
Unlike standard slot and SCT displays, which show only the final value, flag, and priority, the RPL Assignment Viewer displays every assignment that set the slot, in the order they occurred. The RPL Assignment Viewer helps you:
• Debug rule behavior
• Understand how a value was derived
• Trace rule execution order and priority effects
• Diagnose unexpected results
Overview
For a particular series slot on a timestep, view all assignments made. Each assignment includes:
• Value (with units)
• Flag set (e.g., R or Z)
• Priority
• Rule name
• RPL set name
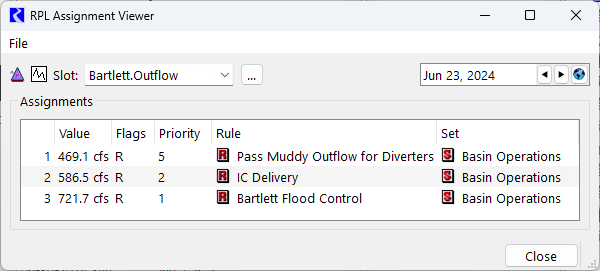
Assignments are listed chronologically, with the final value at the bottom. The following screen shot shows that Bartlett.Outflow was set three times on June 23, 2024, by rules 5, 2, and then 1.
Figure 4.6 RPL Assignment Viewer shown with three assignments
The viewer updates at the following times:
• After a simulation run
• When a run is paused
• When relevant data changes (e.g., slot renamed or deleted)
• At the start of each run, the previous assignment history is cleared automatically
The following are limitations to the tool:
• Only direct assignments by Rulebased Simulation and Initialization Rules are tracked.
• Assignments by Iterative MRM rules and other RPL sets are not tracked.
• Attempted assignments are not tracked or displayed.
• Only assignments to series slots are tracked.
• Tracking must be enabled before the run
• The tool cannot be included in layouts and multi-window setups
Accessing the Viewer
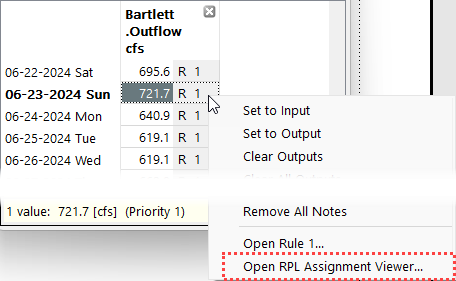
In slot windows, access the RPL Assignment Viewer using the right-click context menu to Open RPL Assignment Viewer. The tool is accessible from:
• Slot Viewer
• Open Slot window
• SCT (System Control Table)
• Account-related windows
Figure 4.7 Screen shot of using the context menu to open the RPL Assignment Viewer
It is also available from the workspace using the Policy and then RPL Assignment Viewer menu.
Enabling Assignment Tracking
Assignment tracking is optional. It is disabled by default to avoid performance impacts.
Note: When tracking is disabled, the viewer shows a banner indicating tracking is off. Use the gear button to open the Settings Manager where you can enable it, as described below.
Warning: Tracking assignments use additional memory and may slow simulation performance. Therefore, it is off by default. We recommend enabling it only when debugging or analyzing behavior.
To enable assignment tracking:
1. Open the Settings Manager from either the workspace gear icon or the File menu in the RPL Assignment Viewer.
2. Navigate to the RPL Parameters
3. Enable: Track RPL Assignments
4. Optionally, enable Save RPL Assignment Information in Model File to save the assignment information in the model file.
A screen shot of the settings is shown:

Also, clear stored assignment data at any time using the Clear Assignment Information button. This clears all assignment information in the model, after confirmation.
Operations
From the viewer, the following operations are available, as shown on the annotated screen shot:
Figure 4.8 Annotated screen shot showing operations on the RPL Assignment Viewer
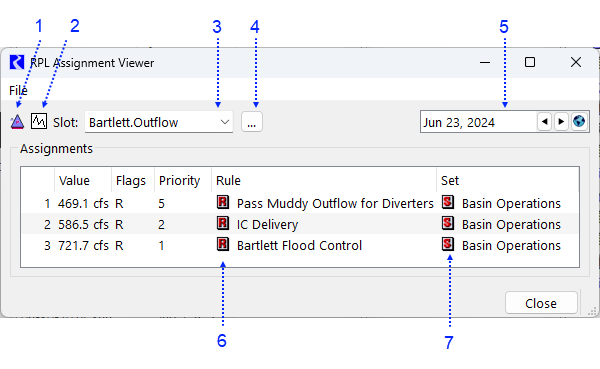
1. Open the Object
2. Open the Slot
3. Show previously viewed slots from the history list
4. Select a different slot using the Selector
5. Change the timestep shown using the datetime spinner and global time scroll
6. Open the rule by selecting the R icon
7. Open the RPL set by selecting the S icon
Not shown, when Accounting is enabled, open the account by selecting the Account icon between the Object and Slot Icon.
The File menu also provides five additional operations:
• Copy Selected Assignment as CSV: Copy the selected row as a comma separated values list. Paste it into Excel or other tools. See below for a sample format of the result in Excel.
• Copy All Assignments as CSV: Copy all assignment rows as a comma separated values list. Paste it into Excel or other tools. See below for a sample of the result in Excel.
• Refresh: Update the display.
• Settings Manager: Open the Settings Manger with the RPL Parameters page shown.
• Clear Assignment Information: Clear all assignment information in the model. A confirmation is presented.
Figure 4.9 Sample Output when Copied and Pasted in Excel (Delimited by commas and lightly edited)

Typical Work Flow
The following is a basic work flow to use the RPL Assignment Viewer:
1. Enable assignment tracking (if needed).
2. Run a simulation.
3. Open a slot or SCT.
4. Right-click the desired slot and timestep cell and then select Open RPL Assignment Viewer.
5. Analyze:
– Assignment sequence
– Rule priorities
– Value changes
6. Select desired rules to open them and see their logic.
Revised: 05/30/2026