
RPL Statements
Blocks are the upper-level construct of a RPL set. For example, rules and accounting methods are blocks. Blocks are made up of statements which are different structures depending on the desired result. See About RPL Sets for details
In the RPL set editor, open a block by double-clicking or right-clicking its icon. This will bring up the <block> Editor dialog. Rename the block by typing in a new name in the Name text field.
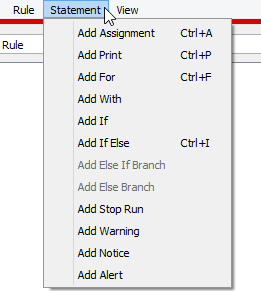
Blocks are constructed from statements at the top level, and statements are constructed from expressions. The following statements are available for RBS, Initialization and MRM rules and accounting methods. They can be selected from the Statement menu in the RPL Viewer or the individual rule or accounting method dialog.
Assignment
An assignment statement assigns to the slot on the left-hand side (LHS) of the equality the numeric value evaluated on the right-hand side (RHS) of the equality. The basic assignment is:
<numeric expr> = <numeric expr>
where the LHS <numeric expr> is a slot and the RHS <numeric expr> is any expression which evaluates to a value in the unit type of the LHS slot.
Note: RBS rules, MRM rules, and accounting methods can assign values on series slots only. Initialization Rules can assign values on series slots, table slots, scalar slots, and periodic slots; see How to Use Initialization Rules for details.
For
Iterative loops can be very useful for computations and multiple assignments. For loops are available to make multiple slot assignments from similar logic and calculations. An index variable is assigned a new value for each iteration of the loop. The inside of the loop is one or more regular assignment statements which should use the index variable to perform a different assignments for each iteration of the loop. This variable may be used in both the LHS slot assignment and the RHS evaluation to affect slightly different behavior within each pass. The default For loop is:
FOR (NUMERIC index IN <list expr>) DO
<numeric expr> = <numeric expr>
END FOR
where the number of loops/assignments is determined by the number of elements in the <list expr>, the NUMERIC label indicates the expression data type of the elements in the <list expr>, and the index is the variable name which will take on the value of each element for use inside the loop. All of these parts of the for statement may be modified.
Note: There is also a For expression on the palette; see Conditional and Iterative Operations Buttons for details.
With
A With statement evaluates an expression and sets the result to a local variable with the given name and type. It then evaluates the contained statements, which may reference the variable. The default WITH syntax is
WITH (NUMERIC val = <numeric expr>) DO
<numeric expr> = <numeric expr>
END WITH
Note: There is also a WITH expression on the palette; see Conditional and Iterative Operations Buttons for details.
If
An If statement makes a statement conditional on a boolean expression without an ELSE.
IF(<boolean expr>) THEN
<statement>
END IF
Note: There is also an IF expression on the palette; see Conditional and Iterative Operations Buttons for details.
If Else
An If Else statement makes a statement conditional on a boolean expression with an ELSE.
IF(<boolean expr>) THEN
<statement
ELSE
<statement>
END IF
Note: There is also a IF ELSE expression on the palette; see Conditional and Iterative Operations Buttons for details.
Else If Branch
Although not a statement by itself, you can add one or more ELSE IF branches to an IF or IF ELSE statement. The ELSE IF is available when the boolean condition or a consequence statement is selected (except when an ELSE consequence statement is selected). An ELSE IF branch is added after the selected branch.
IF(<boolean expr>) THEN
<statement>
ELSE IF(<boolean expr>) THEN
<statement>
END IF
Note: There is also a ELSE IF expression on the palette; see Conditional and Iterative Operations Buttons for details.
Else Branch
Although not a statement by itself, you can add a single ELSE branch to an IF Statement or ELSE IF statement. This part of the statement will be evaluated when none of the other IF or ELSE IF boolean conditions are true.
IF(<boolean expr>) THEN
<statement
ELSE
<statement>
END IF
Note: There is also a ELSE expression on the palette; see Conditional and Iterative Operations Buttons for details.
Print
A Print statement evaluates its expression and formats the result into a message. The blue message is displayed in the Diagnostics Output Window only when the Print Statements diagnostics group is enabled.
Print <expr>
where the <expr> is any expression or concatenated expressions which can be fully evaluated and represented as a string. See Print Statements in Debugging and Analysis for details.
Notice
A Notice statement posts a purple message to the Diagnostics Output Window regardless of diagnostics settings.
NOTICE <expr>
where the <expr> is any expression or concatenated expressions which can be fully evaluated and represented as a string. See Notice, Warning, and Alert Messages in Debugging and Analysis for details.
There is also a Notice expression on the palette; see Miscellaneous Buttons for details.
Warning
A Warning statement posts a message with a pink background to the Diagnostics Output Window regardless of diagnostics settings.
WARNING <expr>
where the <expr> is any expression or concatenated expressions which can be fully evaluated and represented as a string. See Notice, Warning, and Alert Messages in Debugging and Analysis for details.
There is also a Warning expression on the palette; see Miscellaneous Buttons for details.
Alert
An Alert statement posts a message with an orange background to the Diagnostics Output Window regardless of diagnostics settings.
ALERT <expr>
where the <expr> is any expression or concatenated expressions which can be fully evaluated and represented as a string. See Notice, Warning, and Alert Messages in Debugging and Analysis for details.
Note: The Notice, Warning and Alert statements all have the same behavior. They simply post messages with different colors. This allows you to define messages with three different levels of severity.
There is also an Alert expression on the palette; see Miscellaneous Buttons for details.
Stop Run
A Stop Run statement aborts the run and posts the provided message as a diagnostic error message in red text. When executed from within an iterative MRM rule, this statement aborts the MRM run.
STOP RUN <expr>
where the <expr> is any expression or concatenated expressions which can be fully evaluated and represented as a string. See Stop Run Statements in Debugging and Analysis for details.
Execute Script
Available for Iterative MRM Rules only, an Execute Script statement executes the named script.
Caution: This statement should be used with extreme caution as scripts can modify many parts of your model.
EXECUTE SCRIPT <string expr>
where <string expr> is the name of the script to be executed. See Script Management in Automation Tools for details about scripts.
Set Column
For a periodic or table slot, set the column label value. This statement is only available within Initialization rules, see Initialization Rules Set for more information. Next, the statement can be used to set:
• Periodic slots numeric column headers. See Numeric Headers in User Interface for more information.
• Periodic and table slot column labels.
The syntax is:
SET <slot expr> COLUMN <numeric expr> TO <expr>
The first <slot> is the periodic slot to set. The first <numeric> is the zero-based index of the column to set. The second <numeric> is the value to set. If you are setting a NUMERIC heading, the units must match the units of the numeric column headers. For example:
SET DataObject.PeriodicSlot COLUMN 2.0 TO 1000 “cfs”
When this statement sets values, the columns in the slot may rearrange as the column headers are always increasing.
The last <expr> can also be a STRING expression to modify the column label.
SET DataObject.Tablelot COLUMN 2.0 TO “Minimum”
Like other statements, the setting of the values are done at the end of the rule after all statements have been evaluated. All references to column indices by the Set Column statement should reference the periodic slot before the rule executed. Use of a FOR statement to loop over a set of columns is allowed, but you cannot use intermediate results in later parts of the loop; always refer to the slot as it exists at the start of the rule.
Set Row
For a periodic slot, set a row header datetime value. See Periodic Slots in User Interface for more information. This statement is only available within Initialization rules, See Initialization Rules Set for more information.
The syntax is:
SET <slot expr> ROW <expr> TO <datetime expr>
The <slot expr> is the periodic slot to set. The first <expr> is either the zero-based index of the row to set or the datetime of the row to set. The <datetime expr> is the value to set. For example:
SET DataObject.PeriodicSlot ROW 2.0 TO @“January 21”
SET DataObject.PeriodicSlot ROW @“23:00 January 23” TO @“24:00 January 30”
The datetimes are typically partially specified datetimes and should match the components used in the periodic slot.
Note: RPL uses 24:00 as the end of a day while irregular periodic slots use 0:00 on the start of the next day. For example 24:00 April 30 in RPL is the same as 0:00 May 1 on a periodic slot row. When writing RPL logic, continue to use 24:00 notation but realize this will map to 0:00 on irregular periodic slots.
When this statement sets values, the rows in the slot may rearrange as the row headers are always increasing.
Like other statements, the setting of the values are done at the end of the rule after all statements have been evaluated. All references to row indices by the Set Row statement should reference the periodic slot before the rule executed. Use a FOR statement to loop over a set of rows is allowed, but you cannot use intermediate results in later parts of the loop; always refer to the slot as it exists at the start of the rule.
Revised: 01/11/2023