
General RiverWare
Multi-Object Method Selector
Before the Multi-Object Method Selector dialog box was available, a user had to select engineering methods for each object individually, using the Open Object dialog for each separate object. If a new RiverWare release brought a new engineering method to the Slope Power Reservoir simulation object, for example, a user would have to select this new method on each Slope Power Reservoir object in an existing model. For large models, this could be a tedious and time-consuming task. The purpose of the Multi-Object Method Selector is to allow the user to set a current engineering method for a potentially large group of objects from a single dialog.
This task is complicated by the fact that all objects of the same type do not necessarily have the same engineering methods or method categories available. So, for example, it is not always possible for a user to select a given method on all Level Power Reservoirs. The currently selected engineering methods on an object determine the currently available methods and method categories.
To overcome these difficulties, this dialog indicates which objects have a given method category available and therefore which objects will need to be re-configured in order to make the given category available. The dialog similarly indicates which engineering methods are available on each object for a given category. Once an engineering category and method is selected, the dialog only changes the engineering method on objects which have the desired category and method available.
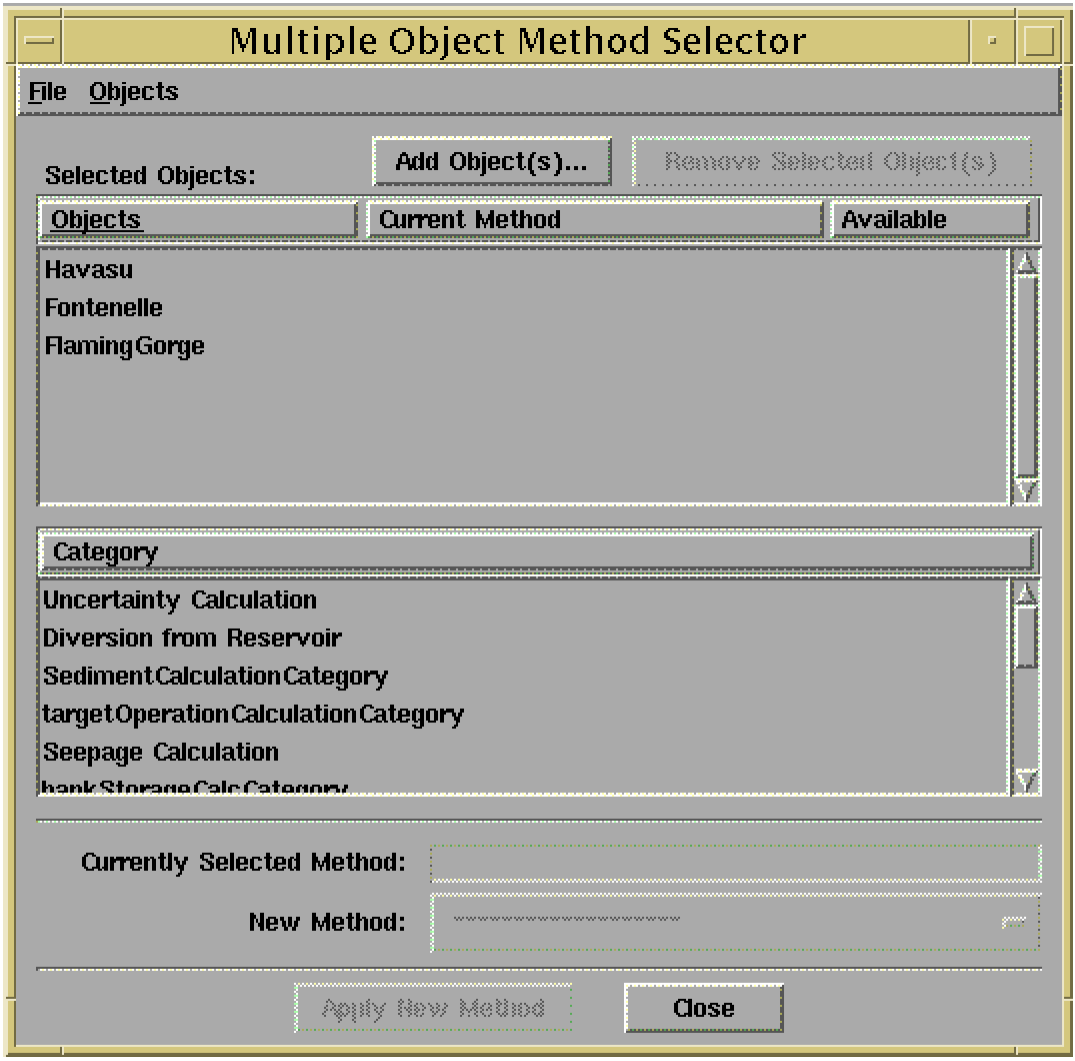
• Open the Multi-Object Method Selector from the main RiverWare menu: “Workspace” -> “Objects” -> “Select Methods on Objects...”
• Add objects to the object list by pressing “Add Objects...” then select objects in the object selector and press “Apply.”
• Select a category from the category list.
• Verify that the category is available on all desired objects by inspecting the “Current Method” column in the object list.
• Select a new method using the “New Method” option menu.
• Verify that the selected method is available on all desired objects by inspecting the “Available” column in the object list.
• Apply the new method to all the objects by pressing the “Apply New Method” button.
• Verify that the objects listed in the confirmation dialog are the objects you intend to affect, and press “OK.”
This is just a general description of how the dialog is used. If you need more detailed user instructions, contact CADASWES.
DMI Importing
Importing with New Start Date After Existing End Date
Prior to this release, if a DMI was importing data into a Series Slot, and the new Start Date for the slot was later than the existing End Date on the slot, the import would abort unless both a new Start Date and End Date were specified. In the RiverWare 4.1 release, it is only necessary to specify a new Start Date for the slot. When this happens, RiverWare moves the Start Date ahead to the new date and then resizes the slot based on the amount of data being imported.
Importing to Aggregate Series Slots
The DMI input files for Agg Series slots now allow comments. Anything following a # symbol will be treated a comment and ignored. Also, blank lines are now ignored. However, all other white space is significant. For example, if the Agg Series slot has 10 columns and the input is:
1 2 3 4 5 6 7
8 9 10
this will result in an error because the end of the line after 7 means that you are trying to enter 7 values for one timestep and 3 values for the next timestep. Each row must be complete and represent a single timestep. A blank line is ignored now as if it was not there. Before, a blank line meant that the last row had been entered.
Command Line Options
A new command line option was added. The --log option is used to write all console output to a file. This is useful when running RiverWare in batch mode because all diagnostic output is written to the terminal/console window in that case. All of the command line options are explained by typing riverware --help.
Revised: 07/05/2022