
SCT
New Display Features
Optional Day and Year Dividers
The original release of SCT 2.0 supported optional automatic divider rows and columns for months and for weekends (between Friday & Saturday, and between Sunday & Monday). The new release also supports optional automatic divider rows and columns for days and years. Each of these four types of time dividers can be independently enabled or disabled, and can be shown with independently configurable colors.
To configure these options, select “View >> SCT Configuration ...” menu item, and operate these controls of the indicated tabbed panes:
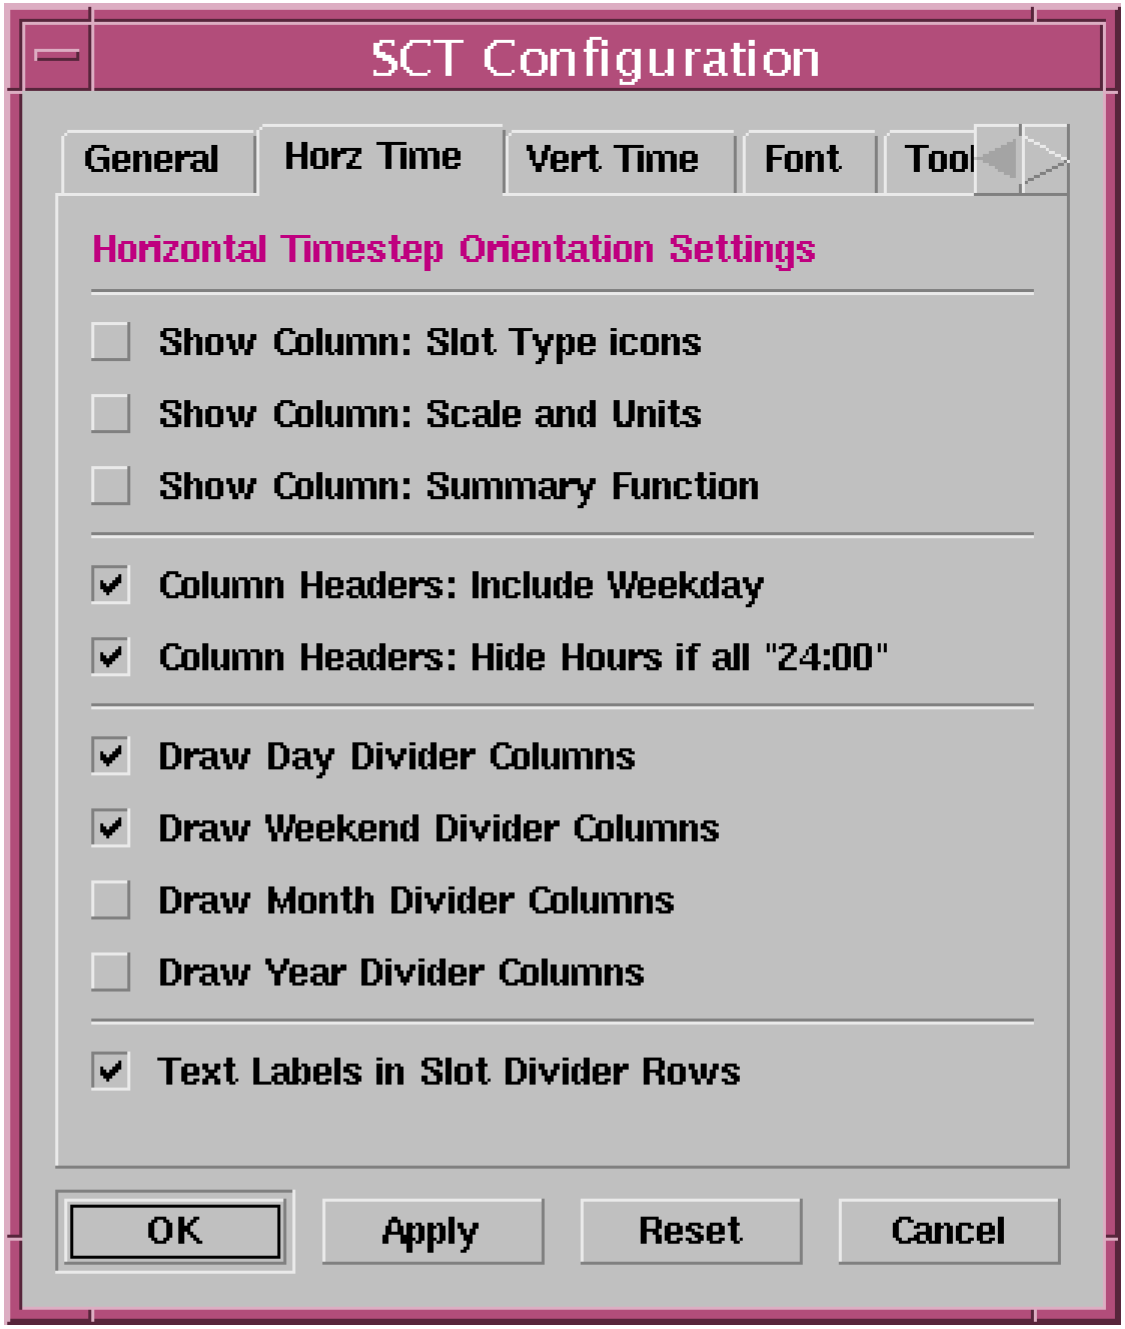
“Horz Time” tab (see image -->)
• [ ] Draw Day Divider Columns
• [ ] Draw Weekend Divider Columns
• [ ] Draw Month Divider Columns
• [ ] Draw Year Divider Columns
“Vert Time” tab
• [ ] Draw Day Divider Rows
• [ ] Draw Weekend Divider Rows
• [ ] Draw Month Divider Rows
• [ ] Draw Year Divider Rows
“Color” tab (press the buttons to pick a different color)
• [ ] Day Divider
• [ ] Weekend Divider
• [ ] Month Divider
• [ ] Year Divider
Textless, Thick-Line Slot Divider Option in Horizontal Timestep Axis Orientation
The user can insert “slot dividers” in between slot rows or slot columns. In horizontal timestep axis orientation (where slots correspond to rows), slot dividers were originally made tall enough for a single line of text. Now, there is an option to draw slot divider rows as only a thick colored line.
This option is selected for the whole SCT. That is, all slot divider rows (in horizontal timestep axis orientation) can be either tall enough for text labels, or can be drawn as only a thick horizontal line. This selection is made by the user in the “Horz Time” tab of the SCT Configuration dialog box with the following new toggle button:
• [ ] Text Labels in Slot Divider Rows
User Settable Fonts
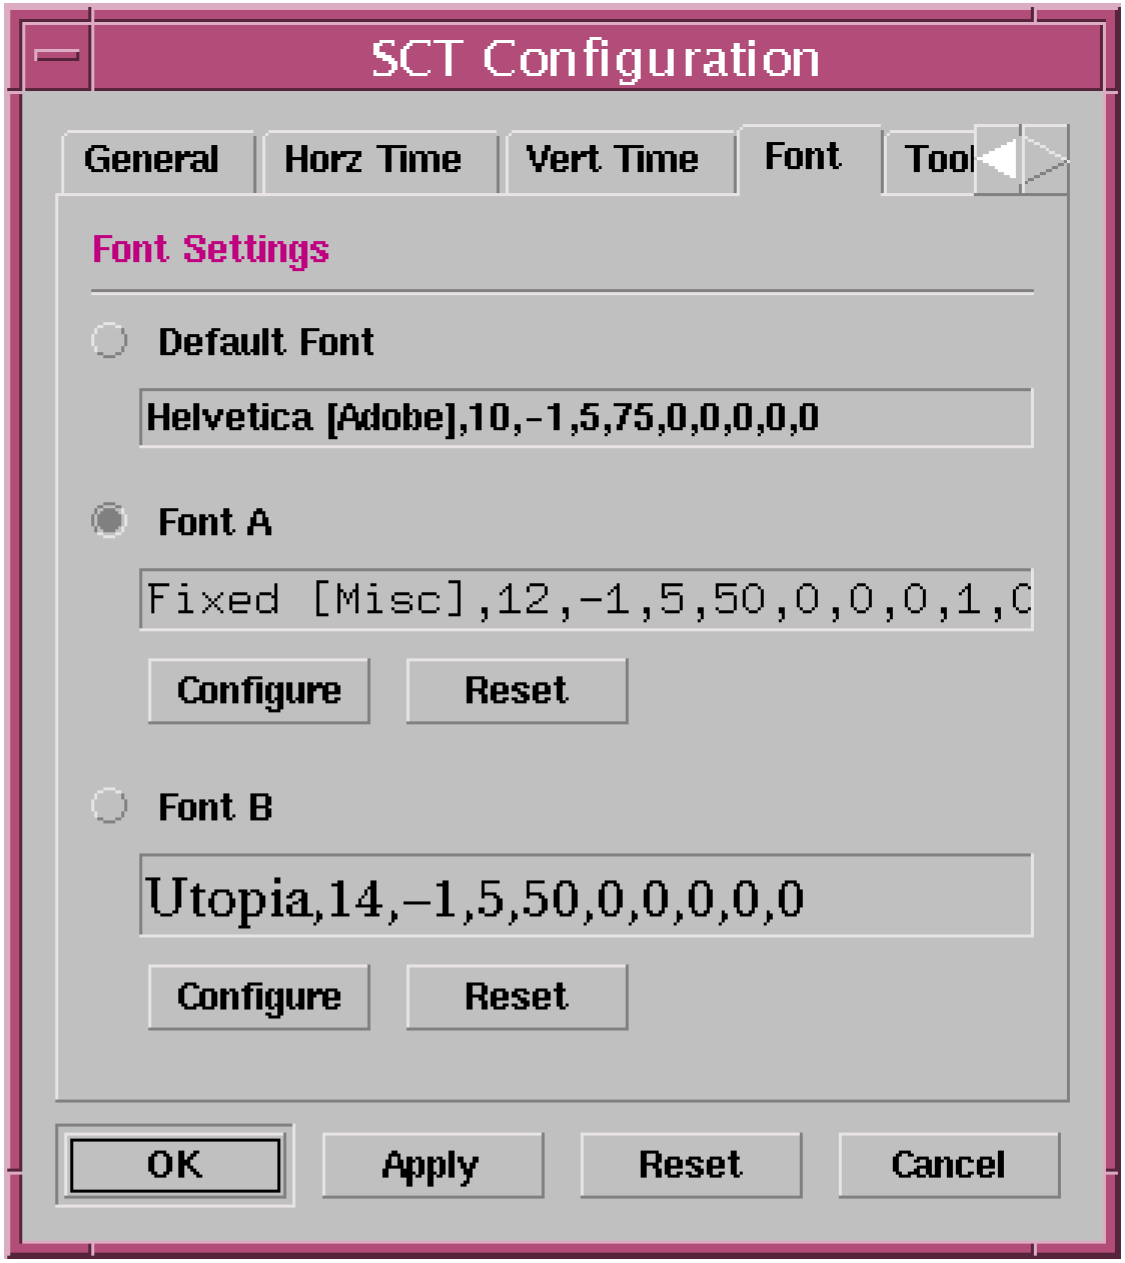
The user can choose the SCT’s font. Only one font can be displayed at any given time, and that font is used for both screen display and printing.
Two custom font specifications can be saved with each SCT, and with the default SCT configuration. The user can choose to use either of those two custom font specification, or the default font.
To choose between those three options (Default Font, Font A and Font B), and to configure the font specification for the latter two options, open up the SCT Configuration dialog box by selecting the “View >> SCT Configuration ...” menu item, and select the “Font” tab.
Select one of the three radio buttons to indicate the font specification to be used by the SCT.
Select either of the “Configure” pushbuttons to change the corresponding custom font specification. This brings up a font selector which allows the user to select a different font face (font family), font size, font weight (e.g. normal or bold), and other font properties.
Select either of the “Reset” buttons associated with either the Font A or Font B item to restore that font specification to the default font.
Applying a font specification to the SCT (with either the “OK” or “Apply” button) may take a moment to complete since the SCT’s geometry needs to be readjusted.
Selection Info Area: User Settable Background and Text Colors
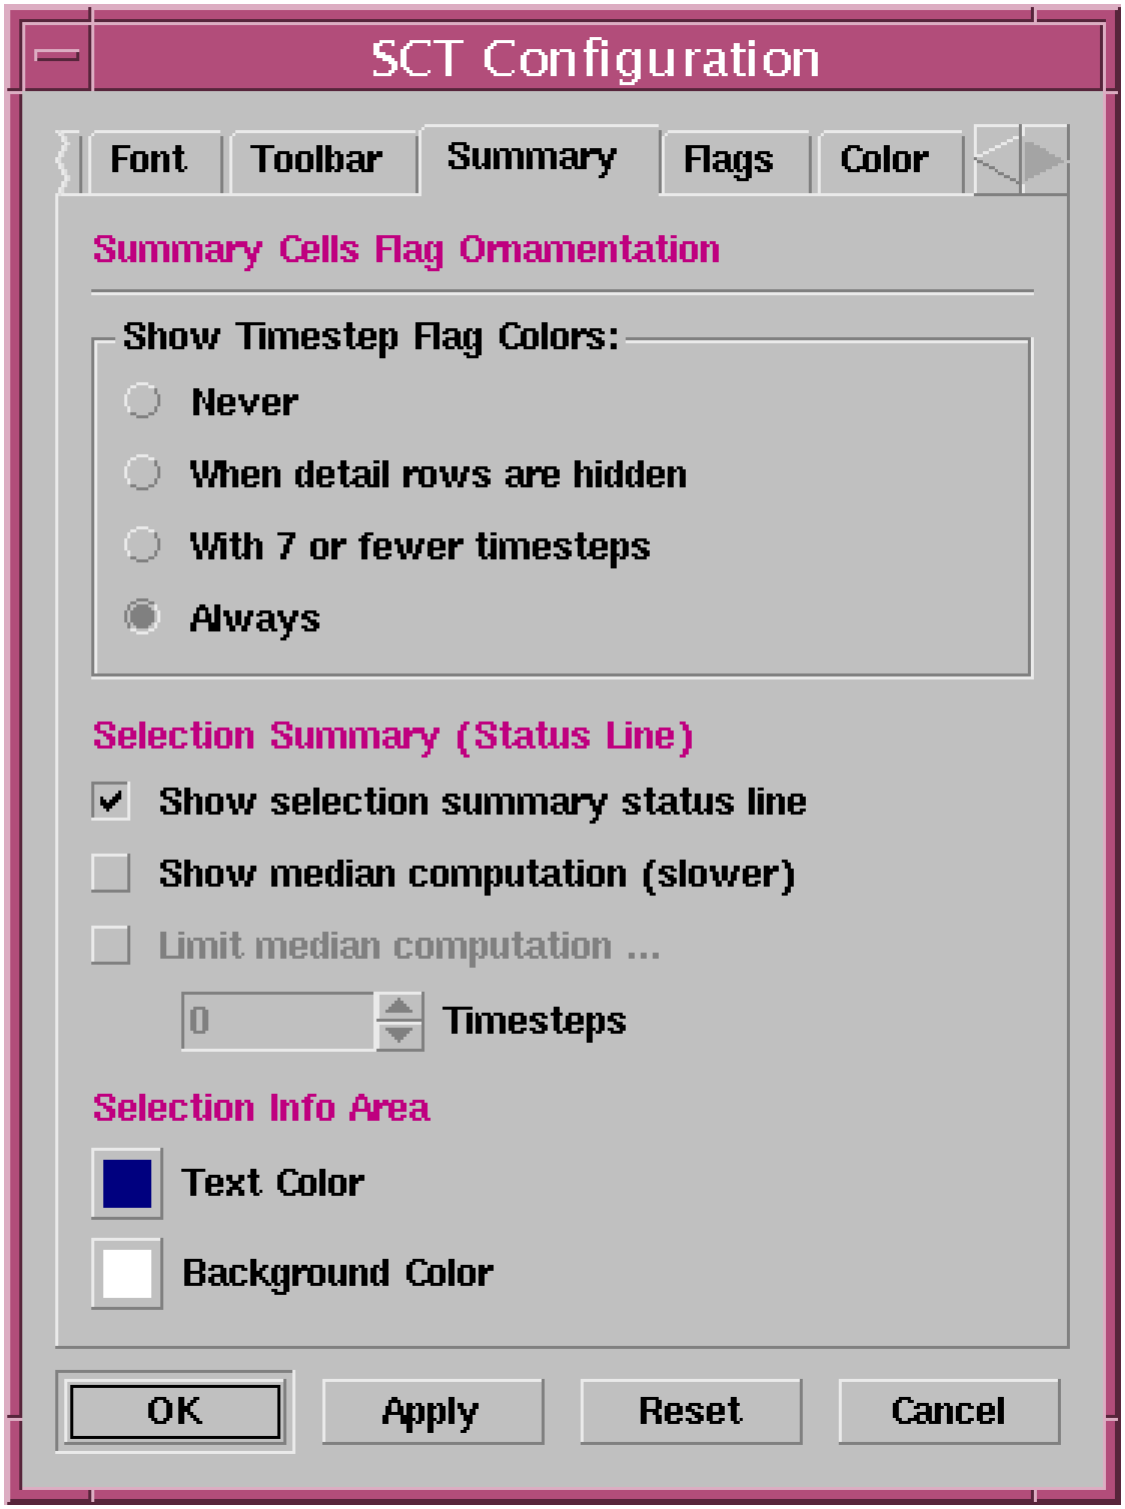
The user can now configure the colors for the Background and the Text displayed in the Selection Info Area at the bottom of the SCT. These colors are chosen from the “Summary” panel of SCT Configuration Dialog Box. Pressing either of these buttons brings up a Color Chooser:
Selection Info Area
• [ ] Text Color
• [ ] Background Color
See image to the right and in the next section.
Selection Info Area: Integrated Sums for “per-time” values (e.g. Flow)
When values of only one particular RATE ("per-time") unit type are selected, the "Integrated Sum" of those selected values is displayed, with an indication of the integrated unit type and unit (e.g. for "flow" values, the integrated unit type is "volume" -- and for “power” values, the integrated unit type is “energy”). See the image below.
This is important primarily for irregular timesteps (e.g. monthly) where the sum of various per-month rate quantities in differently-sized months isn’t well defined. The integrated value is also useful where the rate values’ display-unit time component differs from the timestep (e.g. cms values in a daily timestep model).
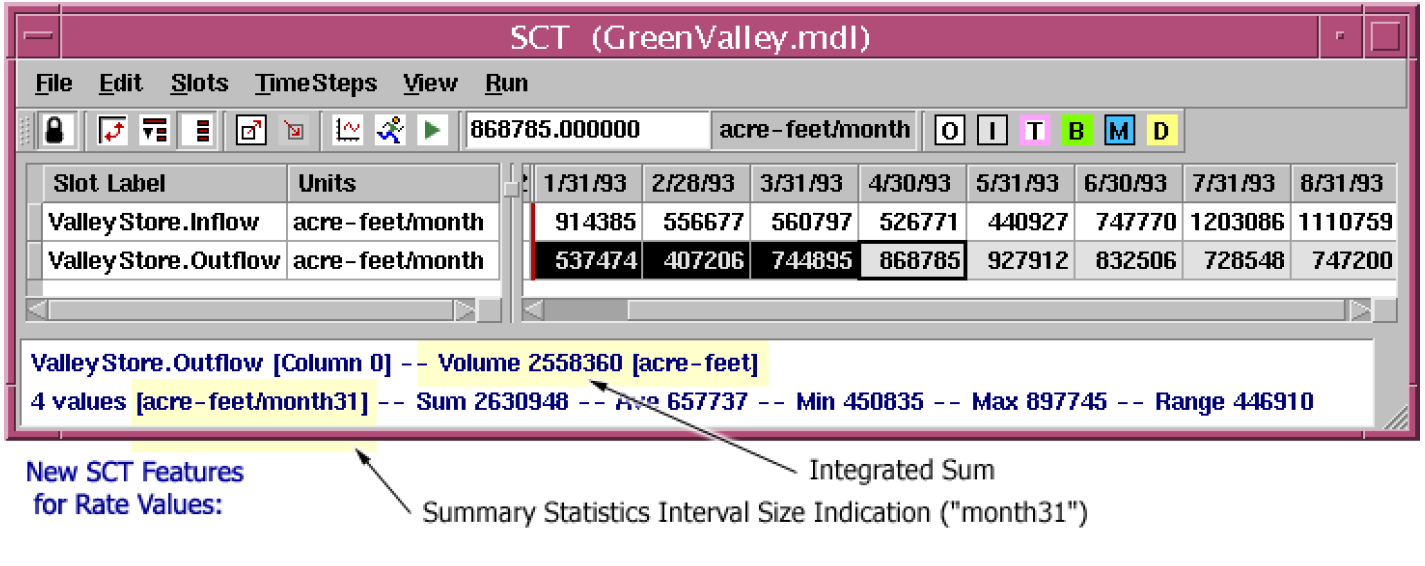
Selection Info Area: Interval size indication for irregular time units (e.g. monthly)
Apart from the Integrated Sum described in the previous section, the display of conventional summary statistics (e.g. average, minumum, maximum) of a selected set of irregular rate values is enhanced. All summary computations are done in well defined rate units (e.g. something per-second). But the user can choose to have rate values displayed in “per-month” or “per-year” values -- which are not generally well defined over multiple months or years. To address this ambiguity, the KIND of month or year which is used to convert the computed summary statistics is indicated in the Selection Info Area using the following nomenclature, (see also the image above):
... /month28
... /month29
... /month30
... /month31
... /year
... /yearL
The particular interval used for that conversion is based on the size of the earliest timestep in the selection.
Object Dispatching Ornamentation in Vertical Timestep Axis Orientation
To indicate that a slot’s object’s dispatching is disabled, the original release of SCT 2.0 supported a crosshatch ornamentation drawn on slot labels only in horizontal timestep axis orientation (where rows correspond to slots). There was no such ornamentation implemented for vertical timestep axis orientation (where columns correspond to slots). Now, in that orientation, the crosshatch for such slots (whose object’s dispatching is disabled) is drawn over the data cells, using the same user defined color for the object dispatching crosshatch. [The omission of this feature in the original SCT 2.0 release was documented as bug 3431].
New Editing Features
Changes to Target Operation Editing
1. Target Operation: No restriction on final timestep value for Setting a new Target Operation
The “Edit >> Target Operation” menu item and the Target Operation toolbar button used to be unavailable to the user (disabled) if the final timestep of the current cell selection didn’t have a defined numeric value. Now, the availability of that operation (to create a new Target Operation) is not dependent on the final timestep numeric value. Any Target Operation having an undefined (“NaN”) value in the final timestep will cause a model run failure, but the user is no longer prevented from creating it. The user must enter a value in that final timestep for the Target Operation to become valid. Note that selecting the final timestep cell of a defined Target Operation and entering a value will preserve the Target flag on that timestep.
2. Target Operation: Setting a Target Operation results in giving Keyboard Input Focus to the final selected timestep.
The typical way of defining a new Target Operation is to first select the range of timesteps within a Reservoir Storage or Pool Elevation Slot, and either select the “Edit >> Target Operation” menu item or press the Target Operation toolbar button. Before this feature was revised, the selection of that whole timestep range remained -- so any subsequent entry of digits caused every timestep within the new Target Operation to be assigned the entered value. This behavior was revised. Now, as a result of defining a new Target Operation, keyboard focus is forced to the final timestep in the selected range. Subsequent entry of digits causes the assignment of the entered number to only the final “target” timestep.
3. Target Operation: Copying of incompletely selected Target Operations
The original release of SCT 2.0 didn’t paste a Target Operation to the destination timesteps if the originally selected source (copied) timesteps didn’t include both the Target Begin and Target (End) timesteps. (But this limitation applies only to Target Operations that include a Target Begin timestep, and not those defined with only a Target [end] Flagged timestep).
With the revised SCT, if the copied region contains a Target (end) Flag, but not a corresponding Target Begin Flagged timesteps (and if this is a Target Operation which actually does have an explicit Target Begin Flag), then a Target Operation is defined in the destination (paste) timestep region, with the Target Begin Flag assigned to the earliest timestep in that destination timestep region.
Note that if a single timestep is selected as the destination region (for the paste operation), then that timestep is effectively the first timestep of an implied multiple-timestep destination region which is the same size as the original source (copied) timestep region. So, in the scenario described above, that single selected destination region would receive the Target Begin flag.
Other New Features
Open Slot Dialogs shown from the SCT
Open Slot dialog boxes for simulation slots (and not for accounting slots) can now be opened from the SCT. When one or more slots are selected, selecting the new “Slot >> Open Slots ...” menu item or the new Open Slots toolbar button (see the following image) the Open Slot dialog boxes for the selected slots are shown. If Open Object dialog boxes for those slots are already open (e.g. previously opened from the Open Object dialog box), then those existing Open Slot dialog boxes are raised.

As with most of the other toolbar buttons, the Open Slot toolbar button is optionally shown. To show or hide this new toolbar button, select the “View >> SCT Configuration ...” menu item and select the “Toolbar” tab. Select or deselect this toggle button:
[ ] Button: Open Slots
Window Size Persistence
When an SCT is saved and reloaded, its width and height are preserved. This is automatic -- no user operations or settings are required.
When the user saves the current SCT as the default SCT configuration (with “View >> Defaults >> Save Current Settings as Default”), the current size of the SCT becomes the default SCT size.
The default SCT configuration is used in these three situations:
when a new SCT is created;
when the user migrates an old SCT (1.0) to the new SCT;
when the user applies the default configuration to an SCT using “View >> Defaults >> Apply Default Settings”.
Printer Settings
The original release of the SCT 2.0 read and saved the printer selection and printer property choices with every print operation. These values are saved in the “user preferences” of the currently logged-in user account. This causes a problem for RiverWare users who are sharing a single Unix (Solaris) user account. Now, those values are read from the user account preferences only at RiverWare program startup, and are saved at RiverWare program exit (but only if the print operation was used during the session). This insures that a particular person’s print selections remain stable during a RiverWare session even if other users are operating RiverWare logged in under the same user account.
Optional Date/Time Spinner for Timestep Navigation
An optional Date/Time spinner was added to the SCT 2.0 Toolbar for navigating (automatically scrolling) to specified timesteps. This will be useful especially in models with many timesteps.
The Date/Time spinner can be shown or hidden by the user, depending on a setting in the SCT Configuration which is stored in SCT files. The low-level default is to SHOW the DateTime Spinner. (That default can be changed by hiding the DateTime Spinner in an SCT, and then saving that SCT configuration as the default configuration with "View >> Defaults >> Save Current Settings as Default").
To Show or Hide the DateTime spinner:
Select from the SCT menubar: "View >> SCT Configuration ..."
Select the "Toolbar" tab
Turn on or off the following toggle button: [X] Date Time Spinner
Select the [OK] or [Apply] buttons.
Entering a date in the Spinner, or operating the up and down buttons of the Date/Time spinner causes the SCT to be scrolled horizontally or vertically (depending on the timestep axis orientation) so that the indicated timestep is shown in the leftmost column or topmost row. An exception to this is when the indicated timestep is within the last "screen" of the time range, in which case the SCT is just scrolled to that last screen.
The Date/Time spinner’s up and down buttons change the indicated date/time by one timestep, even when the SCT is showing timestep aggregations. Since all the timesteps within an SCT timestep aggregation are shown within the same column (and row -- when details are hidden), the SCT will not always be scrolled as a result of clicking the spinner’s up and down buttons.
The "step" of the Date/Time spinner matches the Run Control timestep interval. The Date/Time spinner’s time range matches the SCT’s time range, which is the time range of Run Control PLUS the number of visible PRE-simulation and POST-simulation timesteps configured in the SCT.
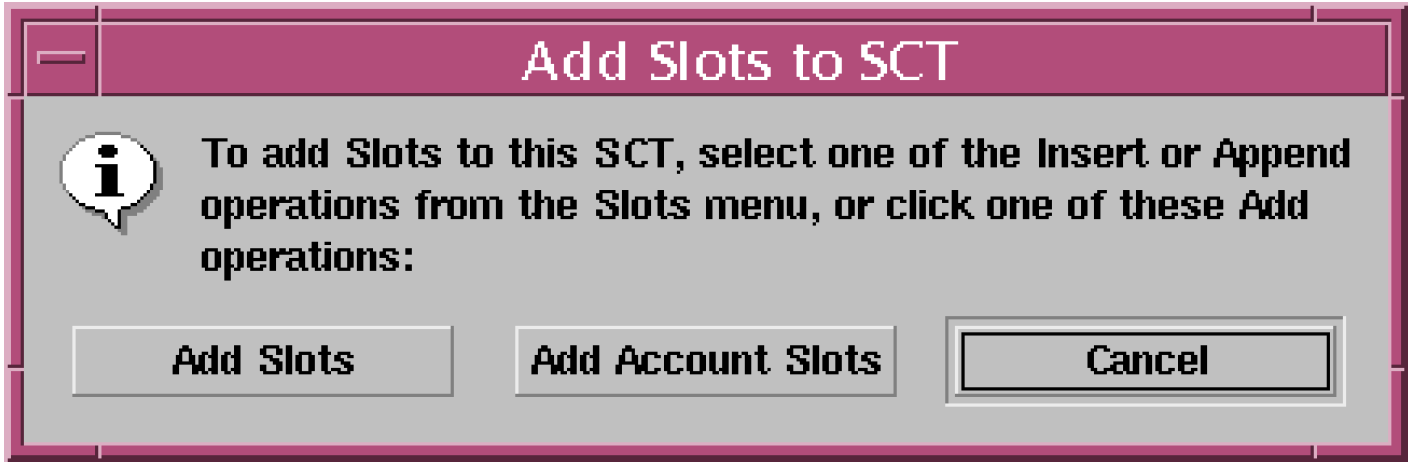
Opening a new SCT, prompt to Add Slots
When creating a new SCT, the message box illustrated below is presented to the user for easy initiation of Slot Selection to add Slots to the SCT. This occurs only if the Workspace is not empty (i.e. only if at least one Object exists).
SCT Bug Fixes
Selection Info Area: “Obscured Timesteps” Description on Summary Cells
The time range of certain Series Slots may extend beyond the time range of the SCT. When this occurs, a corner triangle ornament is shown in the upper left or lower right of the slots’s first or last timestep cell. Actually, this is shown on both summary cells and detail cells. When one of those cells is selected, a message is displayed in the SCT selection info area (at the bottom of the SCT) indicating the number of timesteps of the Slot which are not visible (i.e. the number of “obscured” timesteps).
There was a bug which sometimes prevented the display of that information in the selection info area when a summary cell was selected. This is now fixed.
Target Operation setting operation: Expand slot’s time series
Setting a Target Operation failed (had no effect) if the selected timestep cells extended before or after the time range of the slot. That time range is now expanded as needed.
SCT Configuration Dialog Box fixes
(A) The SCT Configuration dialog box has both an “OK” button and an “Apply” button which apply the user’s settings to the SCT. The “OK” button performs the “Apply” operation and dismisses the dialog box. There was a bug which sometimes prevented the “OK” button to apply changes if the “Apply” button had previously been operated. This is now fixed.
(B) Applying changes made in the SCT Configuration dialog box interfered with other changes to the SCT (e.g. swapping axis or changes to the timestep aggregation configuration) made when the SCT Configuration dialog box was already open. This is now fixed.
Selection Information Area: Read Only
The Selection Information Area at the bottom of the SCT had been editable by the user. That is now disabled, but the user can still copy text from that area by (1) selecting the desired text, (2) pressing the right mouse button over the selected text, and (3) clicking “Copy” from the context popup menu.
Saved “Lock” status not staying locked on loading an SCT from the Workspace.
The SCT supports a “Lock” toggle which allows certain aspects of the SCT configuration -- generally the set of slots represented in the SCT and the labels used for those slots -- to be unchangeable. With the original release of the SCT 2.0, an SCT opened from the RiverWare workspace always came up UN-locked, regardless of the lock status of the saved SCT. This is now fixed.
Retaining window scroll position after adding slots and other reconfigurations.
With the original release of the SCT 2.0, the action of adding or inserting slots, or performing many other reconfigurations caused the SCT to redisplay from the top-left corner.
Now for slot / slot divider insertion operations and most configuration change operations, the SCT scroll position is retained (measured in pixels from the top-left). An exception to this is the slot append operation, which causes the SCT to redisplay at the end of the slot list (either the last row or the last column, depending on the timestep axis orientation).
Target Operation: Invalid state possible when pasting a new target operation over an existing one.
Bug 3446. Under certain conditions, as a result of pasting a copied timesteps containing a target operation, it was possible for the Begin Target flag of an existing Target Operation to not be cleared when it should have been. This is now fixed.
Model name change not reflected in SCT window title.
Bug 3435. The SCT window title shows both the name of the SCT and the name of the currently loaded model. The latter was not being updated when the name of the loaded model (i.e. the name of the RiverWare workspace) was changed, e.g. after performing a “Model >> Save As ...” operation from the workspace window. This is now fixed.
Selecting OK in the Multiple Slot Selector does not always add the highlighted slots to the SCT.
Bug 3432. There were actually several bugs in the Multiple Slot Selector, including a related one which showed up in the Diagnostic Manager (See bug 3526 and 3533 in the bug reporting system -- not described in this document).
Disable Dispatching cross-hatching is not updated in the SCT when selected from the Model Run Analysis dialog.
Bug 3433. Before the SCT 2.0, the Model Run Analysis dialog was the only place from which the Object Dispatching Disabled state for an Object could be changed, so no system-wide notification was needed, and none was implemented. This has been added. So any change of this property on an Object made in any SCT or in the Model Run Analysis dialog now causes an update in the others displaying the respective Object.
Bad Timeslice copying: Paste as Input into TableSeriesSlots
Bug 3498. When copying a whole timestep range across all Slot Items in an SCT which includes Table Series Slots, the Paste As Input operation skipped every other target timestep. For example, for a Table Series Slot:
• Selected Values: 111 222 333 444
• Target Values: 111 (no change) 222 (no change)
Can’t see data in high precision in SCT
Bug 3512. The contents of the Toolbar Value Entry Field and the initial value displayed during an in-cell edit operation had been displayed always with six fractional decimal digits, regardless of the configured “precision” of the Slot containing the value. Now, the Slot’s precision is respected, but a minimum of six fractional decimal digits are displayed.
Slot name changes not handled properly.
The association between an SCT’s reference to a Slot and the actual Slot wasn’t being maintained when the Slot’s name changed. A Slot’s name can change in the following three ways:
The Slot’s containing Object is renamed by the user.
The Slot’s containing Account is renamed by the user.
For Slots on a Data Object, the Slot is renamed by the user.
The change of a Slot’s name doesn’t effect the displayed Slot item label, since the Slot label is only initialized from the Slot name. But the Slot List saved in SCT files, and the display of the actual Slot name in other parts of the SCT (e.g. in the Selection Info area) do need to use the actual current Slot name.
Revised: 06/04/2022