
User Interface Enhancements
RiverWare Workspace
Object and Link Display Groups
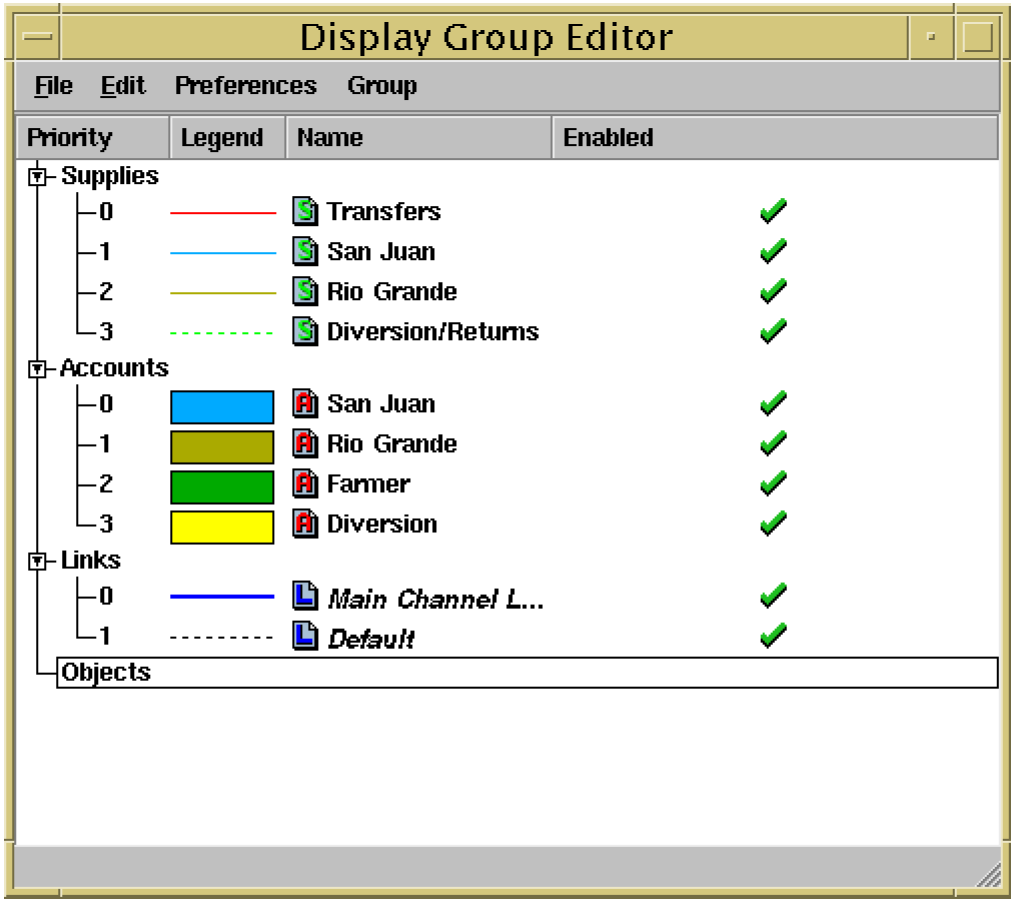
There is a new feature called the Display Group Editor that allows the user to change the appearance of the Objects, Links, Accounts, and Supplies on the workspace. A screen shot of the editor is shown below. These groups contain members that are chosen using the new selector dialog. The selector dialog, described below, can be used to filter by attributes. The user is then able to change the display for the entire group. For example, all main channel links can be colored while diversion and return flow links can be dotted grey. The groups are prioritized such that a higher priority (lower number) will override a lower priority if there are conflicts amongst group members. The groups can be disabled or enabled using the check mark on the right of the editor.
Time Scroll Option on Abort
On an aborted run, it is now possible to scroll all time-scrollable windows to the context time. If the run aborts, there is now a “Time Scroll” button on the RiverWare notice window. For example, if your model aborts on Jan. 1, 1985, the user can select to scroll all time windows, like the Open Slot dialog, SCT’s and the Plot window to this date. This saves the user time when debugging the model.
Show Workspace Option
A new option was added to the File menu of the Open Slot and Open Object dialog that allows the user to show the workspace. This is accessed from the File -> Show Workspace menu.
Close All Objects and Open Selected Objects
On the Workspace menu, there is now an option to close all Open Object and Open Slot dialogs. This is accessed from the Workspace->Objects and Workspace->Slots menus, respectively. The submenu for Slots in the Workspace menu is also new; it contains the following operations: Open Slot and Close All Slots.
New Sub menus in the Policy Menu
Two new submenus were added to the Policy menu on the workspace: “Open Expression Slot RPL Set” and “Accounting Methods.” This allows users to access each of the different RPL sets from one menu.
Open Object Dialog
It is now possible to copy a slot and paste it to a data object. This action is performed from the Slot menu on the open Object dialog.
New Open Slot Dialog
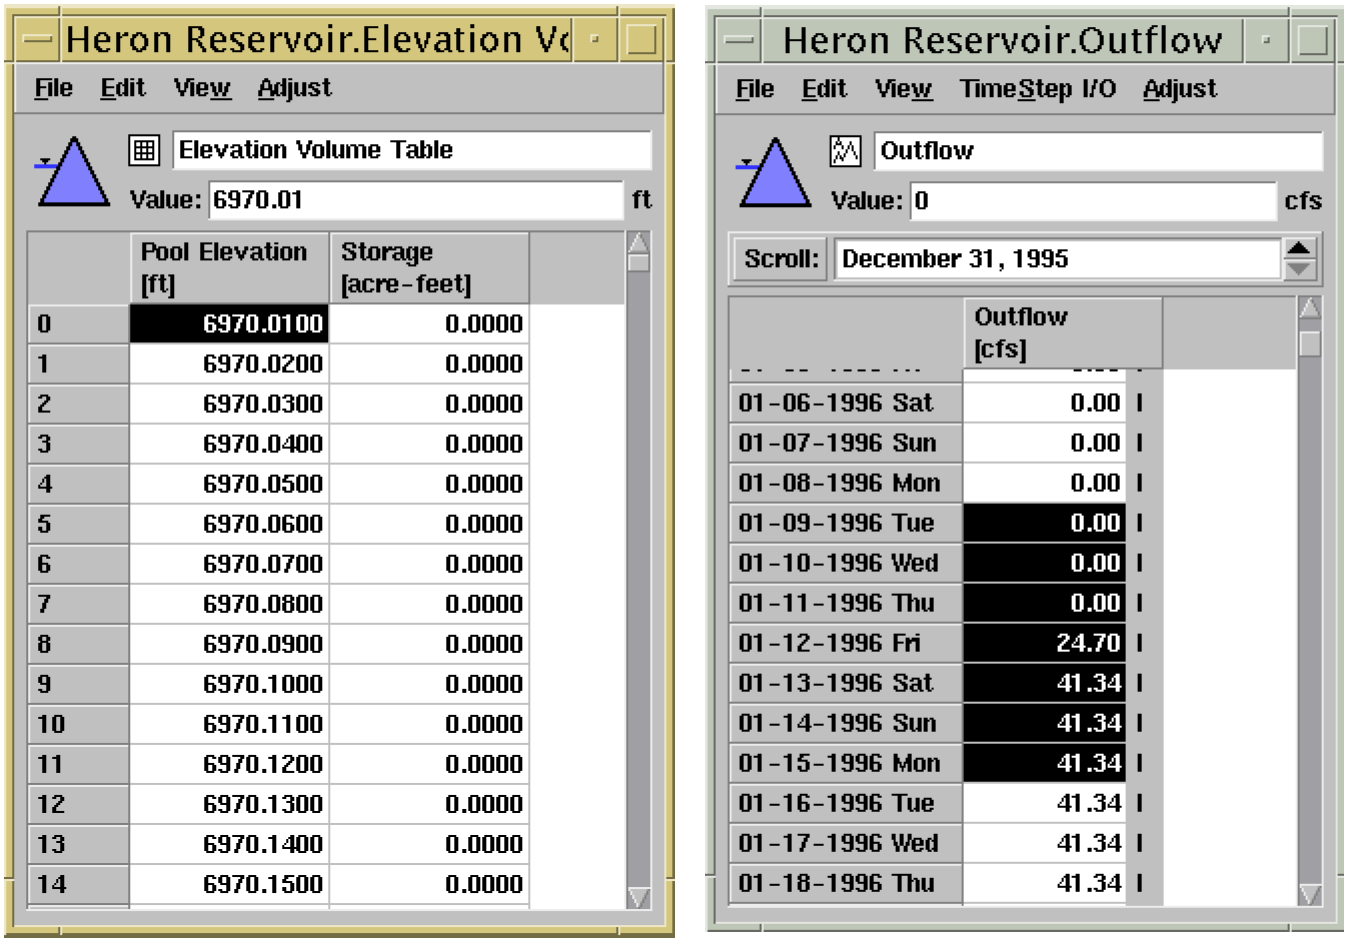
The Open Slot dialog has been re-implemented in Qt and has been enhanced to address many usability issues; following is a description of the changes. First, on series slots, a “scroll to” feature has been added. The user enters a date and either hits return or clicks Scroll to move to that date. Also, a date/time spinner has been added. Previously, the old galaxy dialogs were difficult to scroll using the scroll bars. This has been fixed in the new implementation. There are now dividers to separate dates. For example, in a daily model, a divider is shown between each month. The column width is adjustable using the Adjust menu. There is now the ability to do multi-cell operations, such as set to Output, set to Input, or enter a value for all selected cells. The user highlights the desired cells and then uses standard options available from the Edit, TimeStep I/O, right-click menus or is type in a desired value. The copy and paste features also work for multi-cell selections. When pasting, the user must select the complete paste range, not just the first paste cell. The user can either Paste (input flags are maintained, output values are not pasted) or Paste as Inputs (all values are pasted and flags are converted to input). The figure below shows a screen shot of the new dialogs.
System Control Table (SCT)
The System Control Table (SCT) has been enhanced for better usability. Now the user can use the SCT for nearly all aspects of running a RiverWare model.
Diagnostics Window and Run Status Window Imbedded in SCT
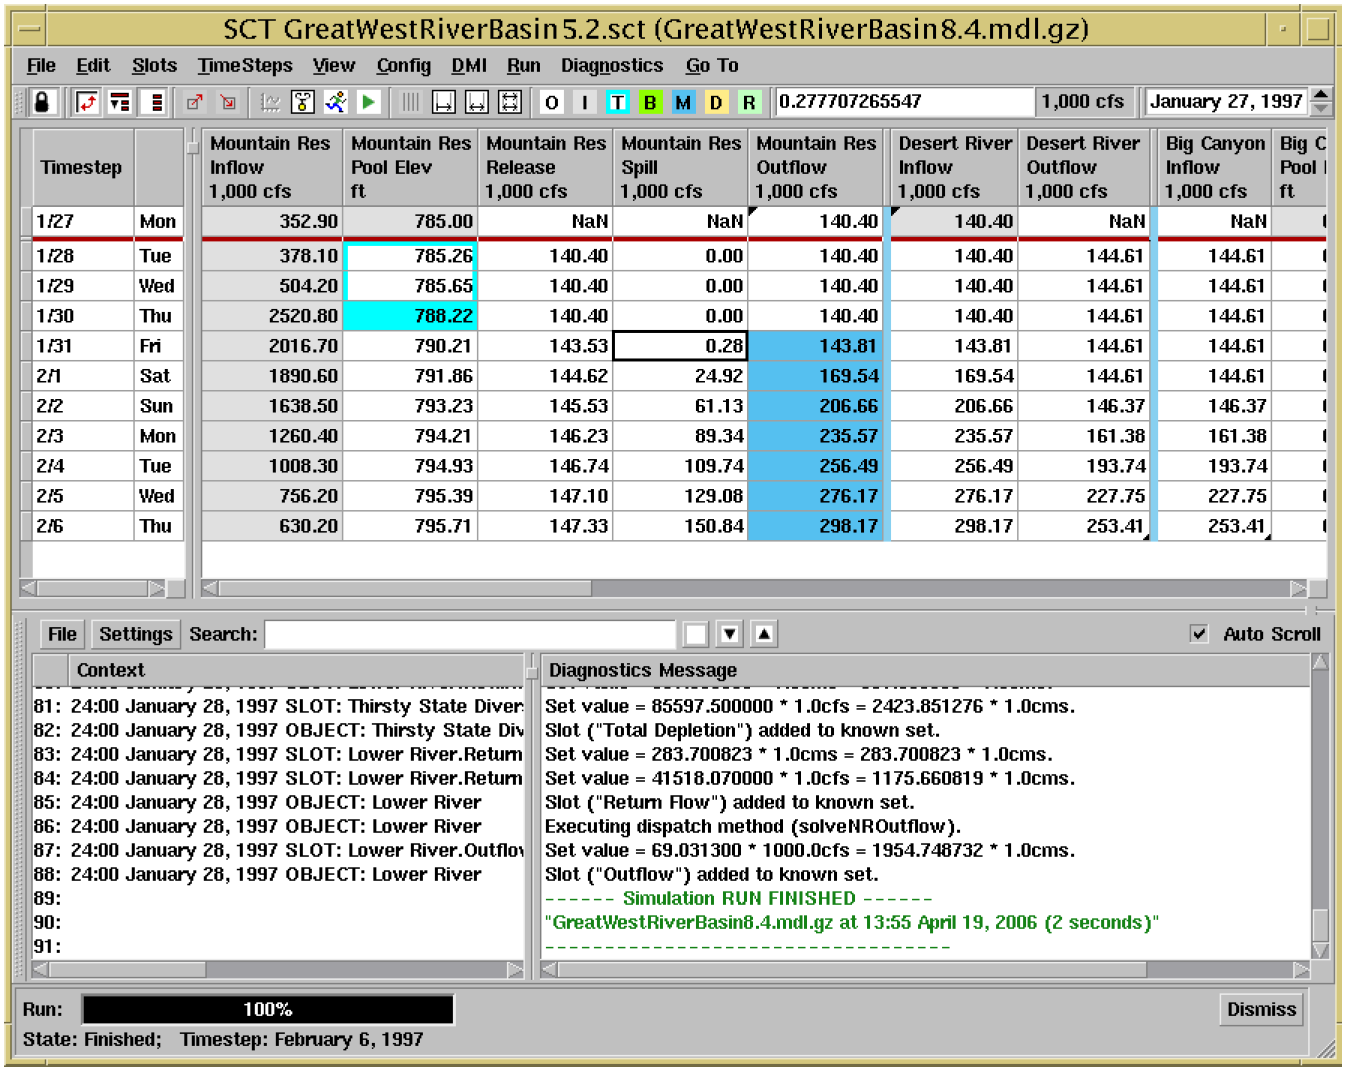
The Diagnostics Window and Run Status window have been imbedded in the SCT status window. A screen shot of the SCT with these two windows is shown in the figure below. The Diagnostics Window can be configured through the Diagnostics menu of the SCT.
DMI Menu Now Appears in SCT Menu Bar
The DMI menu from the workspace now appears in the SCT menu bar. Enhancements include the display of DMI program/group icons to visually distinguish the three types of DMI items, and the option to show all DMI items within the DMI menu instead of within cascading submenus.
Slot Navigation with the Go To Menu
A new menu has been added to the SCT called the Go To menu. This menu allows the user to find a slot using the Find Slot option. In addition, if there are dividers in the SCT, a cascading menu is available that allows you to go to the divider. The first time the Go To menu is chosen, there is an Instructions menu which provides detailed directions on using this menu.
SCT File Menu
There is now the ability to load or create new SCT’s directly from an existing SCT. In addition, when opening an SCT, the previously opened named SCT’s are listed for quick loading under the Reopen menu. Finally, there is now the option to open models directly from the SCT.
Diagnostics Output Window
Diagnostics Window Ported to Qt
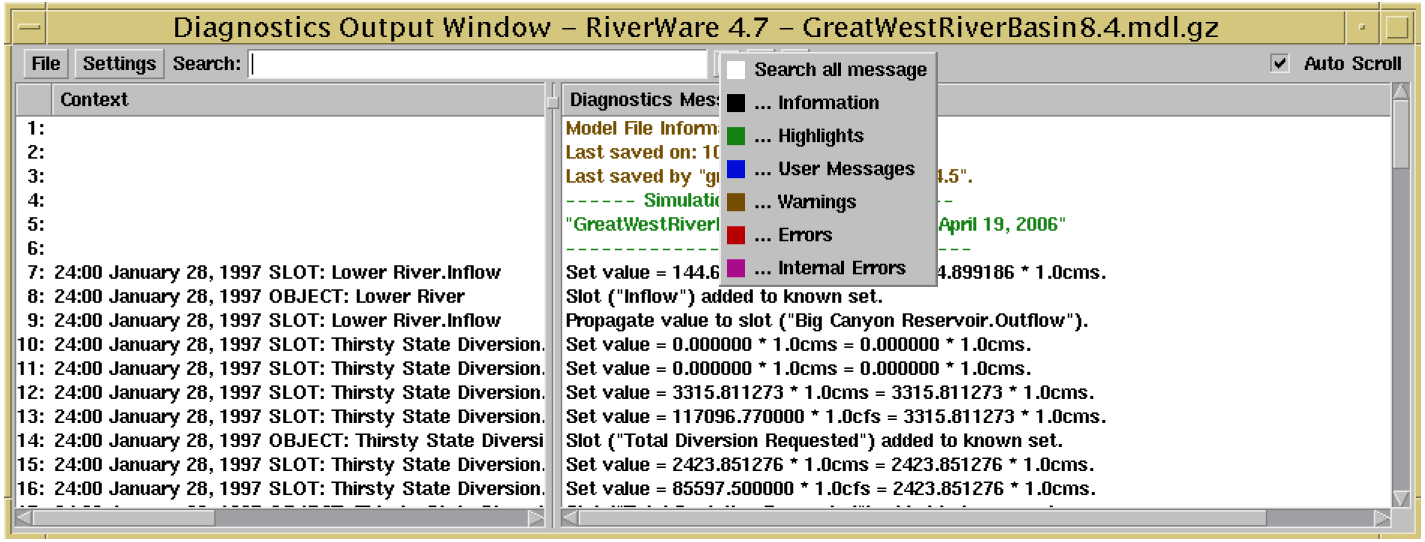
The Diagnostics Output Window was ported to Qt and enhanced. There is a search toolbar where the user can enter key terms and search either up or down. The user can also specify the type of diagnostics to search including Information, Highlights, User Messages, Warnings, Errors, Internal Errors, and all messages. This is accessed by selecting the colored square (it is white to start) just to the right of the search box. The screen shot below shows the dialog and the diagnostics type search filter. In addition, the window scrolling has been improved and line numbers have been added. Finally, the following options have been added to the Edit menu: Copy Message Line, Copy Visible Message, Copy All Message Lines. These menus allow the user to copy diagnostic messages and paste them into an external program.
Selector Dialog
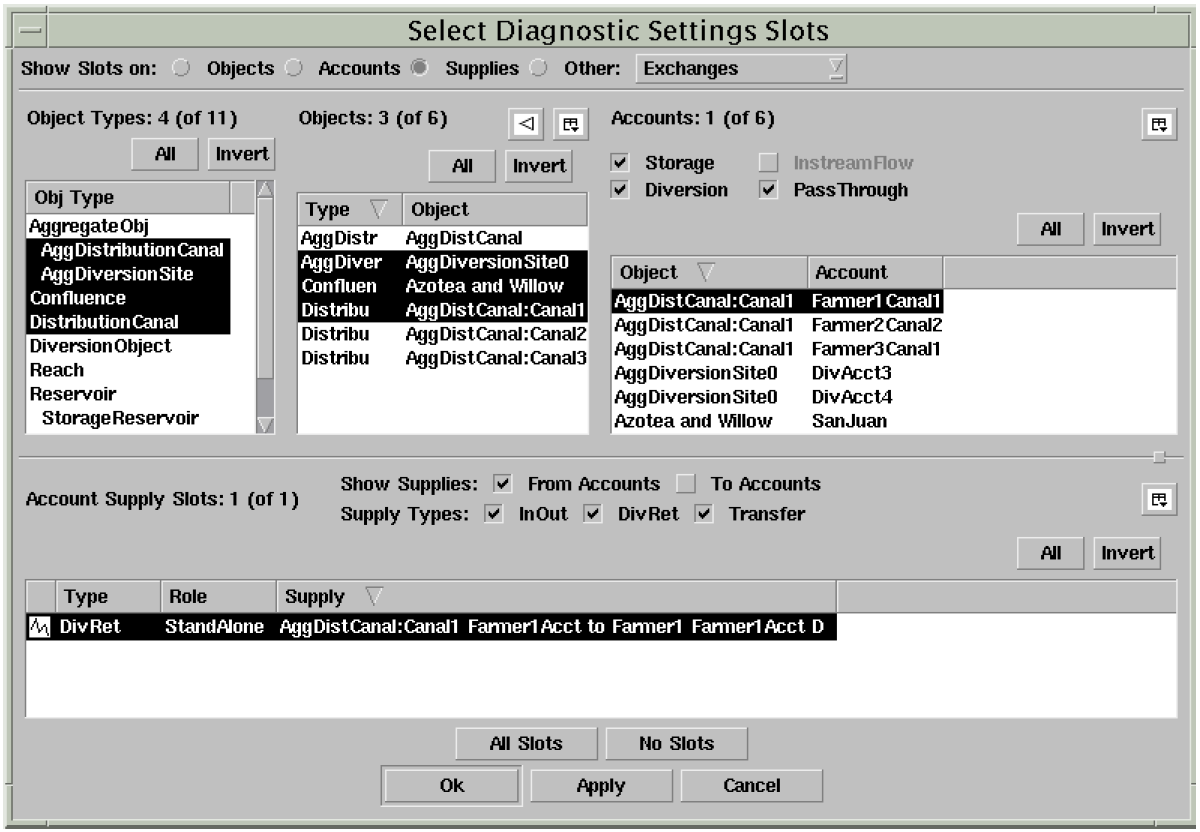
The selector has been completely re-designed and implemented in Qt. Previously, there were multiple selectors depending on the context, i.e. whether the user was selecting a slot, an object, or an account. Now it is the same selector for all cases, with the appropriate choices.
Depending on what is being selecting, different panels will be visible. For example, in the screen shot below, an accounting supply is being selected so there are panels for Object Type, Object, Accounts, and Supplies. The selection can be filtered using the toggle buttons above the panel or the “filter by” option from the icon above the panel to the right. More information on this feature is available in the User Interface section of the RiverWare Help.
Revised: 08/02/2021